


Payroll Sheet: A Practical Guide to Every Action, from Viewing to Saving and Exporting
Payroll Sheet is a single screen that shows employee payslips in a table: each employee in a row and each salary component in a column. You review and edit values directly, as in a spreadsheet, and net pay and totals are recalculated instantly. This tutorial covers the full workflow on the payroll sheet: opening it, reading it, filtering, editing values and saving or discarding them, adding a salary component to multiple employees, deleting payslips, and exporting.
Before you start
- A pay run with employee payslips.
- The View Pay Run permission to open the sheet.
- The Edit Payslips permission to edit values and add salary components, or Edit His Department Payslips to edit payslips of your department’s employees only.
- The Delete Payslips permission to delete payslips.
Open the Payroll Sheet
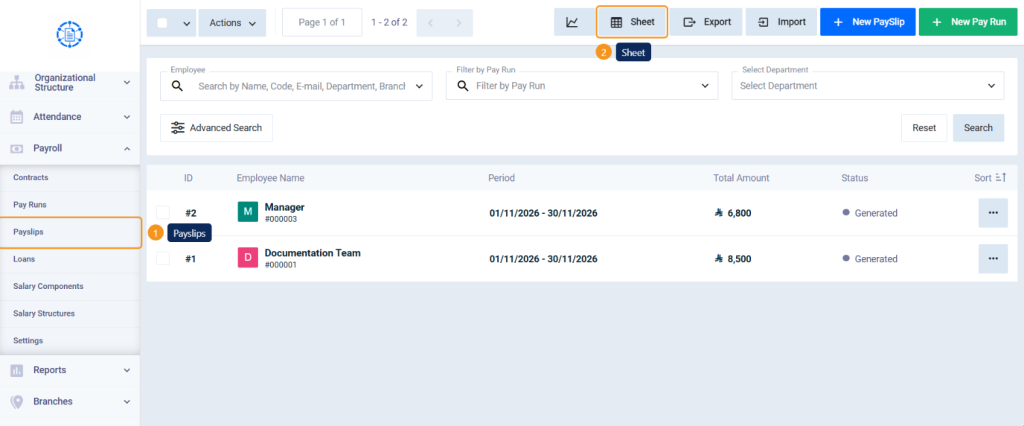
From the Payslips list
- Go to Payslips, then click Payroll Sheet; the sheet shows the payslips of all pay runs.
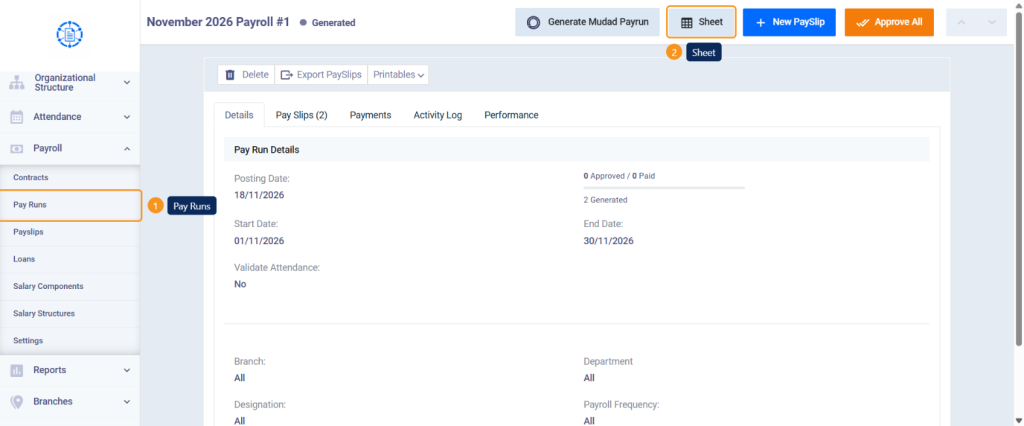
From the Pay Run page
- Open the pay run you want, and click Payroll Sheet; the sheet shows only this pay run’s payslips.
Read the sheet
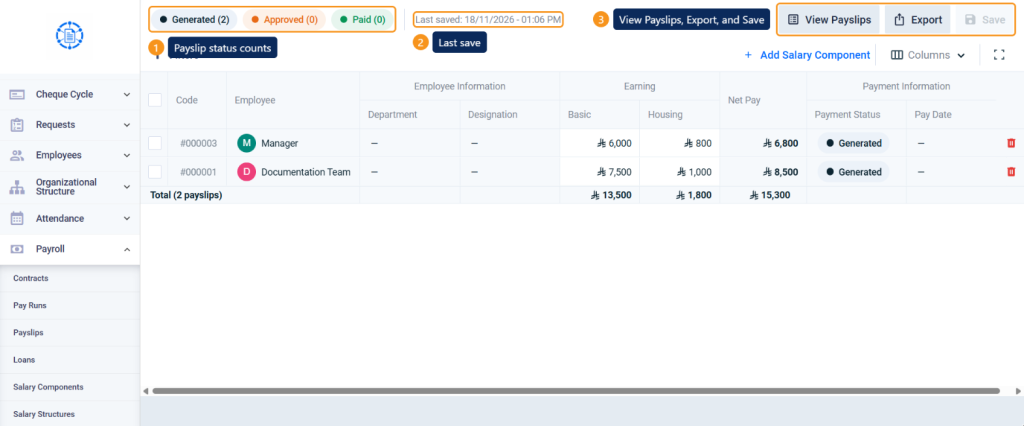
- At the top of the sheet, the number of payslips is shown by status: Generated, Approved, and Paid, next to the date and time it was Last saved.
- From the top buttons: View Payslips to return to the payslips list, Export, and Save, which becomes available when there are changes.
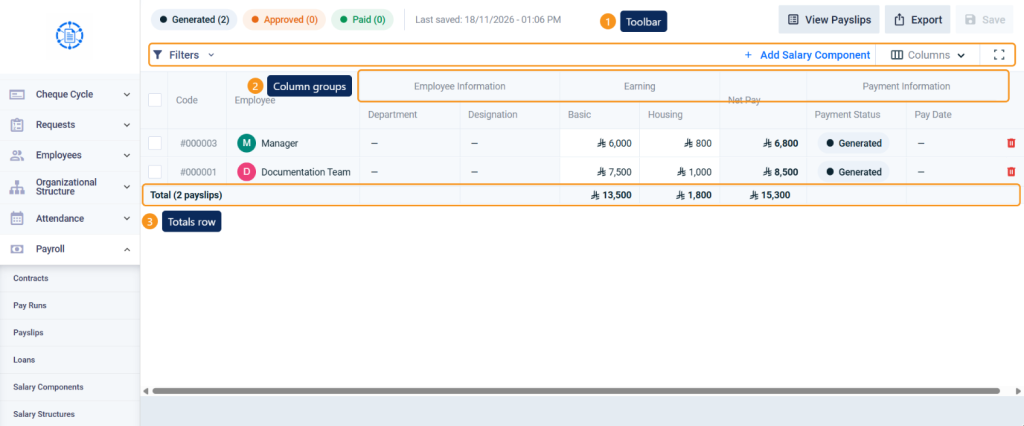
- In the toolbar: Filters, Add Salary Component, Columns, and the Full Screen button.
- The table columns are divided into groups: Code and Employee, then Employee Information, then Earning (such as Basic, Transportation Allowance, and Housing Allowance) and deductions if any, then Net Pay, then Payment Information (Payment Status and Pay Date). A Total row appears at the bottom of the table with the number of payslips and the sum of each column.
Filter the sheet and customize columns
Filtering
- Click Filters, and select the field you want to filter by, or search for it in Search for filters. The available fields are: Employee, Pay Run, Designation, Department, Shift, Branch, Currency, Status, Period from / Period to, and Posting Date from / Posting Date to.
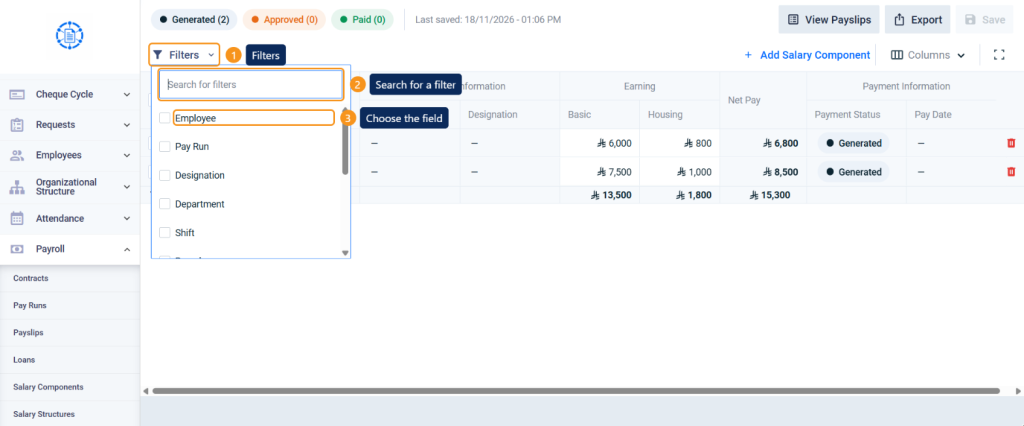
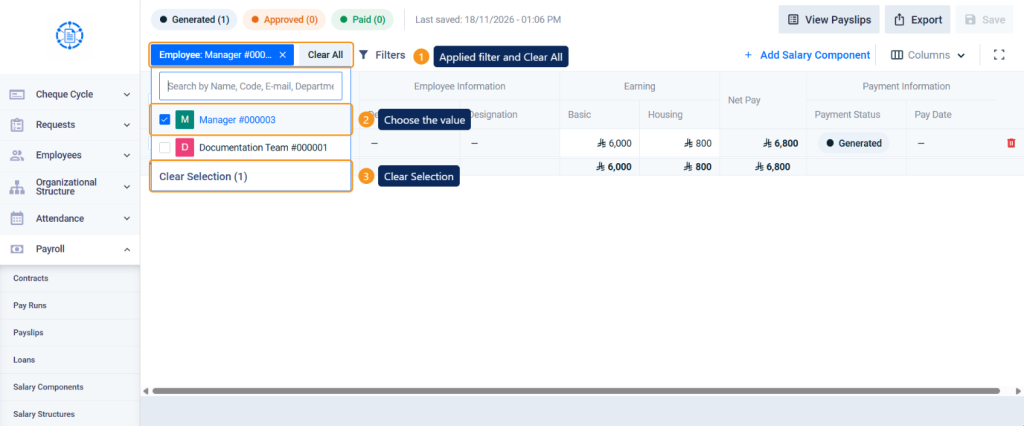
- The field appears as a button next to Filters; select one or more values from it, and the sheet shows only the matching payslips.
- To remove all filters, click Clear All, or click the close icon next to a field to remove it alone.
Showing and hiding columns
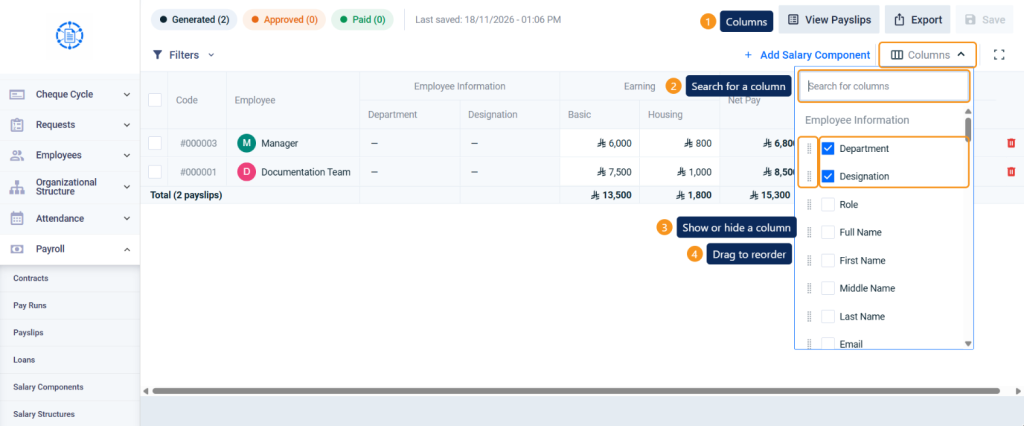
- Click Columns, and select the columns you want to show in the sheet, such as Department, Designation, Email, and Phone, among other employee data.
Column actions
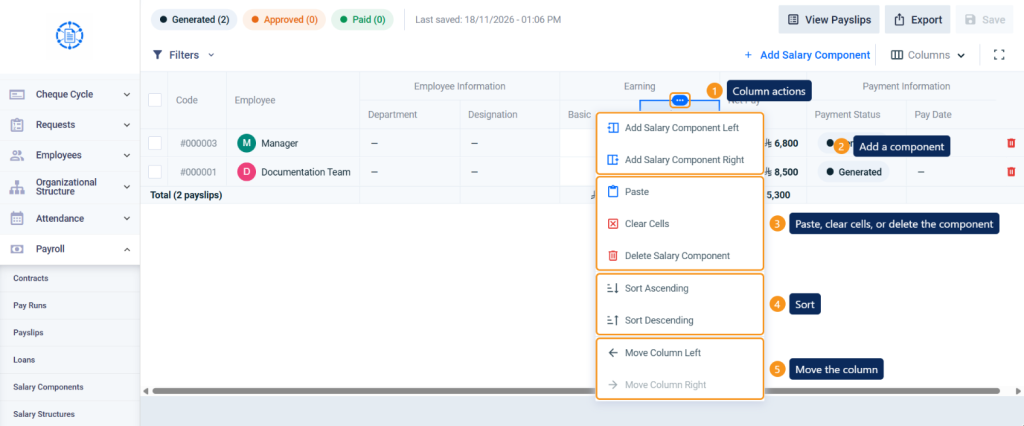
- Hover over any column header, click the Actions button that appears above it, then select:
- Add Salary Component Left or Add Salary Component Right: to add a new salary component column next to the column.
- Paste: to paste copied values into the column.
- Sort Ascending or Sort Descending: to sort the rows by the column values.
- Move Column Left or Move Column Right: to change the column order.
Edit values and save
- Click a salary component cell in the row of a Generated payslip, type the new value, then press Enter.
- The edited value appears in a different color with a button next to it to undo the change in this cell, and Net Pay and the Total row are recalculated instantly.
- The number of unsaved changes appears at the top of the sheet (such as 1 unsaved change) with the Discard Changes button.
- When you finish all edits, click Save.
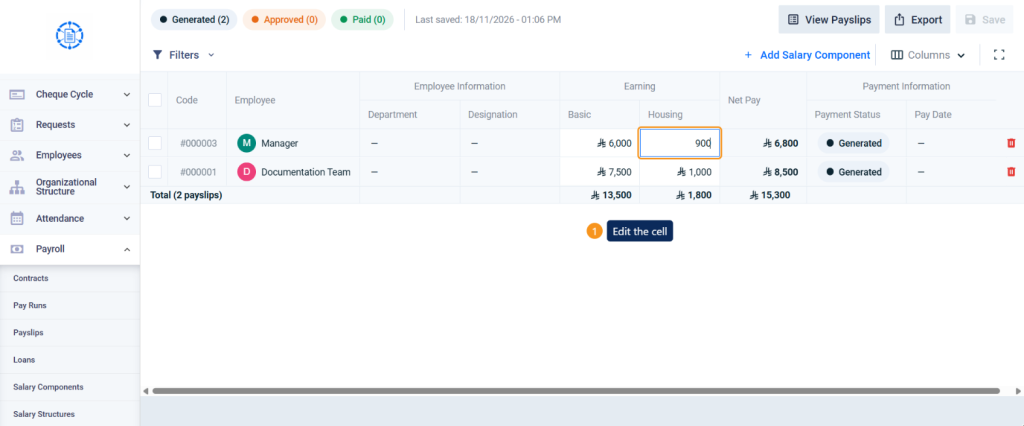
- To undo all edits before saving, click Discard Changes, then click Exit and Discard Changes to confirm, or Cancel to return to the sheet.
Add a salary component to multiple employees
- Select employees using the checkbox next to each row, or select all from the checkbox at the top of the table. The number of selected rows appears at the bottom of the sheet.
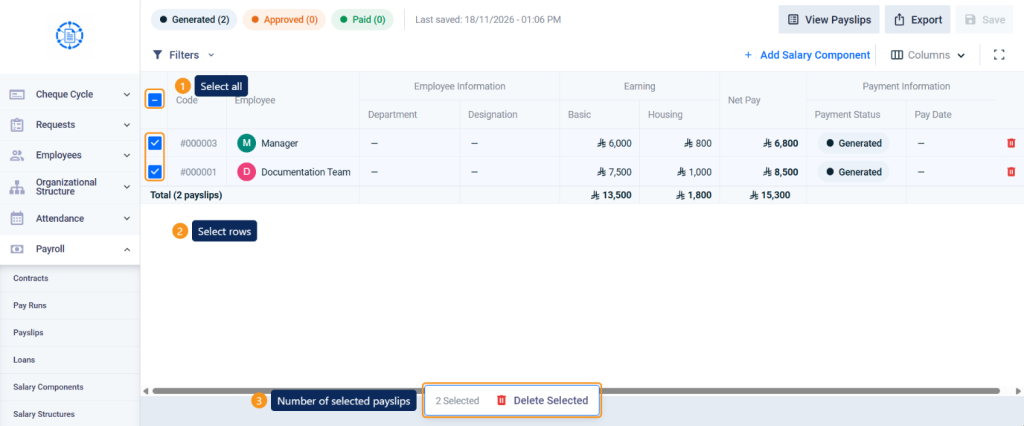
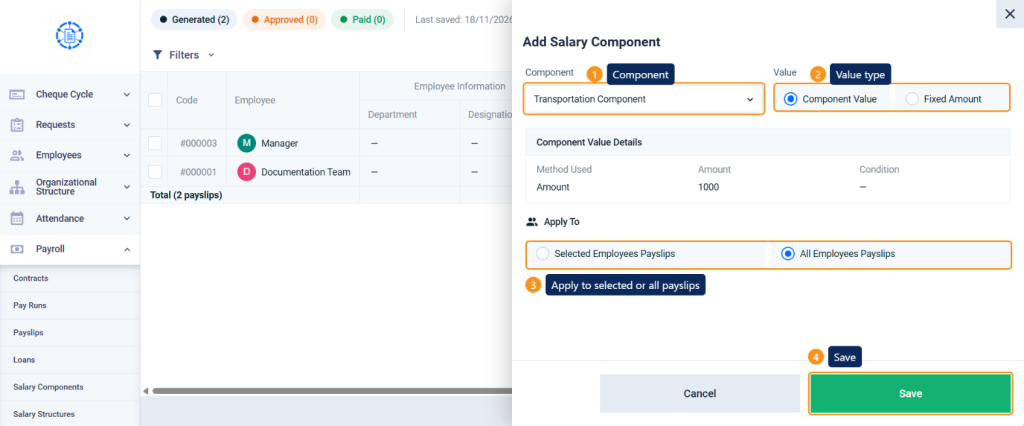
- Click Add Salary Component.
- Select the Component.
- In Value, select Component Value to use the value defined in the component, or Fixed Amount and enter the Amount.
- In Apply To, select Selected Employees Payslips (their names appear in Selected Employees), or All Employees Payslips.
- Click Save.
Delete payslips
- To delete one payslip, click the Delete Payslip icon at the end of its row. The icon is available for Generated payslips only, and unavailable for approved or paid payslips.
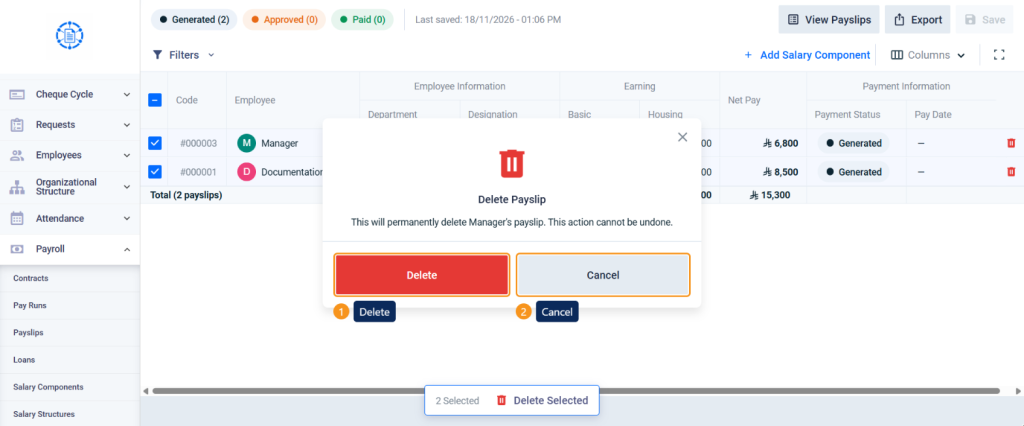
- To delete multiple payslips, select them, then click Delete Selected at the bottom of the sheet.
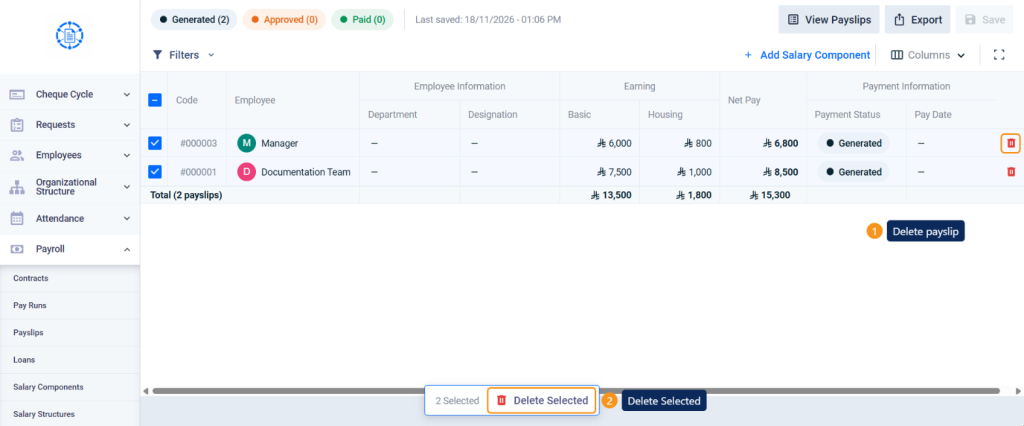
- The Delete Payslip confirmation message appears; click Delete to confirm, or Cancel to go back.
Export and full screen
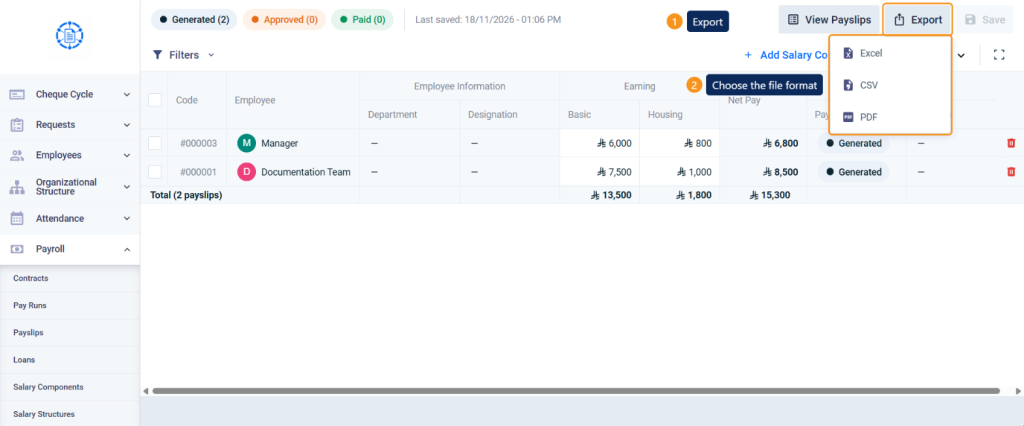
- Click Export, and select the file format: Excel, CSV, or PDF. The sheet is exported with the current filters and visible columns.
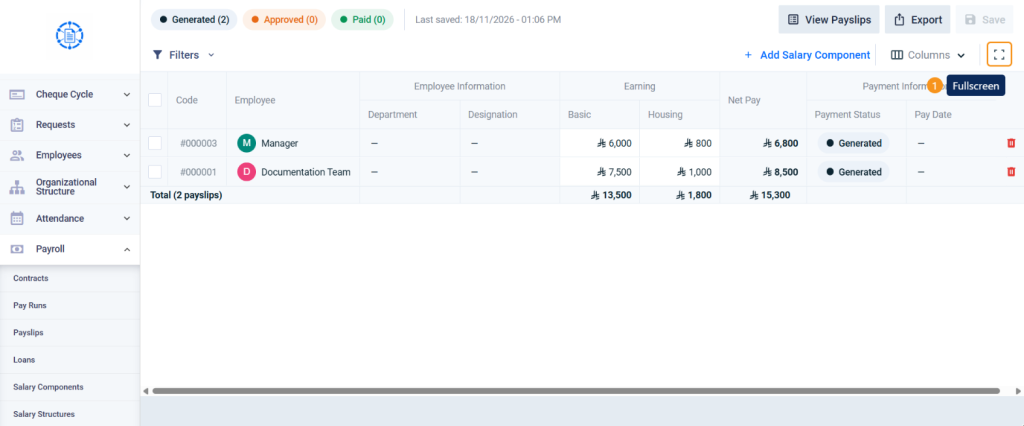
- To view the sheet in full screen, click the Full Screen button, and to return, click Exit Full Screen.
FAQs
Why can’t I edit the values of some payslips?
Because the payslip has the Approved or Paid status; only Generated payslips can be edited from the sheet. Also make sure you have the Edit Payslips permission.
What’s the difference between — and 0 in the sheet?
The — sign means the salary component doesn’t exist in the employee’s payslip, while 0 means it exists and its value is zero.
I edited values and left the page. Were they saved?
No. Edits are saved only when you click Save. The number of unsaved changes appears at the top of the sheet until you save or discard them.
Can I view the sheet for one pay run only?
Yes. Open the sheet from the Payroll Sheet button on the pay run page, or filter the sheet by the Pay Run field.
Why is the delete icon unavailable for some payslips?
The icon is unavailable for approved or paid payslips; only Generated payslips can be deleted, with the Delete Payslips permission.