


Multi-Cycle Approval Workflow Guide
The system allows you to set up a multi-cycle approval path for leave requests, so that a request passes through more than one approval level in sequence, while preventing a duplicate approval request from the same person if they appear at more than one level. This article explains the steps to set up the path and how it works in practice.
Steps to Set Up and Track Multi-Cycle Approval
Step 1: Navigating to Approval Settings
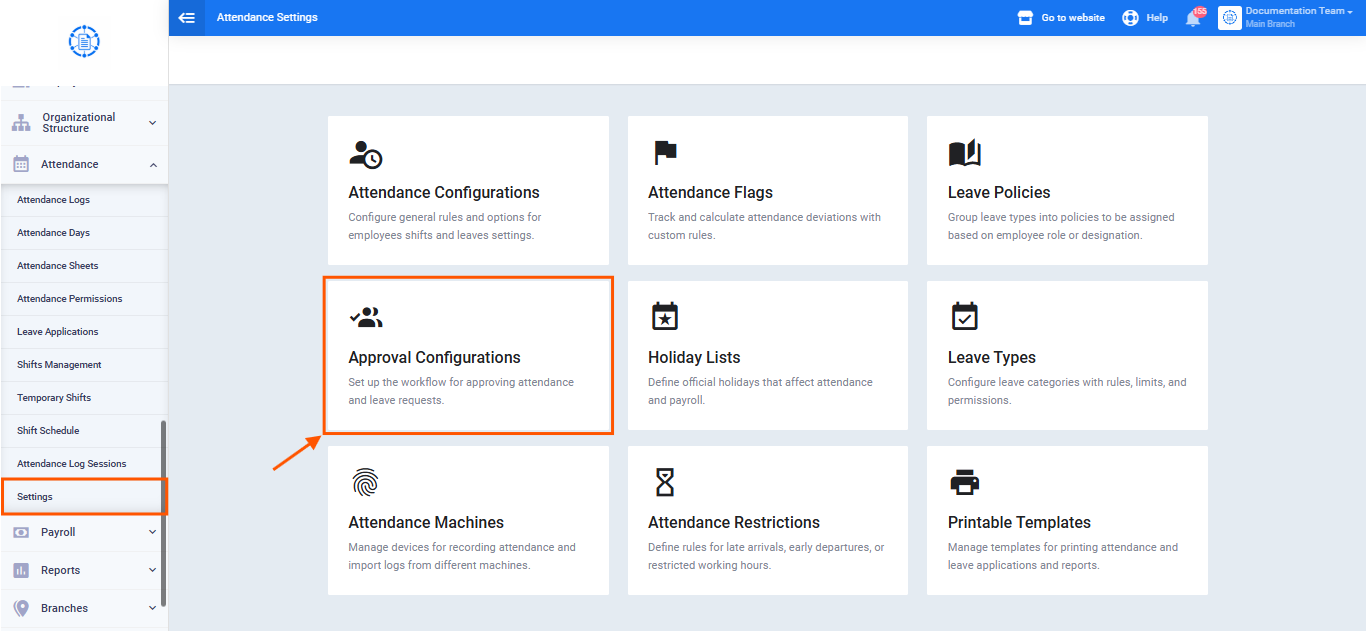
From the main menu, click “Attendance,” then “Attendance Settings,” then click the “Approval Configuration” card to view the list of available approval paths.
Step 2: Creating or Editing an Approval Path
From the “Approval Configurations” list, click “Add Approval Configuration” to create a new one, or open an existing one to edit it. The setup screen opens with two sections:
- Basic Information: Configuration Type (Leaves / Requests), Configuration Name, Status, Departments, Branches, Type, and Leave Type. There’s also a toggle: “Allow Entering Leave Applications In Past Dates.”
- Approval Configurations: The section related to the approval path itself, explained in the following steps.
Step 3: Setting the Approval Type and Adding Approval Levels
Within the “Approval Configurations” section, complete the setup as follows:
First: Choosing the Approval Type
- Single Approval: Only one approval level.
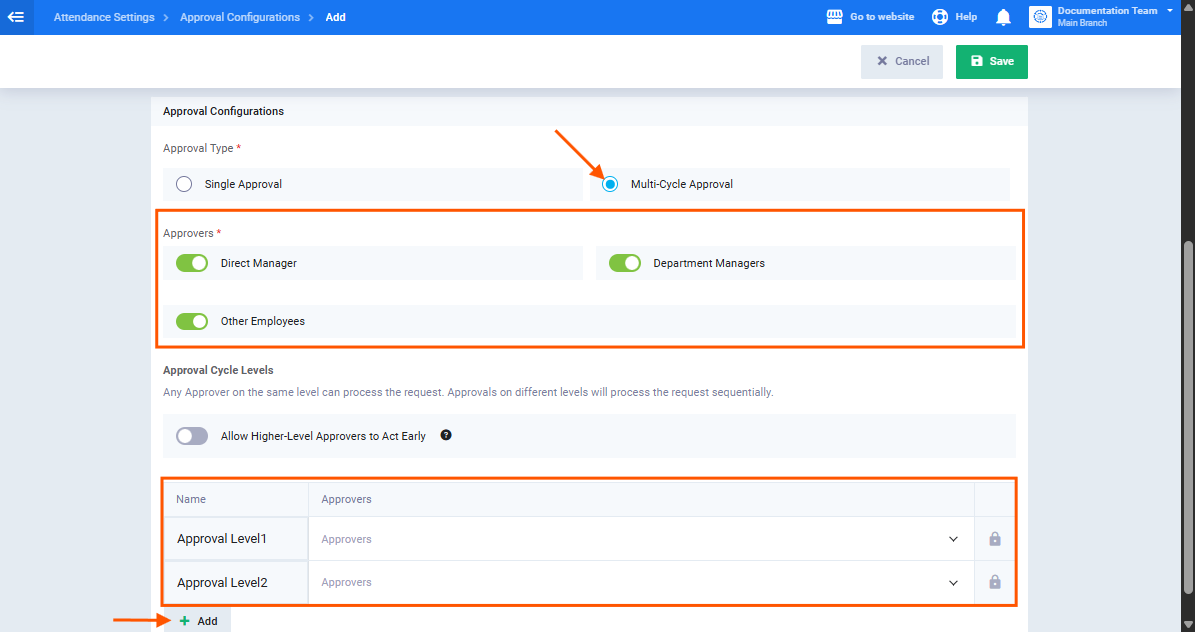
- Multi-Cycle Approval: The request passes through more than one level in sequence — this is the value you need to enable this path.
Second: Enabling the Approvers
Under “Approvers,” enable the sources that will be available for selection within approval levels:
- Direct Manager — enabled by default.
- Department Managers.
- Other Employees — allows selecting any specific employee by name as a manual approver, with no restrictions on their type, status, or role.
Third: Building the Approval Cycle Levels
Under “Approval Cycle Levels” (note: “Any Approver on the same level can process the request“):
- “Approval Level 1” appears ready automatically in the table (it cannot be deleted — a lock icon appears next to it instead of a delete button).
- From the “Approvers” field in each row, select one or more of: Direct Manager, Department Managers, or Other Employees (based on the sources you enabled above).
- If you select more than one approver at the same level, it’s enough for just one of them to approve to complete that level.
- To add a new level, click the “Add” button below the table, it automatically appears named “Approval Level 2” and so on, with the option to delete it via the trash icon (unlike the first level).
- Repeat adding for each additional approval level required.
Step 4: Enabling “Allow Higher-Level Approvers to Act Early” (Optional)
Enable this option if you want approvers at higher levels to take action before approvals at lower levels are completed. When approved from a higher level, lower levels are automatically bypassed and the request is considered approved. When rejected from a higher level, the request is rejected directly without waiting for the lower levels.
Step 5: Saving the Setup
Click “Save” to activate the configuration and apply it to leave requests linked to the departments, branches, and types specified in the basic information.
How the Path Works in Practice When a Request Is Submitted
Step 6: Employee Submits the Request
When an employee submits a leave request, the request starts with the status “Under Review (0/number of levels),” and a notification (instant mobile alert + email) is sent to all approvers at the first level.
Step 7: Status Updates With Each Approval
With each approval at a level, the request’s status updates automatically (e.g., “First Approval Obtained (1/3)“), a notification is sent to the employee about the update, and a notification is sent to the approvers at the next level.
Step 8: Automatically Bypassing Duplicate Levels
If the same person is an approver at more than one level (e.g., being both the direct manager and the department manager for the same employee), their approval is only needed once, and the system automatically bypasses any subsequent level containing this person alone or within a group.
Step 9: Finalizing the Request
When the last approval level is completed (or when early approval from a higher level is triggered), the request changes to “Approved” status, and a final notification reaches the employee with the name of the approver who finalized the request. Any rejection at any level stops the path immediately, and rejection notifications are sent without forwarding the request to the next level.
Step 10: Reviewing the Activity Log
From the leave request’s details, open the Activity Log to review every action in detail: who submitted the request, who approved or rejected at each level, the timing of each action, and any reversal of a previous approval.