Advance Payments Guide
Advance Payment is an amount received from the client before products/services are delivered or a sales invoice is issued. This payment can be used to cover one invoice or multiple future invoices. Likewise, a single sales invoice can be linked to multiple advance payments, providing flexibility in managing collections and accounting linkage.
Steps to Activate Advance Payments
Activate the KSA e-Invoice
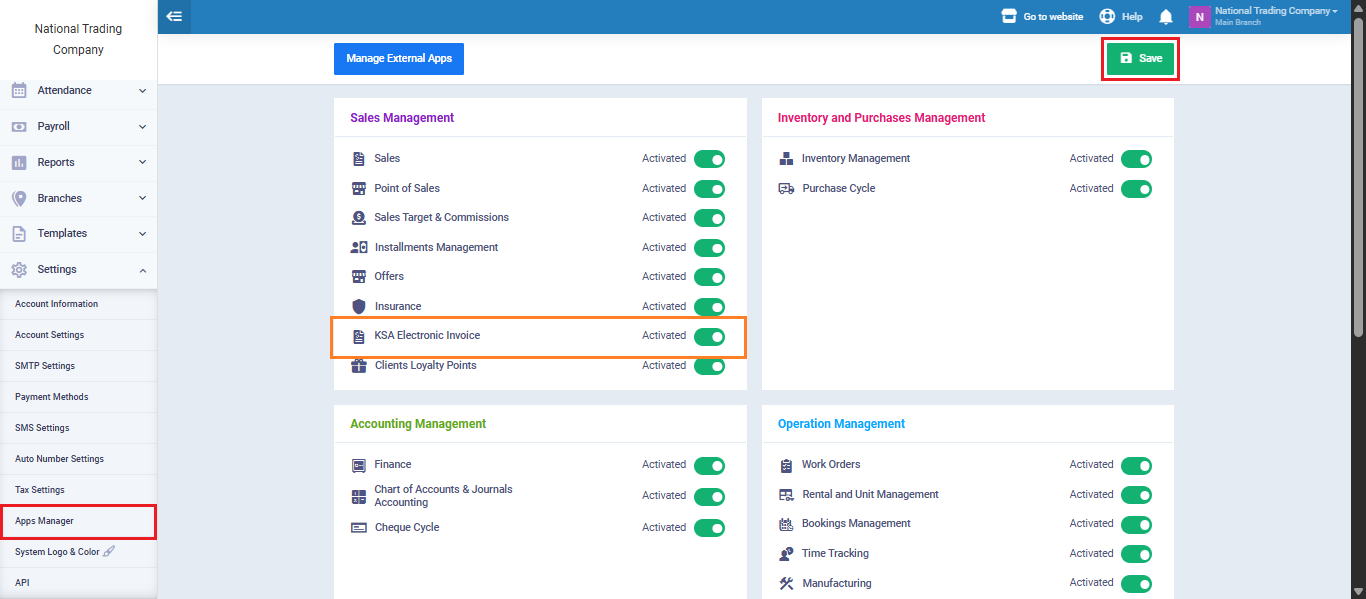
First, make sure that the “KSA e-Invoice” app is activated through the “Apps Manager” section in the system.
From the main menu, click on “Settings”, then select “Apps Manager”, click the Activate KSA e-Invoice button, and finally click “Save.”
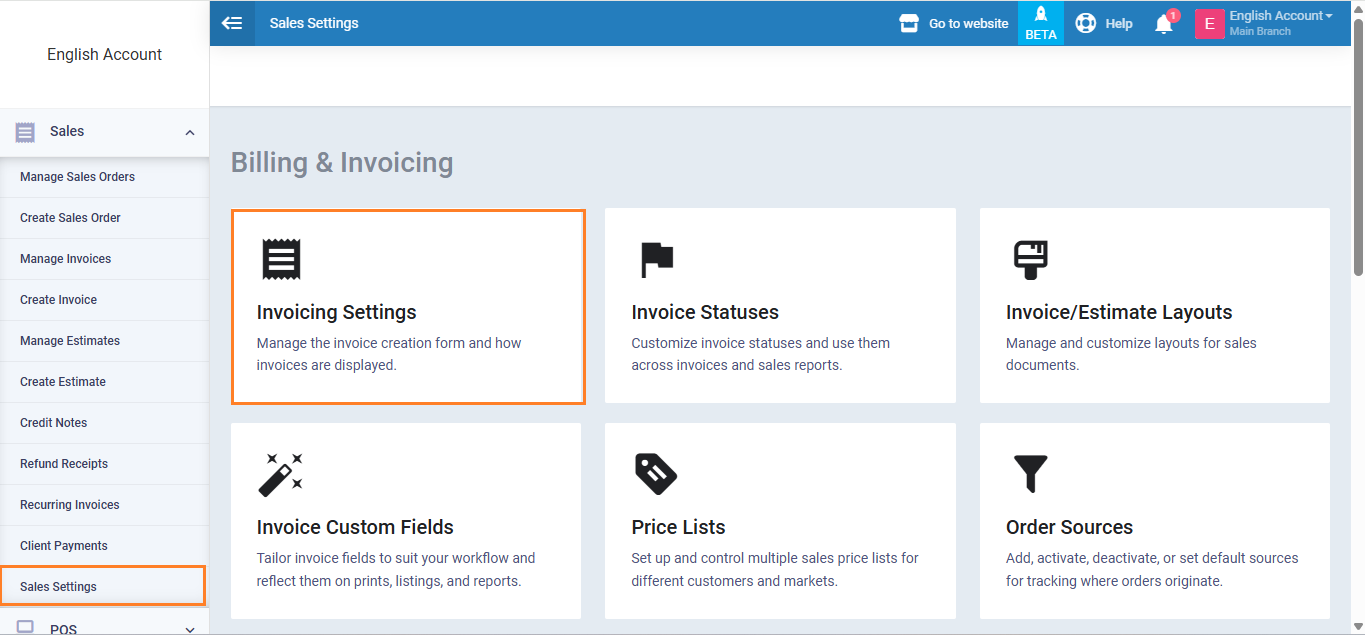
Then, from the main menu click on “Sales“, and from the dropdown click on “Sales Settings“.
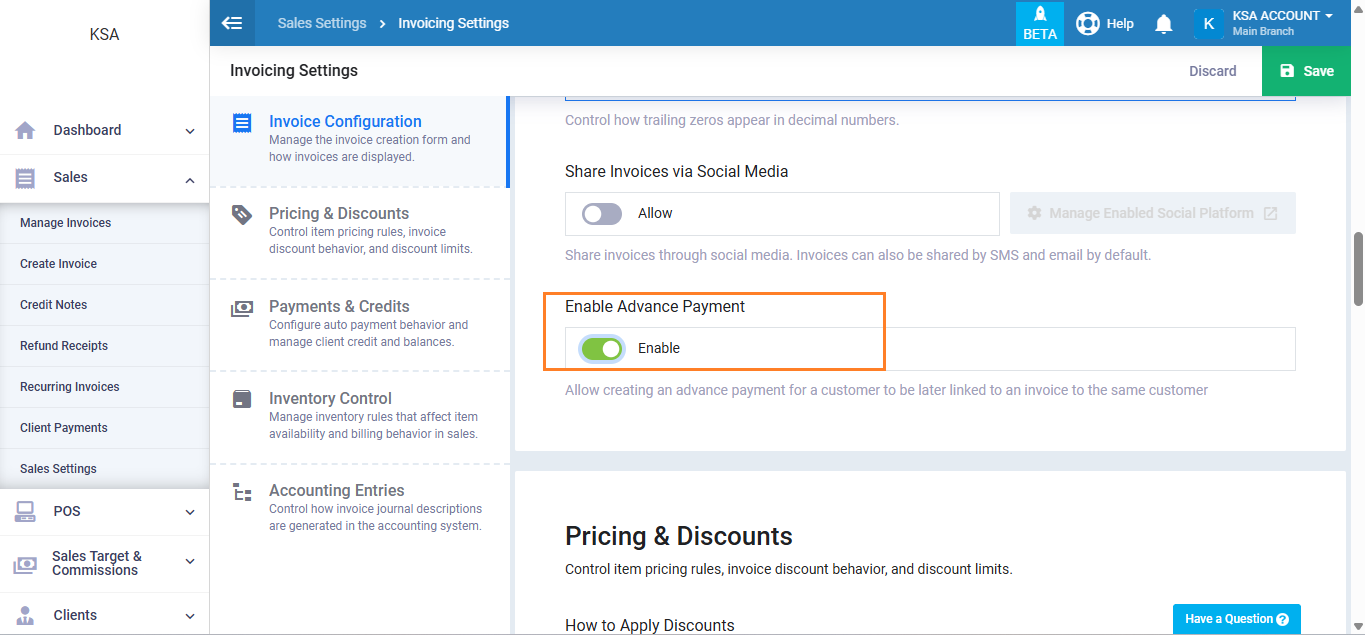
Then activate the “Advance Payment” by marking the checkbox beside it.
Click on the “Save” button.
Create an Advance Payment Invoice
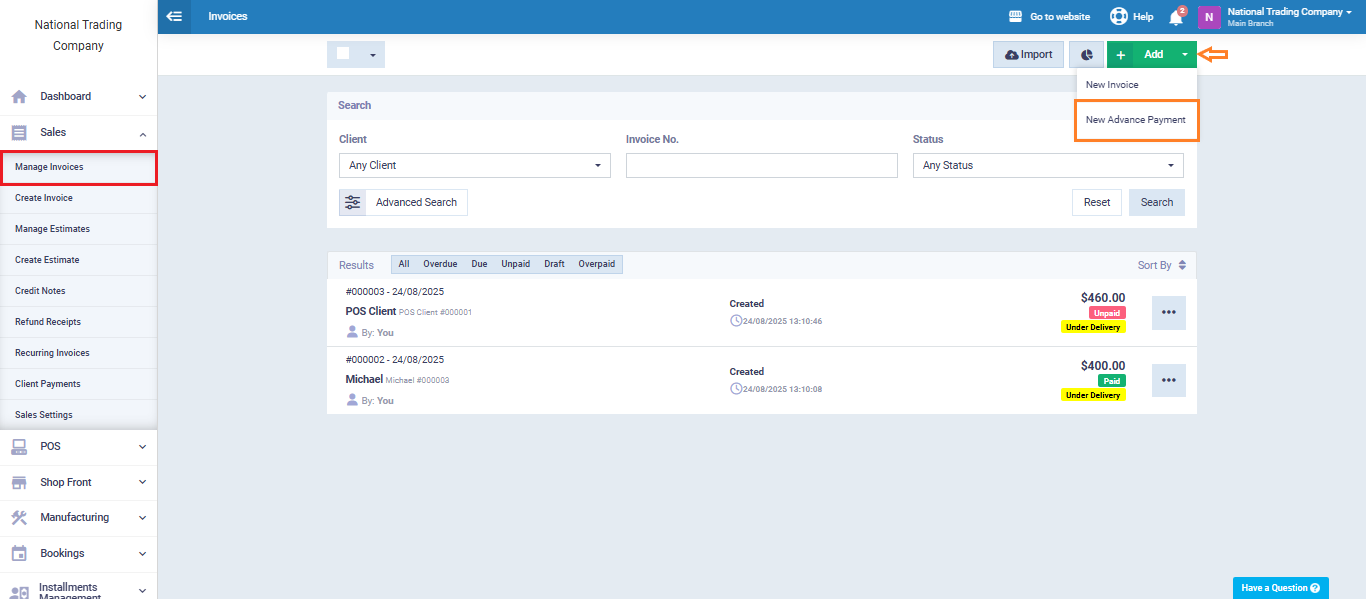
From the main menu, click on “Sales”, then from the dropdown menu select “Manage Invoices“.
Click the arrow next to the “Add” button, then choose “New Advance Payment.”
The advance payment invoice is similar to a sales invoice in terms of data entry.
Enter the same basic details such as:
- Client
- Product or service name (item)
- Unit price
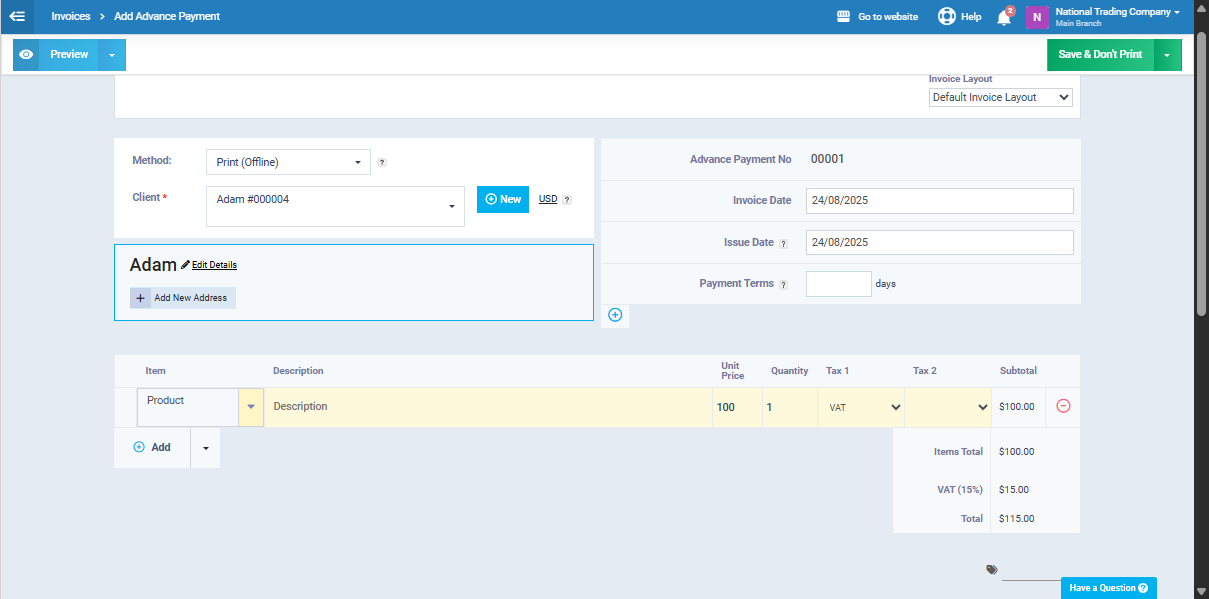
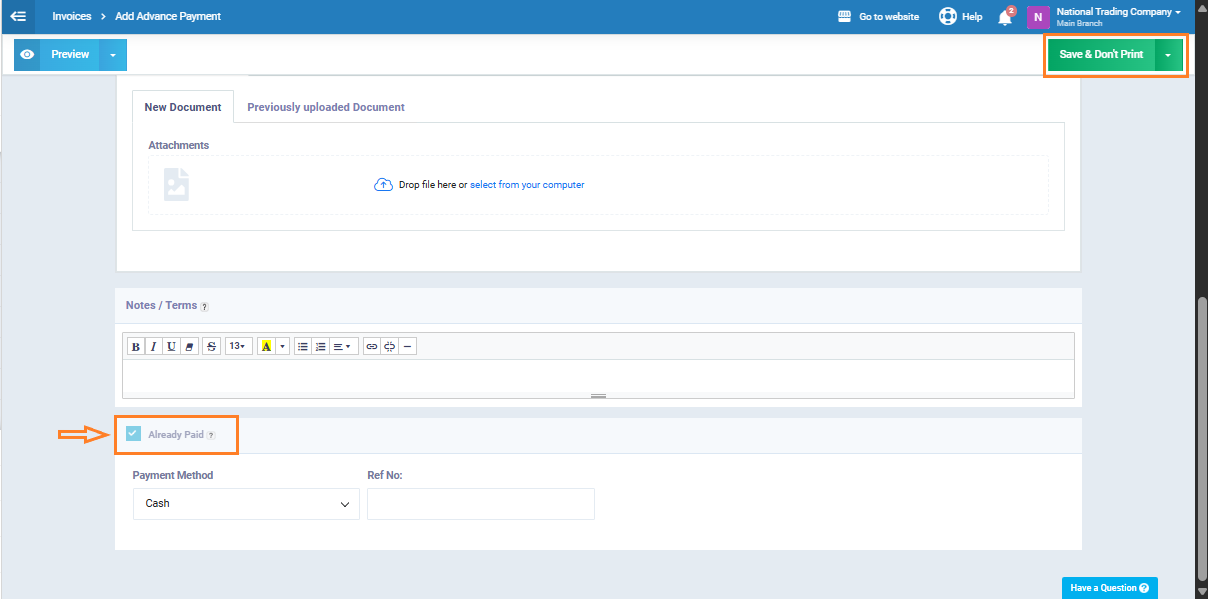
You can also add notes or attach supporting documents if needed.
Note that the “Already Paid” icon cannot be modified, since this invoice represents a payment that has already been received from the client and recorded in the treasury.
After entering the details, click “Save” to issue the invoice.
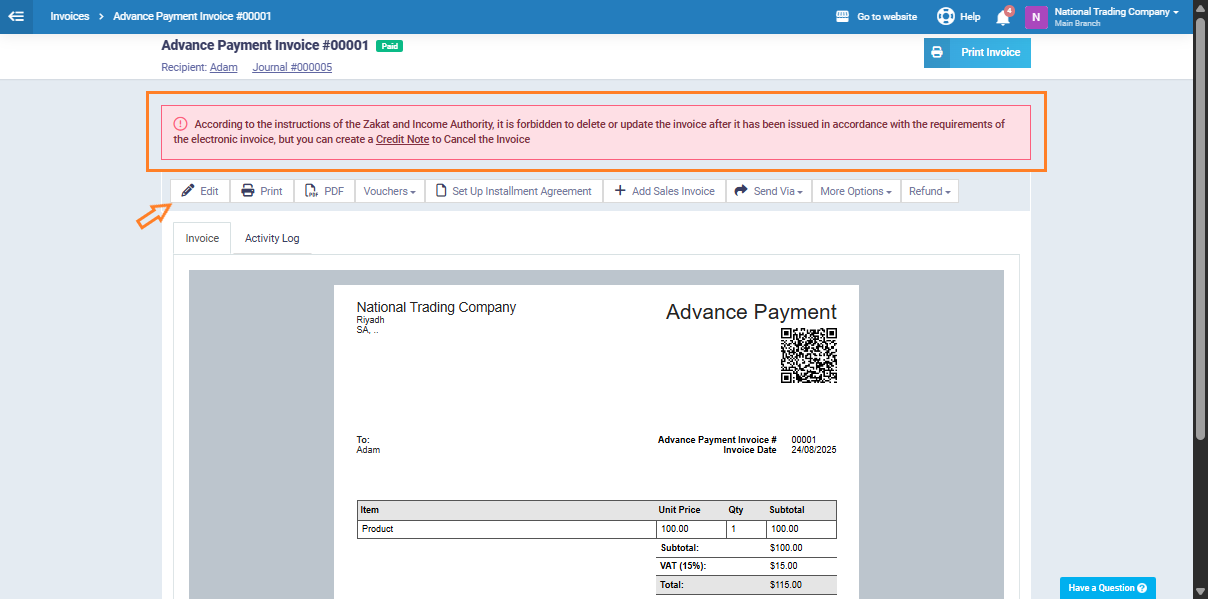
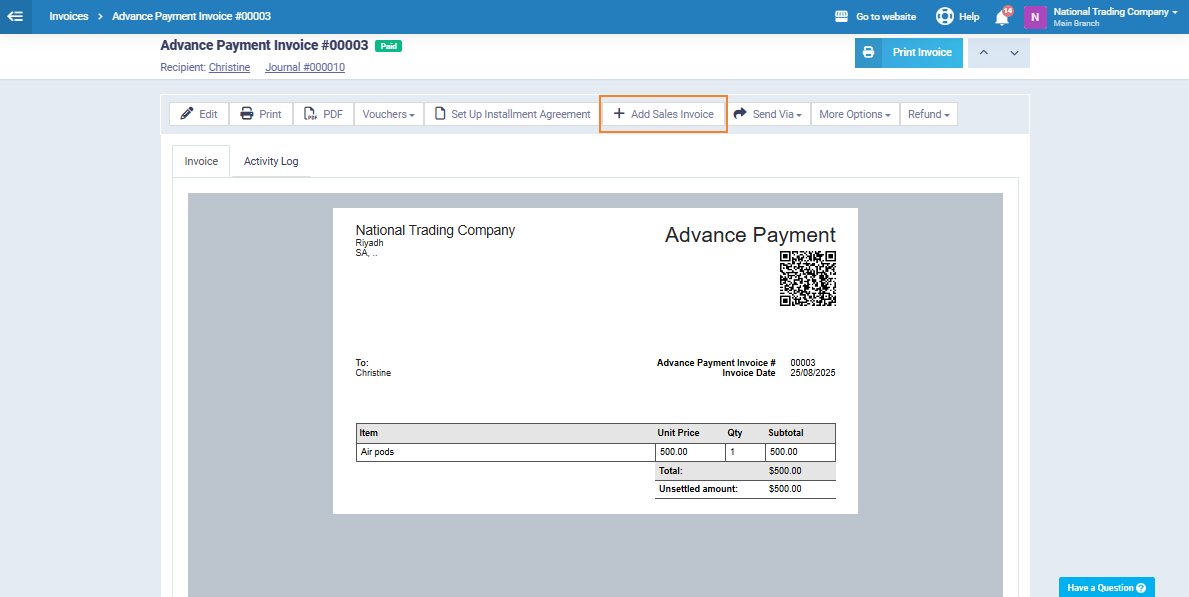
Once saved, the advance payment invoice is issued successfully. As shown below, the invoice toolbar appears and includes the following options:
-
Edit: Allows modification of the invoice details before final issuance (not available after the invoice has been electronically sent under the KSA e-invoicing system).
-
Print: Prints an official copy of the invoice.
-
PDF: Downloads a PDF version of the invoice, suitable for saving or sharing.
-
Vouchers: Displays or adds vouchers linked to this invoice.
-
Add Installment Agreement: Creates an installment plan for the total invoice amount, with scheduled payments.
-
Add Sales Invoice: Allows linking or creating a sales invoice based on the advance payment, if not already linked.
-
Send Via: Provides options to send the invoice to the client via email or other available channels in the system.
-
More Options: Includes several tools:
-
Add Note or Attachment: Attach documents or add notes inside the invoice.
-
Schedule Appointment: Create a reminder or timeline related to the invoice.
-
Clone: Generate a duplicate of the current invoice.
- Delete: Delete the invoice (only before electronic submission).
-
Return (Create Credit Note): If changes are needed after issuance, a credit note is created to cancel or adjust part of the invoice in compliance with the ZATCA requirements.

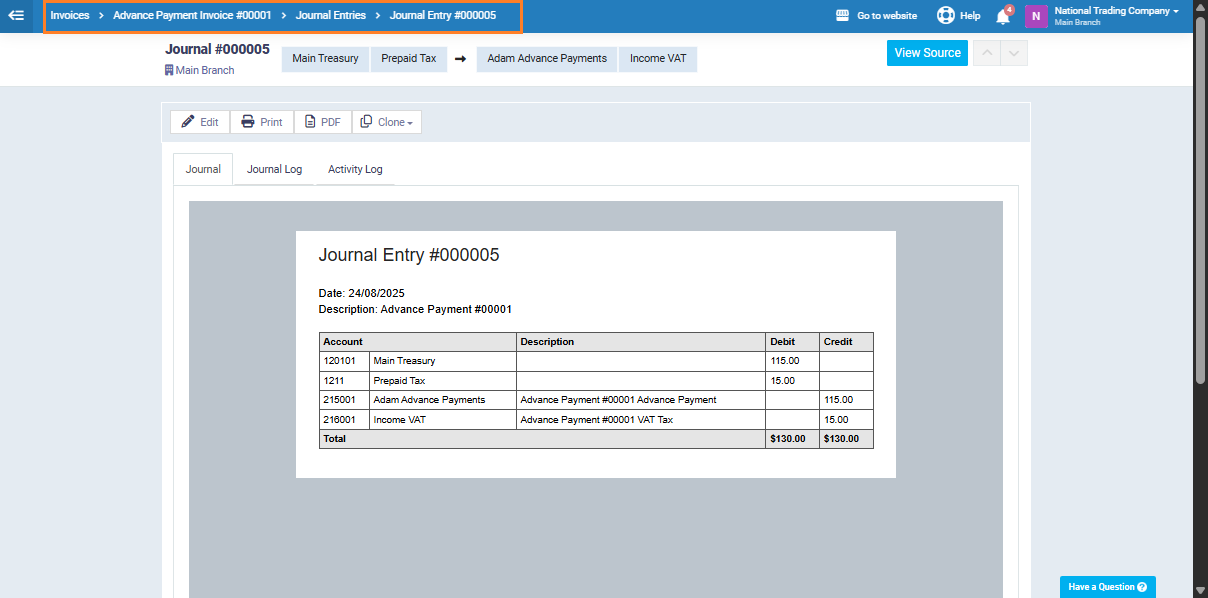
When an advance payment is received from the client, a journal entry is recorded to reflect the cash receipt and allocate the amount appropriately in the financial accounts.
Debit Side: The full amount is recorded in the Main Cash Account.
Credit Side:
The received amount is divided into two parts:
The first part is recorded in the Customer Advance Payments Account, as it represents an amount paid by the customer for a product or service not yet delivered.
The second part is recorded in the VAT Account, as it represents the tax due on the advance payment.
Distribute an Advance Payment to a New Sales Invoice
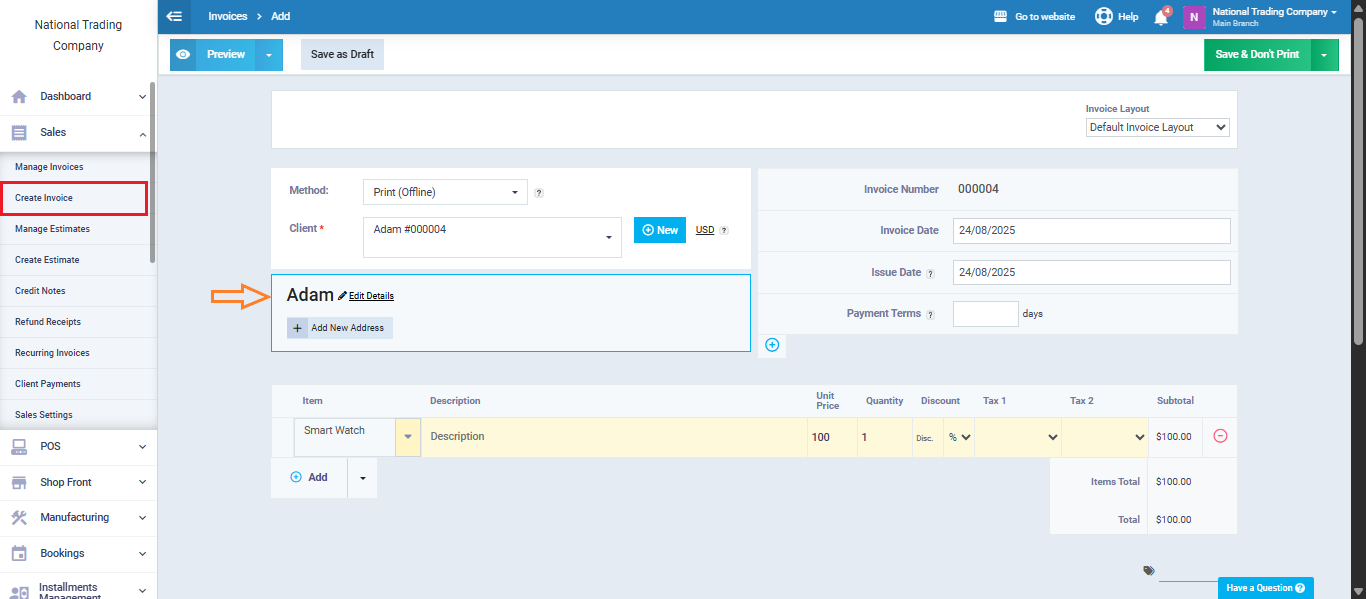
When creating a regular sales invoice, you can use the advance payments previously made by the client to settle the invoice amount. This is done by distributing the advance payment to the invoice as follows:
First, create the sales invoice and make sure to select the same client who already has recorded advance payments in the system.
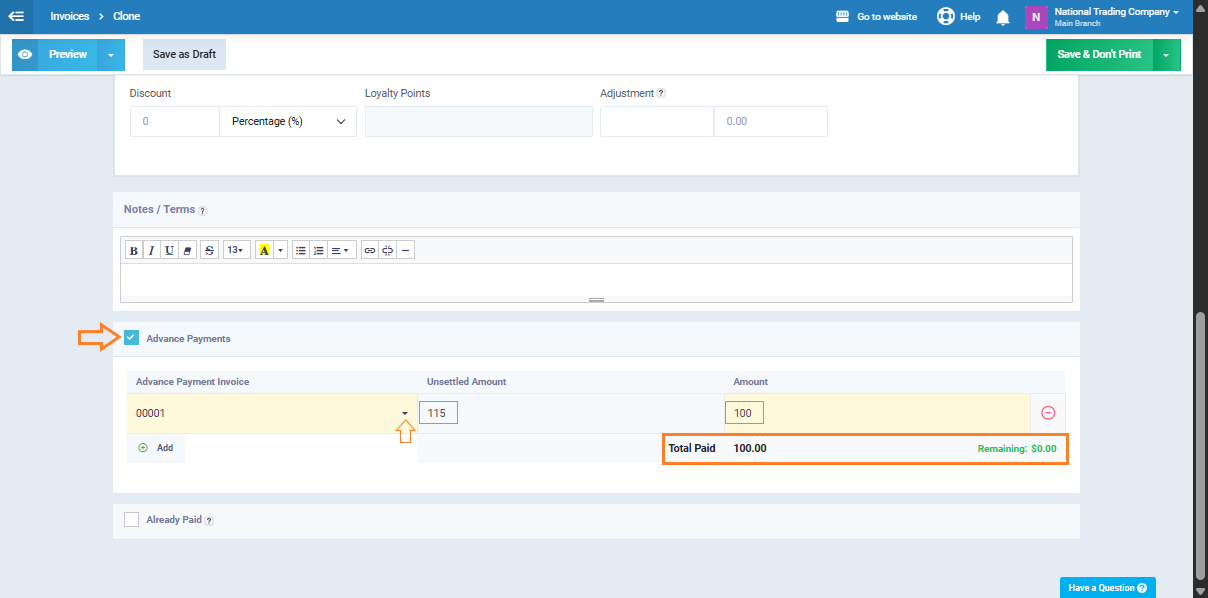
From the bottom of the invoice creation screen, activate the “Advance Payments” toggle. A table will appear containing the following fields:
-
Advance Payment Invoice: The reference number of the advance payment invoice previously issued to the client.
-
Unsettled Amount: The remaining balance of the advance payment that has not yet been applied to any invoices.
-
Amount: The portion of the advance payment you want to apply to settle part or all of the current invoice. This can be adjusted manually as needed.
-
Total Paid: The total amount of advance payments applied to the invoice (displayed at the bottom of the table).
-
Remaining: The difference between the total invoice amount and the amount settled using advance payments. This will appear in green if the invoice is fully paid.
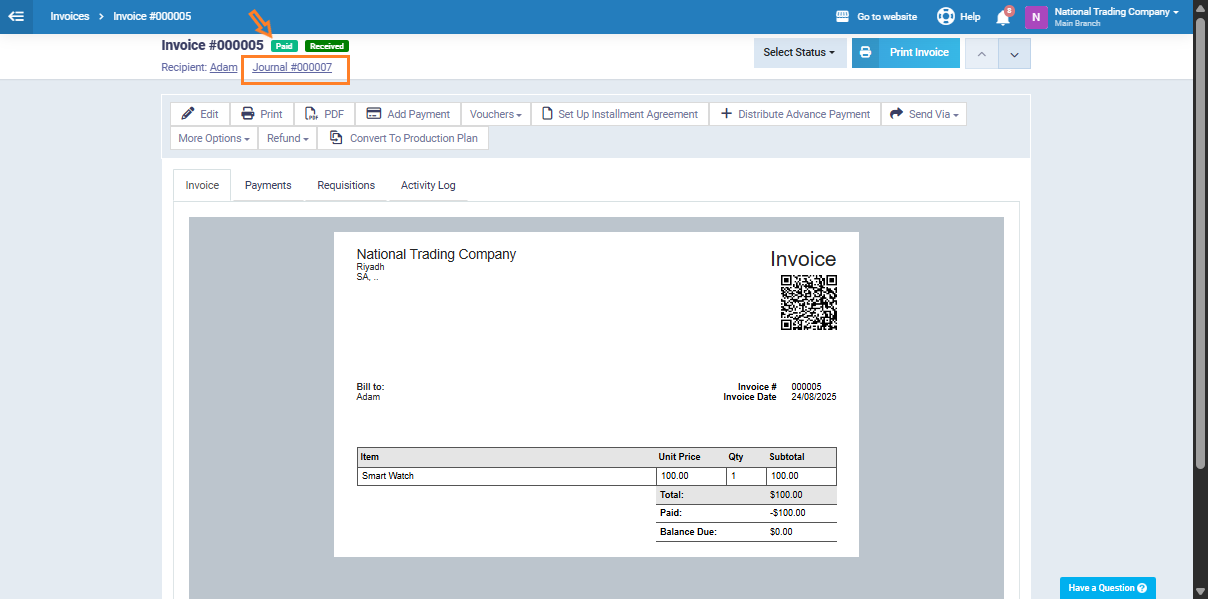
Once the invoice is saved, its status automatically changes to “Paid”, and the system generates both the journal entry and the cost of sales entry for the invoice.
Distributing an Advance Payment on an Existing Invoice
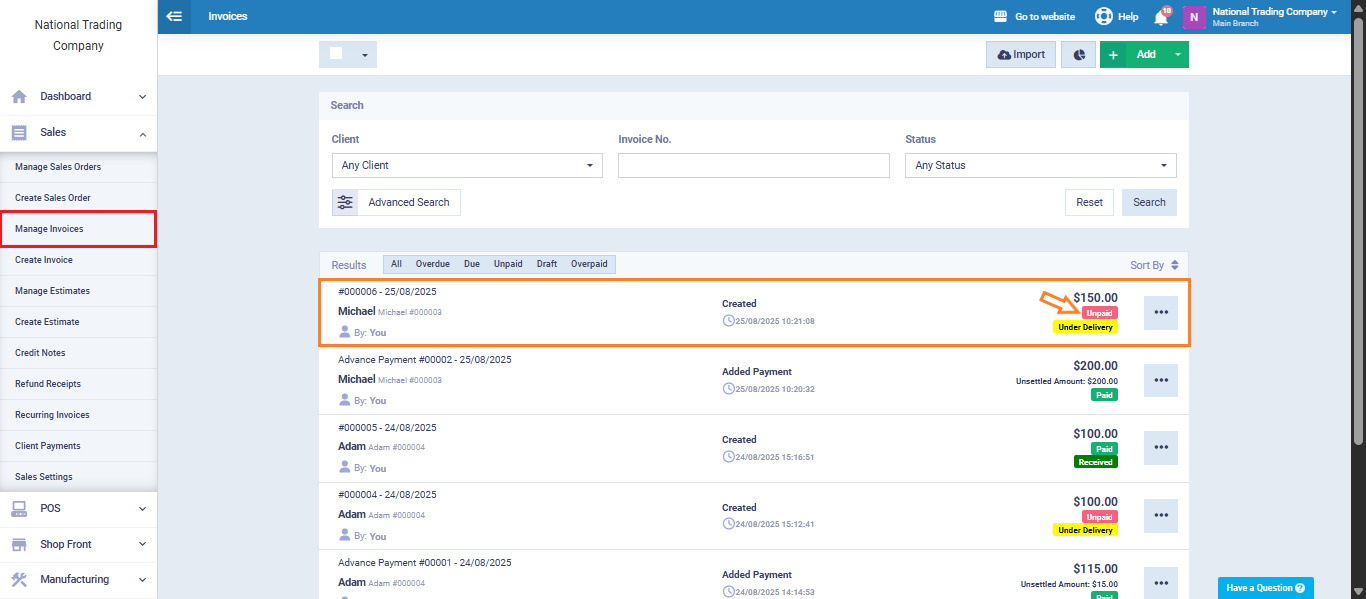
From the main menu, click on “Manage Invoices” under “Sales“, then select an invoice with the status “Unpaid.”
From the toolbar, click the “Distribute Advance Payment” button.
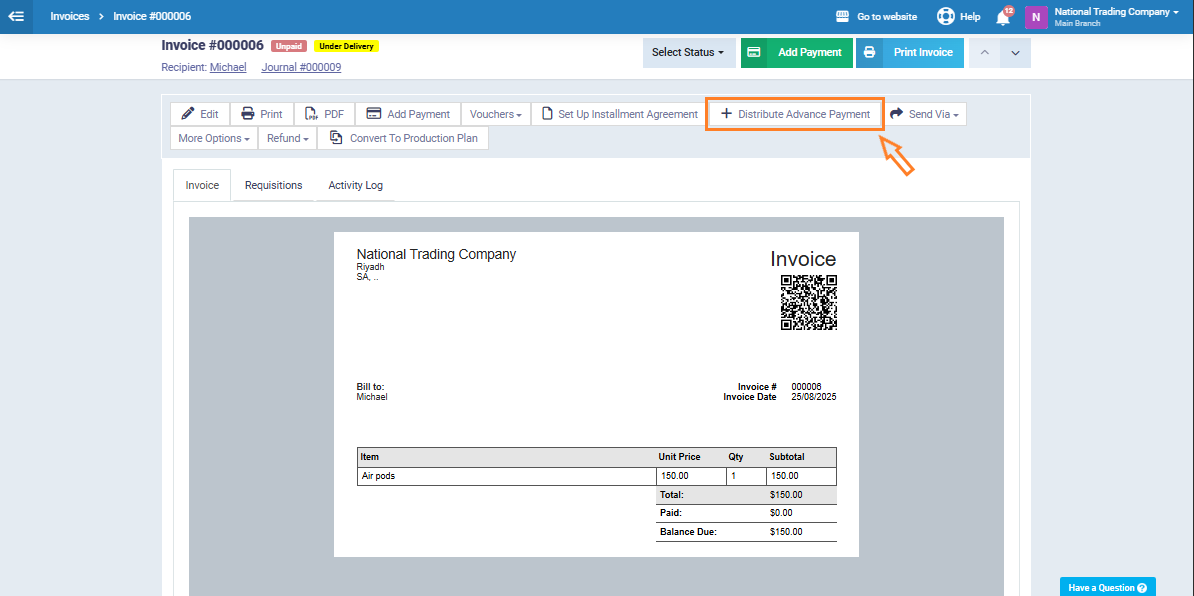
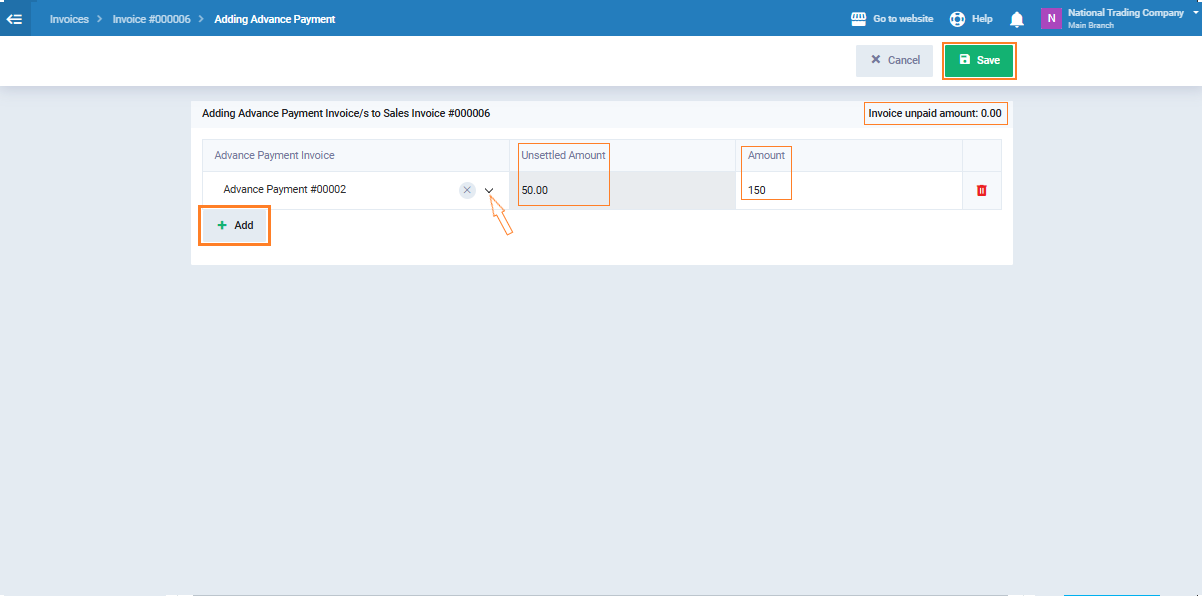
The advance payment distribution table will be displayed as follows:
- Advance Payment Invoice: Shows the reference number of the advance payment invoice available for the client that can be applied to the current invoice.
- Unsettled Amount: Represents the remaining portion of the advance payment that has not been distributed or used in other invoices; this is the amount available for distribution.
- Amount: The portion you choose to distribute from the unsettled amount to the current invoice. You can enter the amount manually based on the invoice requirement.
- Invoice unpaid amount: Displays the remaining balance due on the invoice before deducting the advance payment, helping you decide how much can be covered.
- Add: This tool allows you to add another advance payment from the same client, if they have multiple advance payments available that you wish to distribute to the same invoice.
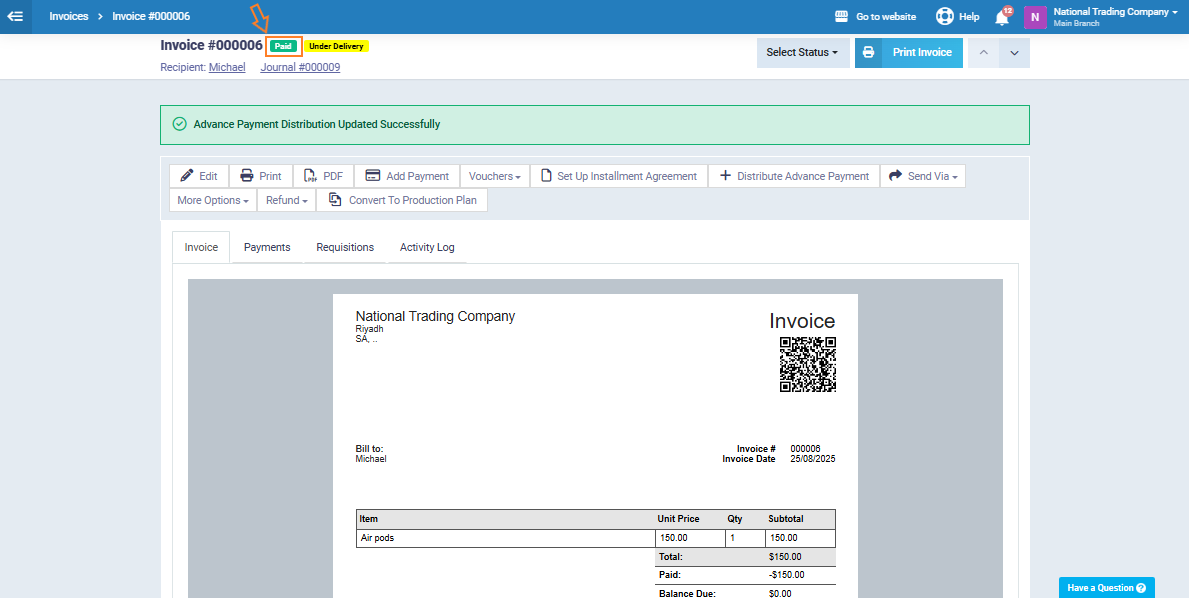
Click the “Save” button, and you will see that the invoice status is automatically updated to “Paid” after the advance payment has been distributed on it.
Adding a Sales Invoice to an Advance Payment Invoice
From the main menu, go to “Sales”, then select “Manage Invoices” from the dropdown menu.
Next, select the advance payment invoice from the list of invoices.

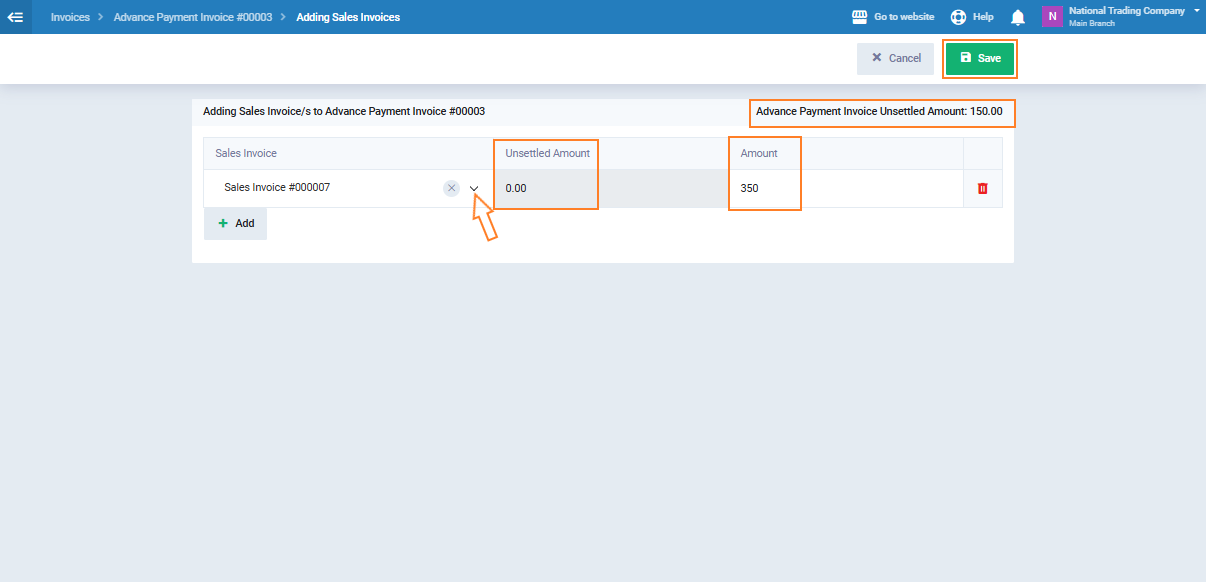
From the toolbar at the top of the invoice, click “Add Sales Invoice.”
Enter the following details to link the sales invoice to the advance payment:
- Sales Invoice: The invoice that will be linked or settled with an existing advance payment.
-
Unsettled Balance: The remaining amount from the advance payment that has not yet been used in any invoice.
-
Amount: The value you want to settle from the advance payment against the selected sales invoice.
-
Advance Payment Invoice Unsettled Amount: The remaining portion of the advance payment invoice after some amounts have already been settled.
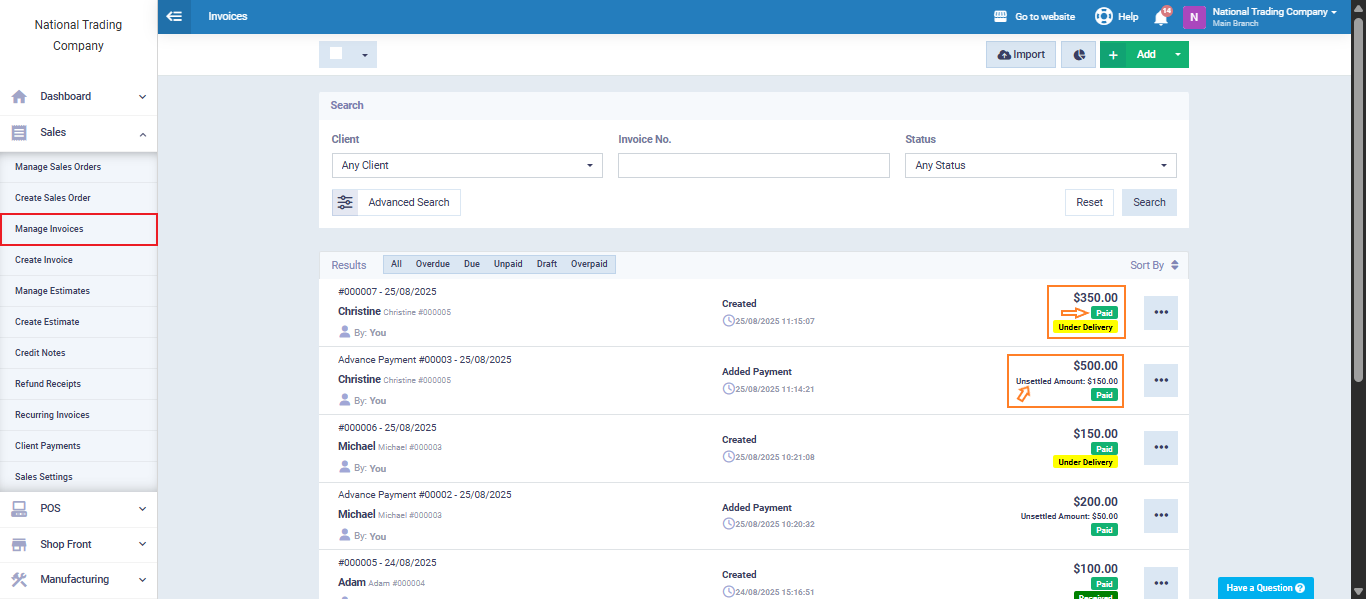
After returning to “Manage Invoices”, you will notice the following:
-
The status of the sales invoice has changed to “Paid”, indicating that its value has been fully settled using the advance payment.
The advance payment invoice has been updated and now displays as follows:
-
Total Amount: Represents the full value of the advance payment made by the client.
-
Unsettled Amount: The remaining portion of the advance payment that has not yet been used to settle any other invoice and can be applied later.