


How does the Medical Insurance System Work?
One of the fields that require an accounting system for insurance is the medical field. That’s why the software has prepared a specialized application for insurance agents that you can rely on to handle the accounting affairs of insurance companies you contract with, with ease. We provide you with a guide for medical insurance in system, so you can understand how to use this important application and manage it yourself.
In this topic, we will practically apply it to our dental clinic account and delve into the details of:
- Adding a new insurance company to your clinic’s account.
- Adding an insurance category/segment to the insurance company.
- Linking the client to a specific insurance company and insurance category.
- Processing the rules of the insurance category.
Adding a New Insurance Company to Your Clinic's Account
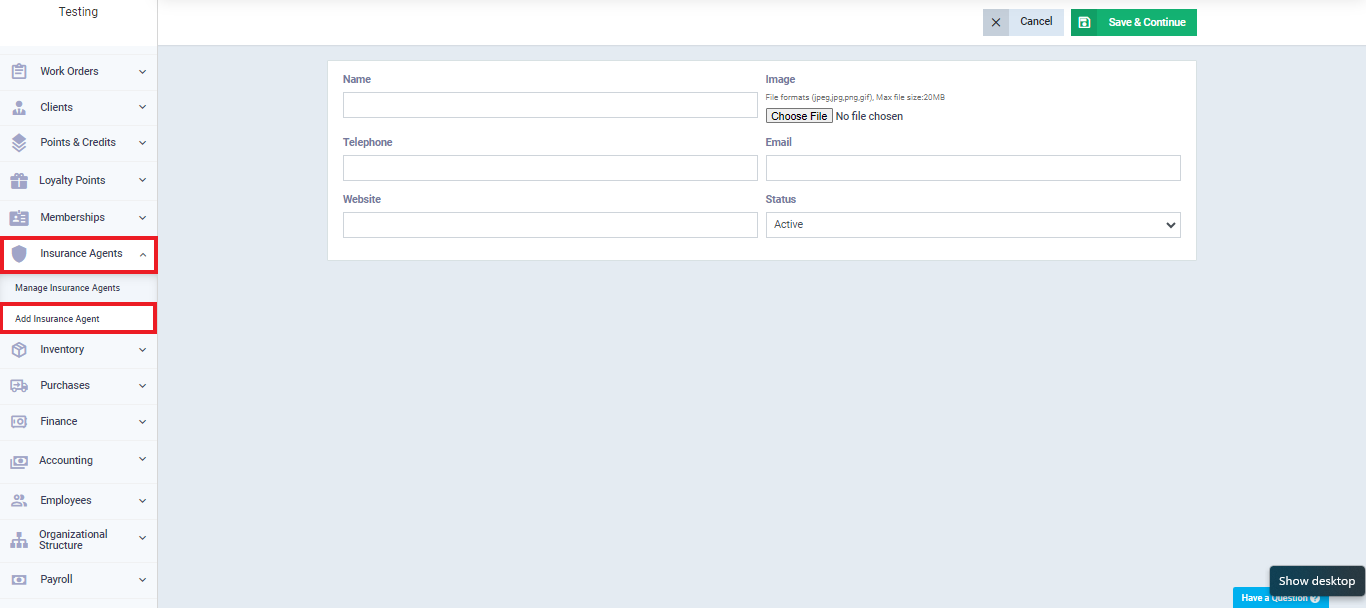
Adding a new insurance company to your account starts your journey with the medical insurance guide. To add a new insurance company, click “Insurance Agents” from the main menu, then select “Add Insurance Company.”
The control panel for the insurance company appears, allowing you to input its information, as shown in the following image.
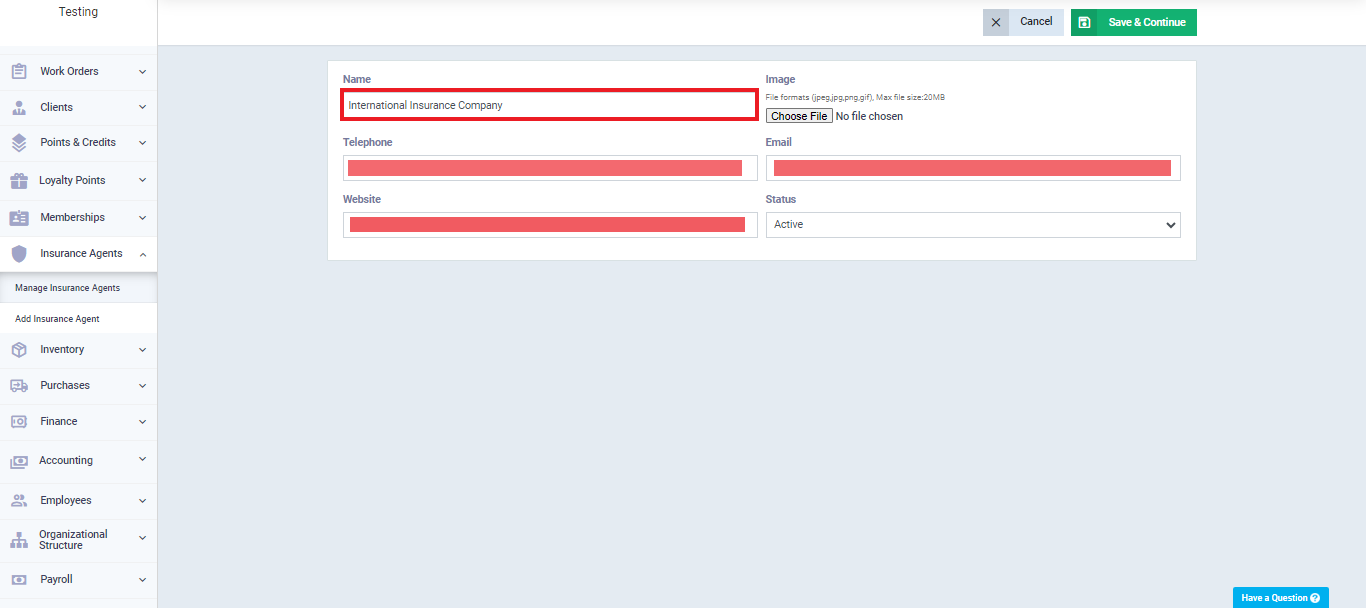
Let’s apply a practical example in the medical insurance guide using a virtual insurance company named “International Insurance Company.”
Here’s how we fill in its details:
- Name: Enter the insurance company name as “International Insurance Company.”
- Phone: Record the insurance company’s phone number in this field.
- Website: Specify the insurance company’s website.
- Image: Insert the insurance company’s logo to distinguish it from others. Click the “Choose file” button and select the image from your device’s memory.
- Email: Register the insurance company’s email address.
- Status: Set the insurance company’s status as “active” to perform operations on it.
After filling in the data, click “Save and Continue” to add the International Insurance Company to your account. Next, we will add an insurance category specific to this company.
Adding an Insurance Category or Segment to Insurance Companies
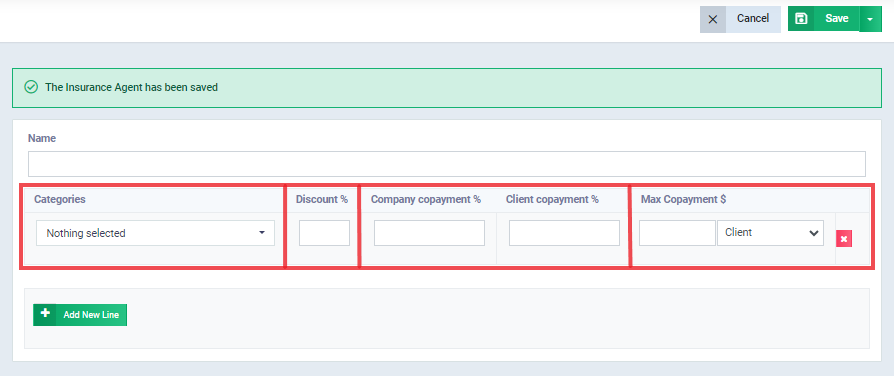
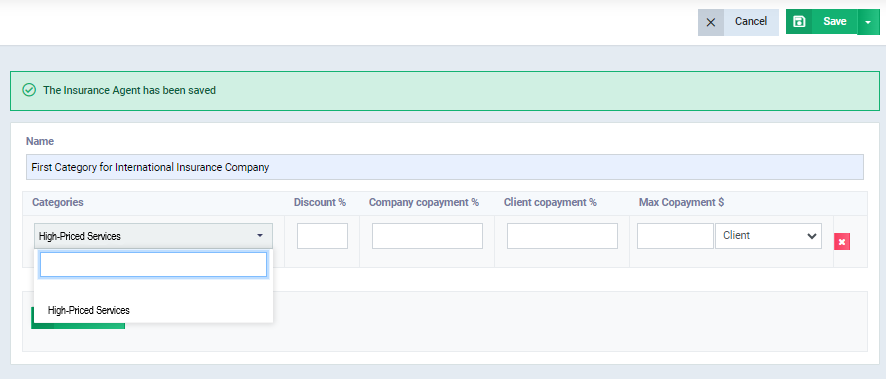
Once you’ve added “International Insurance Company” and filled in its data, clicking “Save and Continue” will automatically bring up the “Add Insurance Category” screen. You can then fill in the category details as shown in the image.
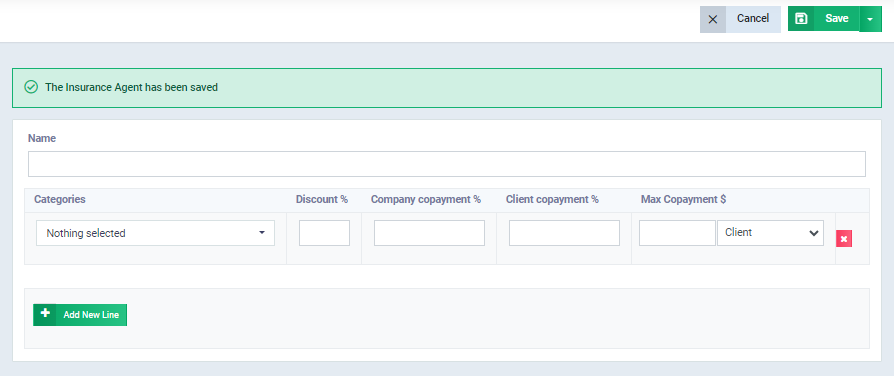
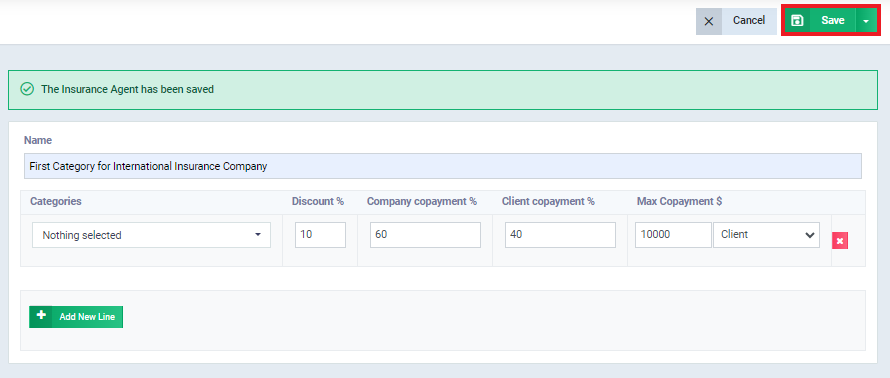
First, specify a name for the insurance category you’re adding to International Insurance Company, let’s call it “First Category for International Insurance Company.” Then, provide the following details:
Categorizing the Services/Products Included in the Insurance Category
To facilitate tracking and organization of insurance segments according to products/services or clients, the system requests you to input products with their respective categories when creating a new insurance category. Therefore, it’s essential to have product categories in your account.
In our practical example with the dental clinic account, we’ve created the “High-Priced Services” category, and we’ve added two products to it: Dental Implants and Orthodontics.
Returning to the control panel of the “First Category for International Insurance Company,” in the Categories field, select “High-Priced Services” as shown in the image.
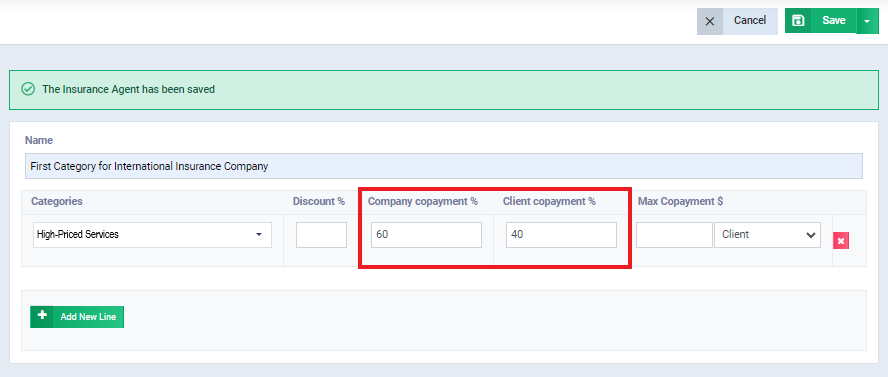
The Percentage Borne by the Insured and the Insurance Company
Both the insured and the insurance company bear a percentage of the product’s cost, known as the “co-payment percentage.” When you specify the percentage for either party, the system automatically calculates the remaining cost borne by the other party. For example, if you set a 60% co-payment percentage for the insurance company (Company Co-payment), the client will automatically bear a 40% co-payment percentage (Client Co-payment).
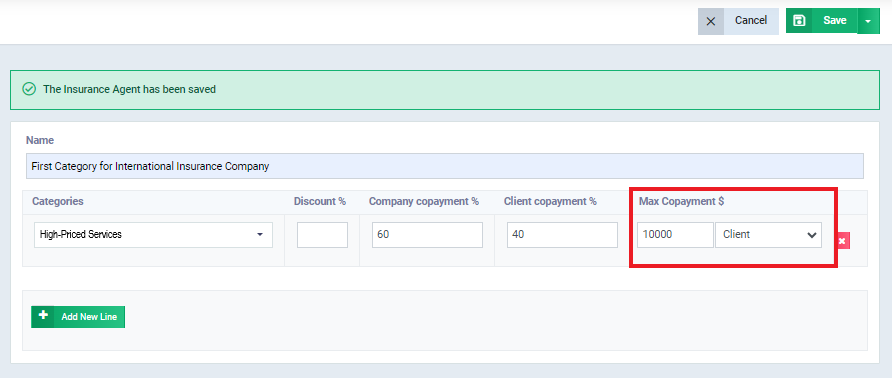
The Maximum Co-payment Limit
The system allows us to set a maximum payment limit for either party (the insured and the insurance company).
For example, if it is agreed that the maximum limit for the insurance company’s payment is 10,000, and the cost of the service the customer will receive is 100,000, the customer’s cost will be 10,000 only, even if the co-payment percentage for them is higher. This ensures that the maximum payment limit is not exceeded.
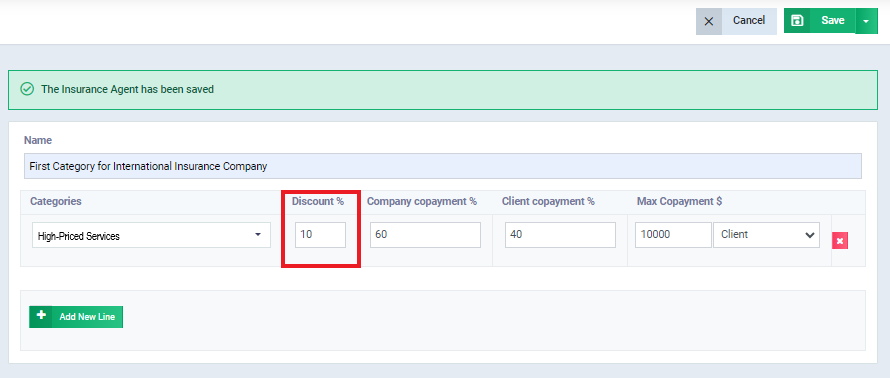
The Additional Discount Percentage at the Invoice Item Level
We can add a discount to the co-payment cost for the client, not the insurance company. This discount is applied after splitting the co-payment percentage between the client and the insurance company.
Save the Insurance Category After Filling in the Required Data
After understanding the meaning of each field in the insurance category and successfully adding it as described earlier, save the insurance category by clicking on “Save,” as shown in the following image:
Adding a New Insurance Category to an Insurance Company
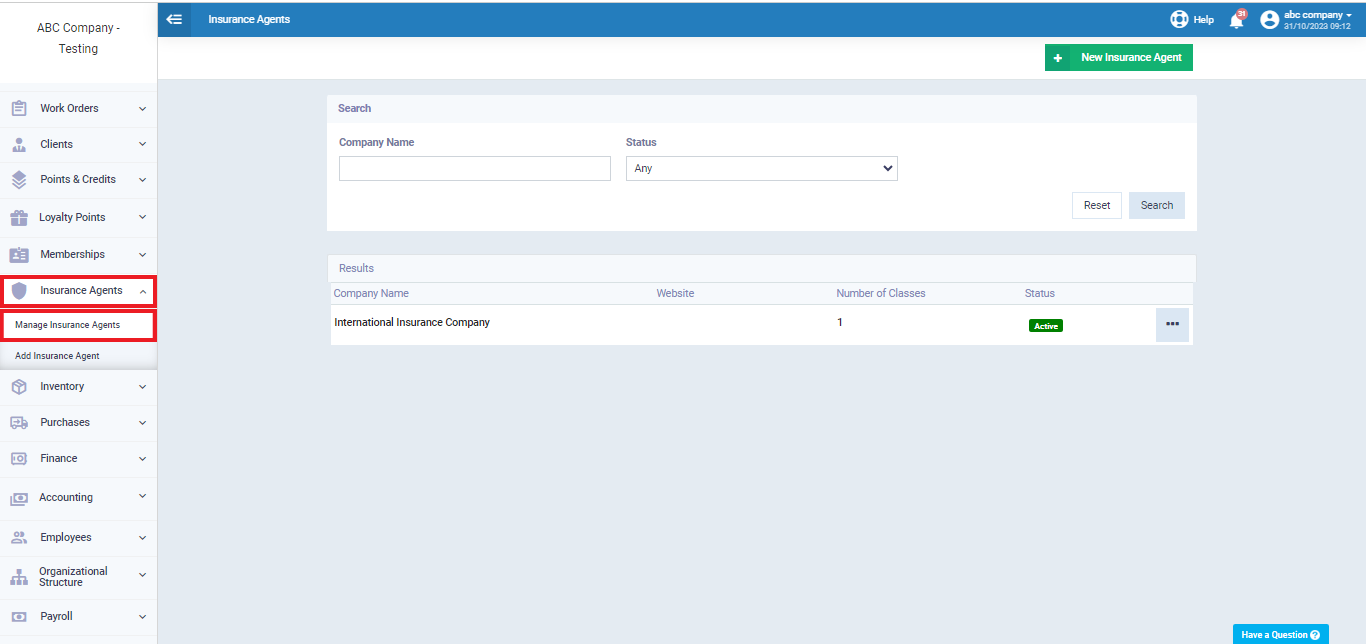
You can add one or more insurance categories to any of your insurance companies in your account by clicking on ‘Insurance Agents’ from the main menu, and then ‘Manage Insurance Agents.’
Then, select the insurance company to which you want to add an insurance category, as shown in the following image:
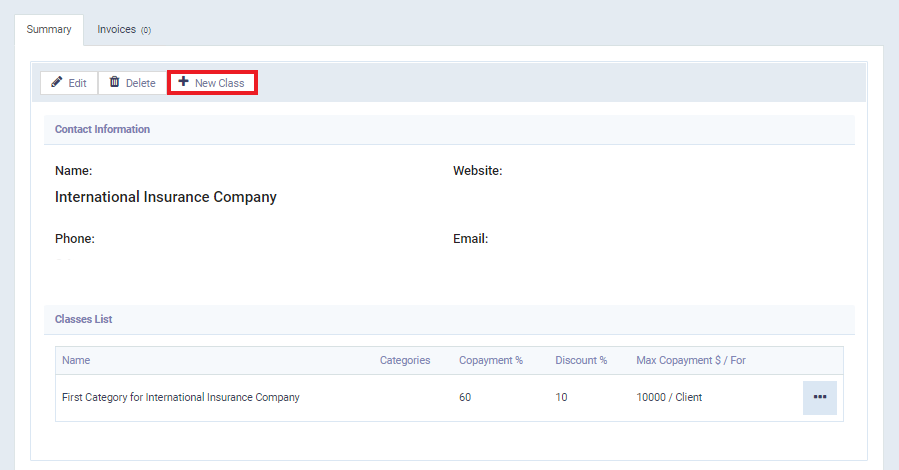
After entering the insurance company’s profile, click on ‘New Class,‘ as shown in the following image:
Then continue filling in the insurance category details as explained above.
Linking the Client to a Specific Insurance Company and Insurance Category
After adding a new insurance company and insurance category, we are now going to link the client to them so that the system can automatically apply insurance when creating invoices for this client. To do this, we need to have clients in the account.
Since we already have clients in the account for our dental clinic example, we will select one of our clients, ‘Patt.’
First, we click on ‘Patients’ in the main menu, then ‘Manage Patients,’ and select ‘Patt’ as shown in the image.

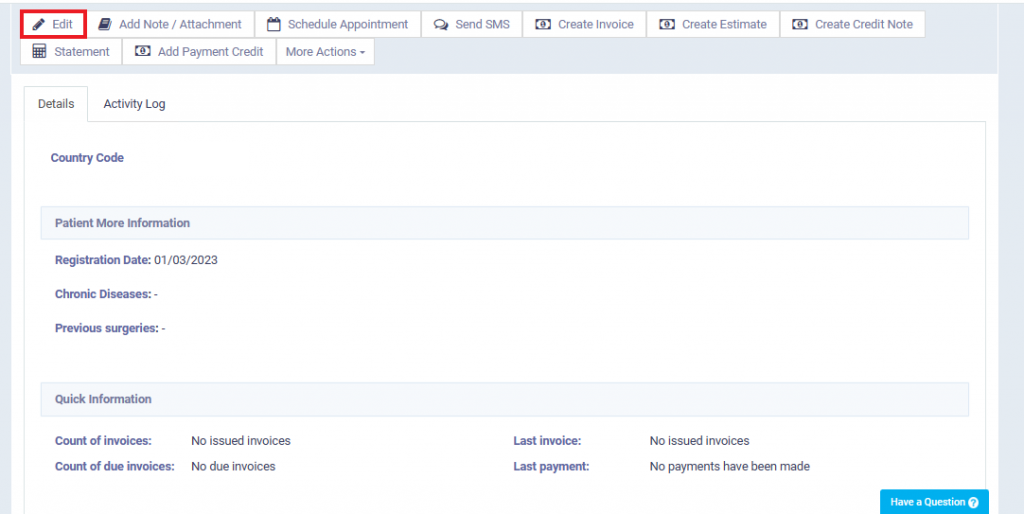
In the patient’s file, click on “Edit” as shown in the following picture:
Below the “Account Information” field in the patient’s data control panel, you will find two options:
- Insurance Company: Select from the available options; in this case, choose “International Insurance Company”.
- Insurance Category: Choose from the available options, which is “The First Category for International Insurance Company” in this instance.
Beneath these two fields, you can input the client’s insurance number in the “Client Insurance Number” field.
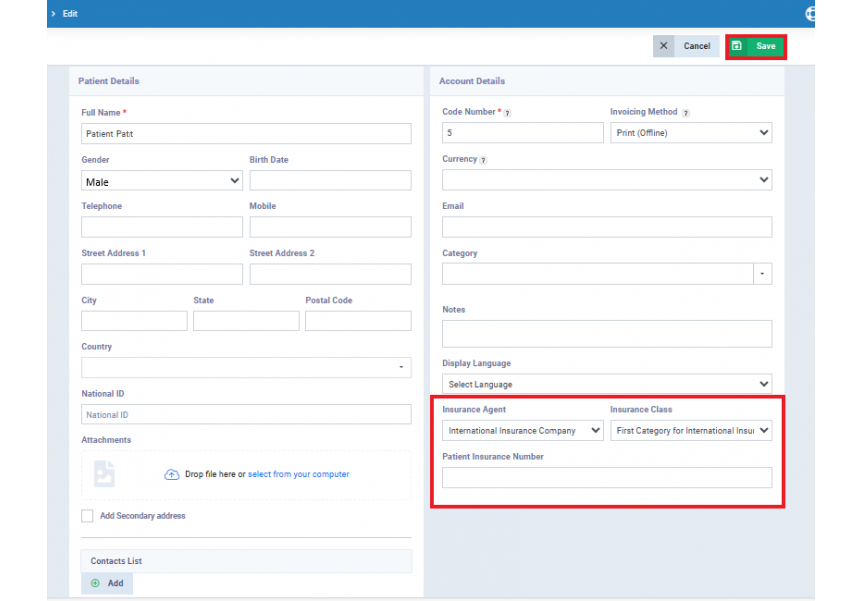
Then click “Save“
Cases for Configuring Insurance Category Settings and How Each Case Is Processed
Pay attention to the following rules to understand how the system calculates the co-payment for both the client and the insurance company.
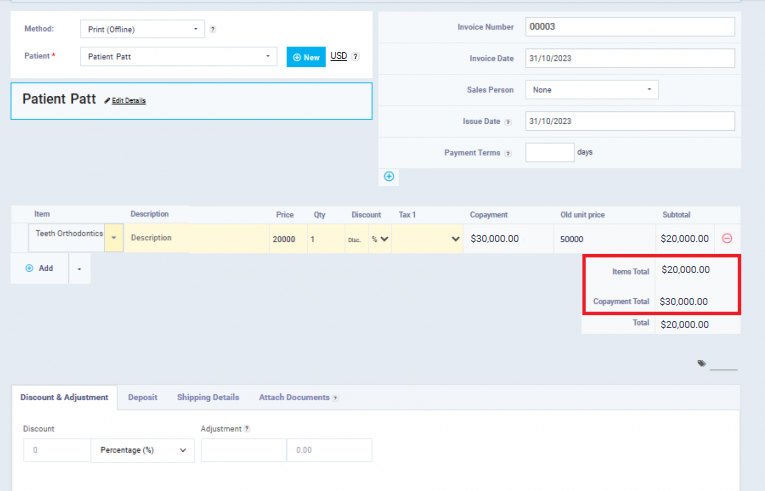
Case 1: No maximum payment or discount
In this case, where co-payment percentages are defined for both the client and the insurance company, without setting a maximum payment or discount, the system automatically divides the total cost of the service/product in proportion to the client’s and insurance company’s percentages.
For example:
- Client: Patt (insured by the International Insurance Company – The First Category for International Insurance Company).
- Service: Dental Implant (with a cost of 50,000, categorized as a high-price product).
- Co-payment Percentage: Client (40%), Insurance Company (60%).
- Discount: None
- Maximum Payment: None
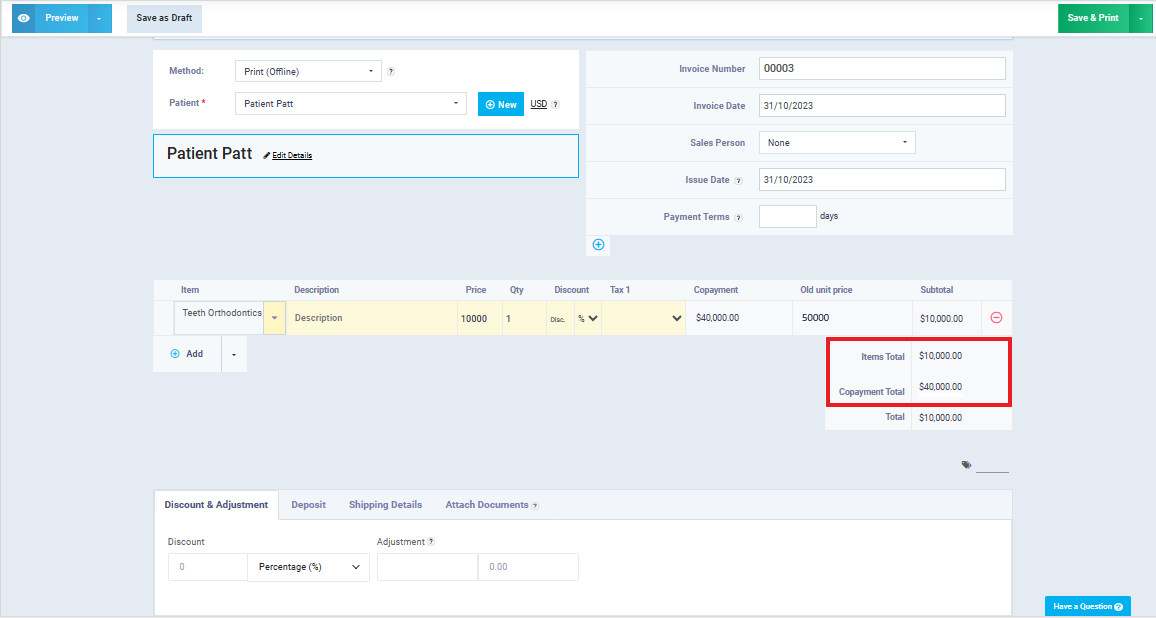
Case 2: There Is a Maximum Client Co-payment with No Discount
In this case, where a maximum client co-payment is set without specifying a discount, the system charges both the client and the insurance company according to their respective co-payment percentages. If the cost exceeds the maximum client co-payment limit, the system ensures not to exceed this limit by transferring the remaining portion of the total cost of the product or service to the insurance company.
Illustrative Example:
- Client: Patt (insured by International Insurance Company – First Category for International Insurance).
- Service: Dental Implant (costing 50,000, categorized as high-priced products).
- Co-payment Percentage: Client (40%), Insurance Company (60%).
- Discount: None
-
Maximum Client Co-payment: Maximum co-payment of 10,000 (for the client).
Case 3: There is a maximum insurance company contribution limit, and there is no discount
In this case, the system charges both the client and the insurance company according to their respective co-payment percentages. If the cost exceeds the maximum insurance company contribution limit, the system ensures not to exceed this limit by charging the remaining cost to the client.
Example for illustration:
- Client: Patt (insured by International Insurance Company – First Category for International Insurance Company).
- Service: Dental implant (costs 50,000, within the high-price product category).
- Co-payment percentage: Client (40%), Insurance Company (60%).
- Discount: None
-
Maximum payment limit: Maximum insurance company contribution limit of 10,000.

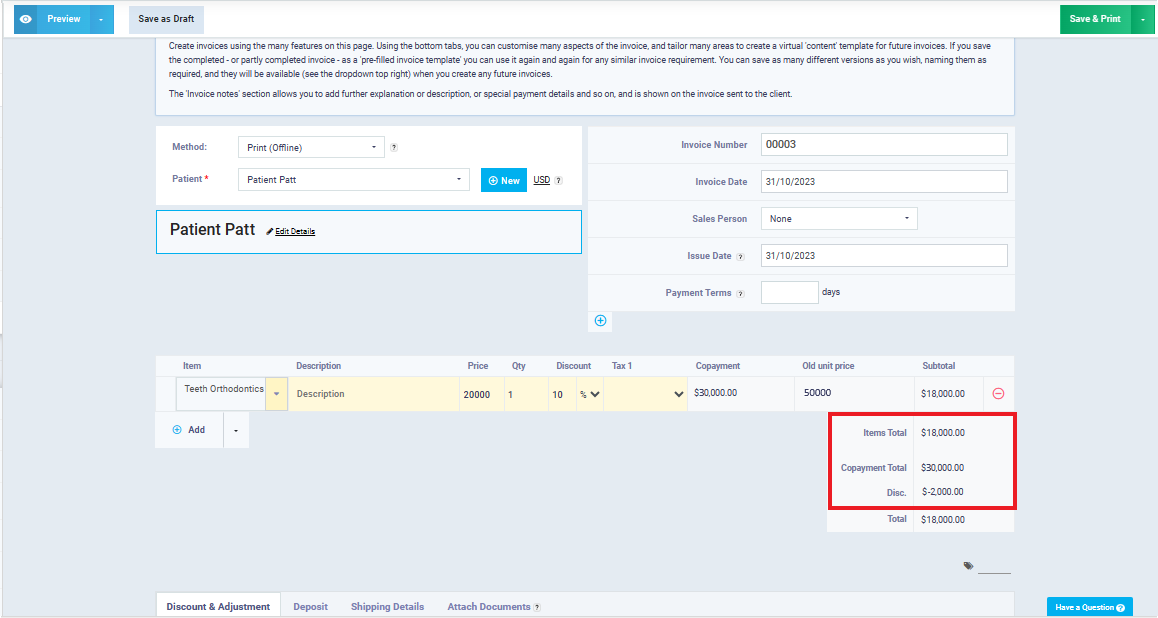
Case 4: There is a discount, and there is no maximum limit
In this scenario, where a discount is set for the client (typically, the discount is applied to the client and not the insurance company) without a maximum limit, the system loads the cost for both the client and the insurance company according to their respective co-payment percentages and then applies the discount to the client’s co-payment percentage.
Illustrative Example:
- Client: Patt (insured by International Insurance Company – First Category for International Insurance).
- Service: Dental Implants (costing 50,000, which falls under the high-price product category).
- Co-payment Percentage: For the client (40%), and the insurance company (60%).
- Discount: 10%
-
Maximum Payment Limit: None.
Case 5: There Is a Discount, and There Is an Insurance Company Maximum
In this case, where a discount is set for the client and an insurance company maximum is defined, the system loads the cost for both the client and the insurance company according to their co-payment percentages. If the insurance company’s co-payment exceeds the maximum, the excess over the maximum is charged to the client, and then the system applies the discount to the client’s co-payment percentage.
Illustrative Example:
- Client: Patt (insured by International Insurance Company – First Category for International Insurance Company).
- Service: Dental implant (costing 50,000, falling into the high-priced product category).
- Co-payment percentage: Client (40%), Insurance Company (60%).
- Discount: 10%
-
Insurance Company Maximum: 10,000.
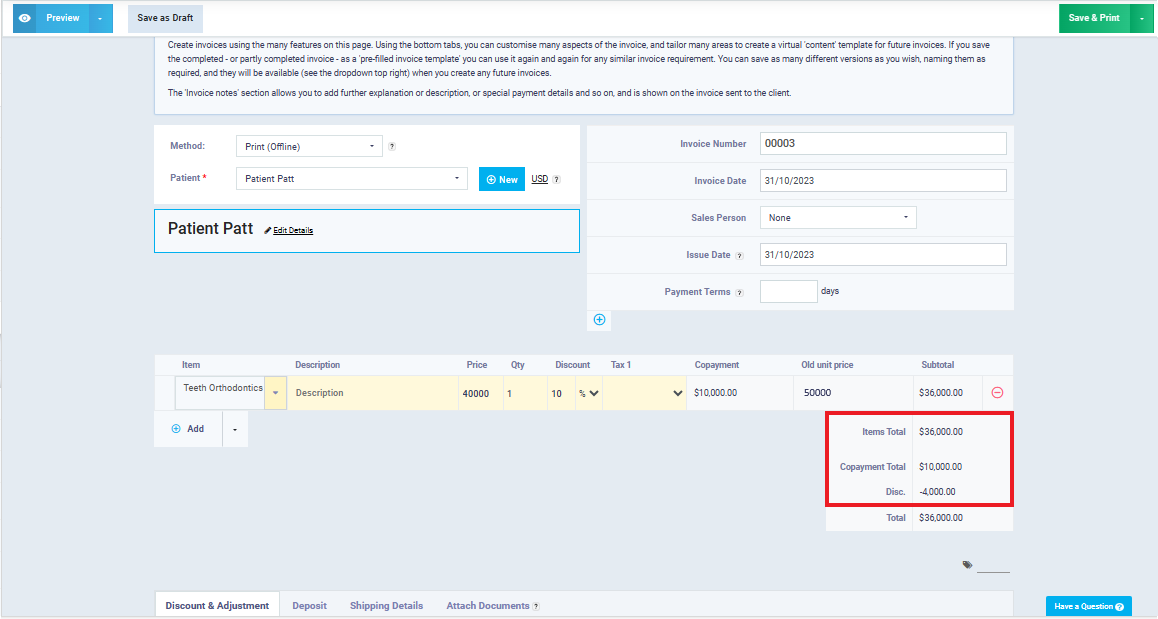
Case 6: There Is a Discount and a Maximum for the Client
Here we encounter an issue when the client benefits from the maximum co-payment, as they will receive a discount due to not exceeding this limit, in addition to the discount allocated to them in the insurance category. According to common insurance practices, this situation is handled differently, and it will become clear in the following paragraphs.
- Client: Patt (insured by International Insurance Company – First category of International Insurance Company).
- Service: Dental implant (costing 50,000 and classified as a high-priced product).
- Co-payment percentage: For the client (40%), and the insurance company (60%).
- Discount: 10%
-
Maximum co-payment: Maximum co-payment of 10,000 (for the client).

Here is an explanation of what happened:
The system loaded the client with a virtual cost, on which it applied a discount of 10% to make it exactly 10,000 (the maximum payment for the client). It then subtracted this virtual cost from the total cost of the service (50,000) to calculate the cost borne by the insurance company.
As shown on the invoice, (11,111) is the virtual cost, and the system derived this value using the following equation, where we denote the unknown with (C):
- C – 0.1C (10% discount) = Maximum payment for the client (10,000)
- C – 0.1C = 10,000
- 0.9C = 10,000
- 0.9C ÷ 0.9 = 10,000 ÷ 0.9
-
C = 11,111
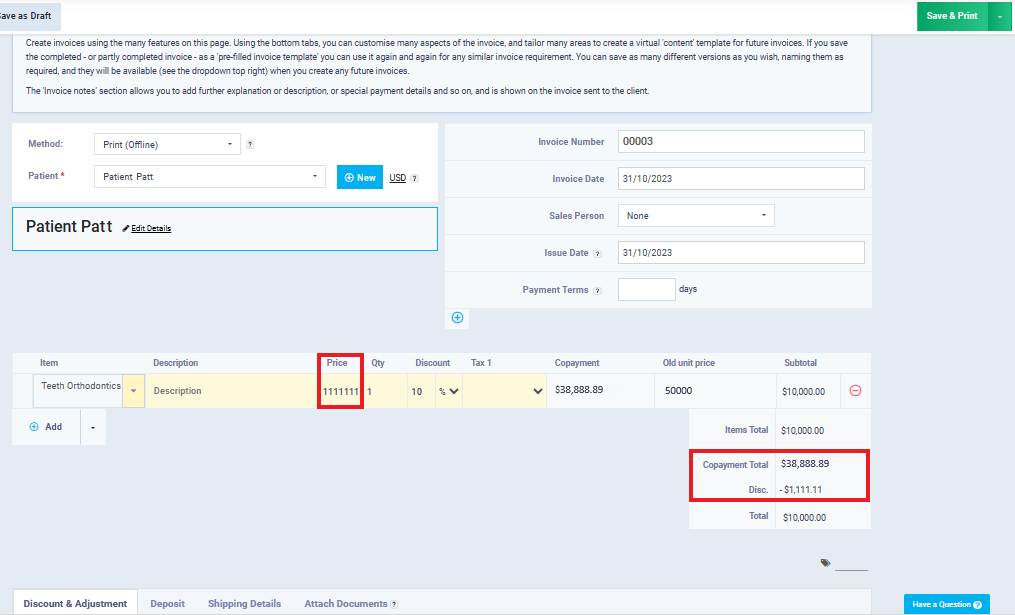
So, (C) is the virtual cost that the system loaded for the client, and then it subtracted it from the total cost of the service to calculate the cost borne by the insurance company:
- Insurance Company’s Payment = Total Cost of the Service – Virtual Client Cost
- Insurance Company’s Payment = 50,000 – 11,111 = 38,888
The system processes this equation as explained to avoid applying the discount after applying the maximum payment.
With this, we have reached the end of the Medical Insurance Guide. We have learned how to add a new insurance company to the account, add an insurance category or class to it, link the client to an insurance company and a specific insurance category, and the mechanism for processing insurance category rules.