


Settlement of the Tax Account by the End of the Fiscal Quarter
What is the meaning of Settling the Tax Account "VAT"?
- The software assists you in monitoring your sales and purchases, which also impacts your tax accounts if your sales or purchases are subject to value-added tax (VAT).
- At the end of each quarter, the balance for value-added tax is settled until the due tax is paid to the “Zakat and Income Authority”.
- This article will explain the method of settling, closing, and also proving the payment for the value-added tax account sequentially.
Adding the "Tax Settlements" Account in the Chart of Accounts
First, a special account for tax settlements must be added within the chart of accounts. This account will serve as an intermediary account, where the balance of the tax accounts in the program is closed, and then the payment process to the Zakat Authority is also proven through it until its balance becomes “zero” after the full payment is completed.
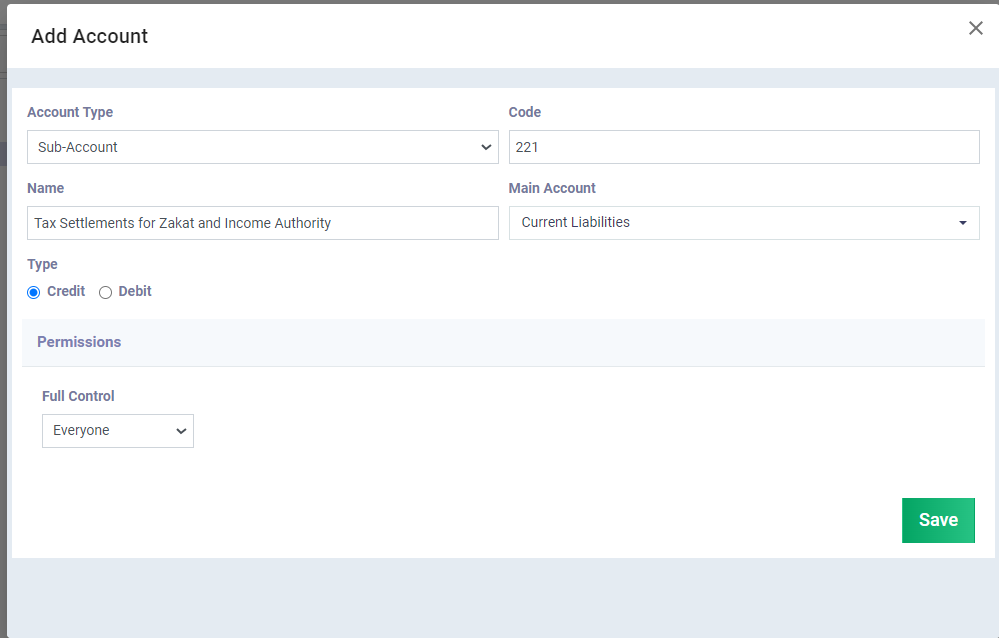
Steps to Add a Special Account for Tax Settlements in the Chart of Accounts:
- Click on “Accounting” from the main menu.
- Click on “Chart of Accounts”.
- The program displays the chart of accounts in a hierarchical organization.
- Click on “Liabilities” then “Current Liabilities” so that the account has the same accounting sequence as tax accounts.
- Click on the “Add Account” button.
- Enter the details of the account you want to add to the chart:
- Account Type: Select the account type as “Sub-Account”.
- Code: Assign a code for the new account.
- Note: No repetition is allowed for the codes of any subsidiary or main accounts within the chart.
- Name: Enter the account name as required, example: “Tax Settlements for Zakat and Income Authority”.
- Main Account: You can specify the main account under which the new account will be listed.
- Type: The nature of the account type should not be changed from that of the main account under which this account falls”. Click on the “Save” button.
- Click on the “Save” button.
Displaying the value of the tax due for payment to the ZATCA
Steps for Displaying the Tax Declaration Report
- Click on “Reports” from the main menu.
- Click on “Accounting Reports”.
- Click to view “Tax Declaration”.
- In the “Taxes” field, select the type of tax for which the report is to be displayed, or choose “All” to display all types of taxes if available.
- In the “Revenue Type” field, choose “Issued (Accrual)” to display all invoices, or “Fully Paid (Cash)” to display only paid invoices.
- In the “Date Range” field, specify the period for which the tax amount is to be displayed.
- Select the currency.
- If there are multiple branches, specify the branches for which the report is to be displayed.
- Click on “Show Report”.
The report will be displayed as follows:
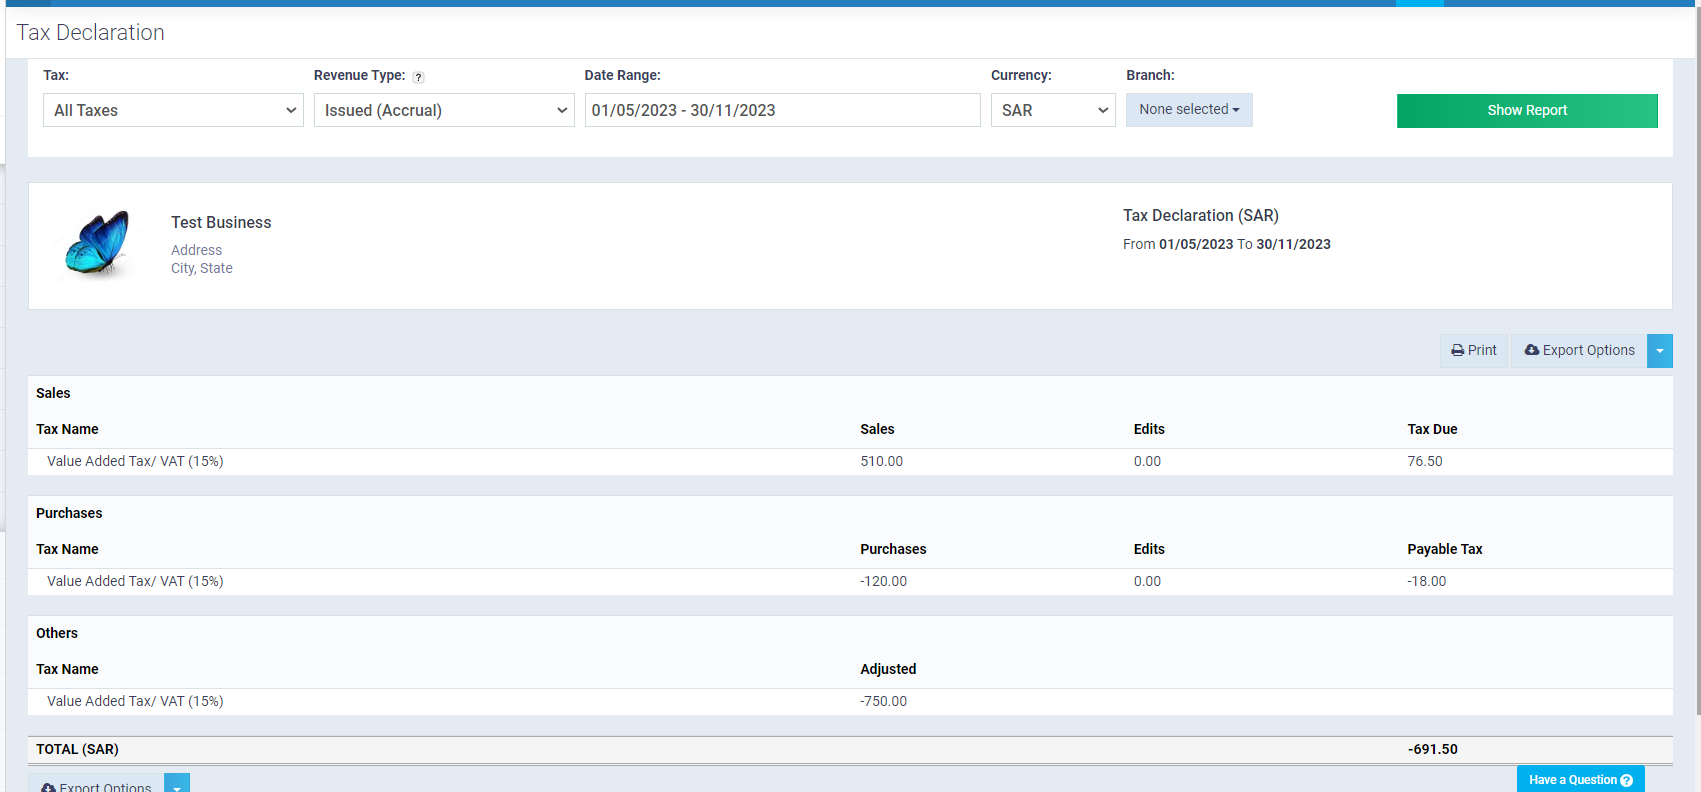
In the example shown in the previous image, the data is explained as follows:
- Sales
- Tax Name: This field shows the name of the tax, which is “Value Added Tax/ VAT (15%)”.
- Sales: This field shows the net sales value “excluding tax” for the specified period in the report.
- Edits: This field shows the net value of “refund receipts and credit notes” for the specified period.
- Tax Due: This field shows the due tax amount on the net sales listed in the “Sales” field.
- Explanation: In the example above, the net sales value is: 510.00 and there are no adjustments or returns to be deducted, hence the due tax amount from net sales is 15% of the previously mentioned value, which will be: 76.50.
- Purchases
- Tax Name: This field shows the name of the tax, which is “Value Added Tax/ VAT (15%)”.
- Purchases: This field shows the net purchase value “excluding tax” for the specified period in the report.
- Edits: This field shows the net value of “purchase refunds” for the specified period.
- Payable Tax: This field shows the paid tax amount on the net purchases listed in the “Purchases” field.
- Explanation: In the example above, the net purchase value is: 120 and there are no adjustments or returns to be deducted, hence the payable tax amount from net purchases is 15% of the previously mentioned value, which will be: 18.
- Others
- Tax Name: This field shows the name of the tax, which is “Value Added Tax/ VAT (15%)”.
- Adjusted: This field displays the net amount of due tax for any transactions added through journal entries or by adding “Assets”.
- Total
- This field shows the net difference between the value of “Sales Tax Due” minus the value of “Purchases Payable Tax” and “Others” if there is tax on purchases.
You can match the “Tax Declaration” with the ledger report for both the “VAT Payable” and “VAT Receivable” accounts before adding the settlement entry to ensure the accuracy of the data.
Adding a Tax Accounts Settlement Journal
Adding a tax settlement entry is done by creating a journal entry as explained in the following steps:
- Click on “Accounting” from the main menu.
- Click on “Journal Entries”.
- Click on the “Add Entry” button.
- Enter the “Date” field to determine the date of the journal entry.
- The date of recording the tax settlement entry should be on the last day of the period for which the tax is to be settled,
Example: If you are recording the tax settlement for the first quarter of the current year, the date of the entry should be: 31/03/2023.
- The date of recording the tax settlement entry should be on the last day of the period for which the tax is to be settled,
- Select the “Currency” of the entry.
- Enter a “Description” for the entry.
- Select the collected/ received value-added tax account to represent the “Debit” side of the entry.
- Enter the description for the received value-added tax account in the entry.
- Assign a value or balance for the collected value-added tax account in the “Debit” field of the entry.
- Click on the “Add” button.
- Select the paid value-added tax account to represent the “Credit” side of the entry.
- Enter the description for the paid value-added tax account in the entry.
- Assign a value or balance for the paid value-added tax account in the “Credit” field of the entry.
- Click on the “Add” button.
- Select the “Tax Settlements” account that was created to represent the “Credit” side of the entry.
- Enter the description for the “Tax Settlements” account in the entry.
- Assign a value or balance for the “Tax Settlements” account in the “Credit” field of the entry.
- The value or balance of this account will be the difference between the value of the received value-added tax and the value of the paid value-added tax account.
- Click on the “Save” button.
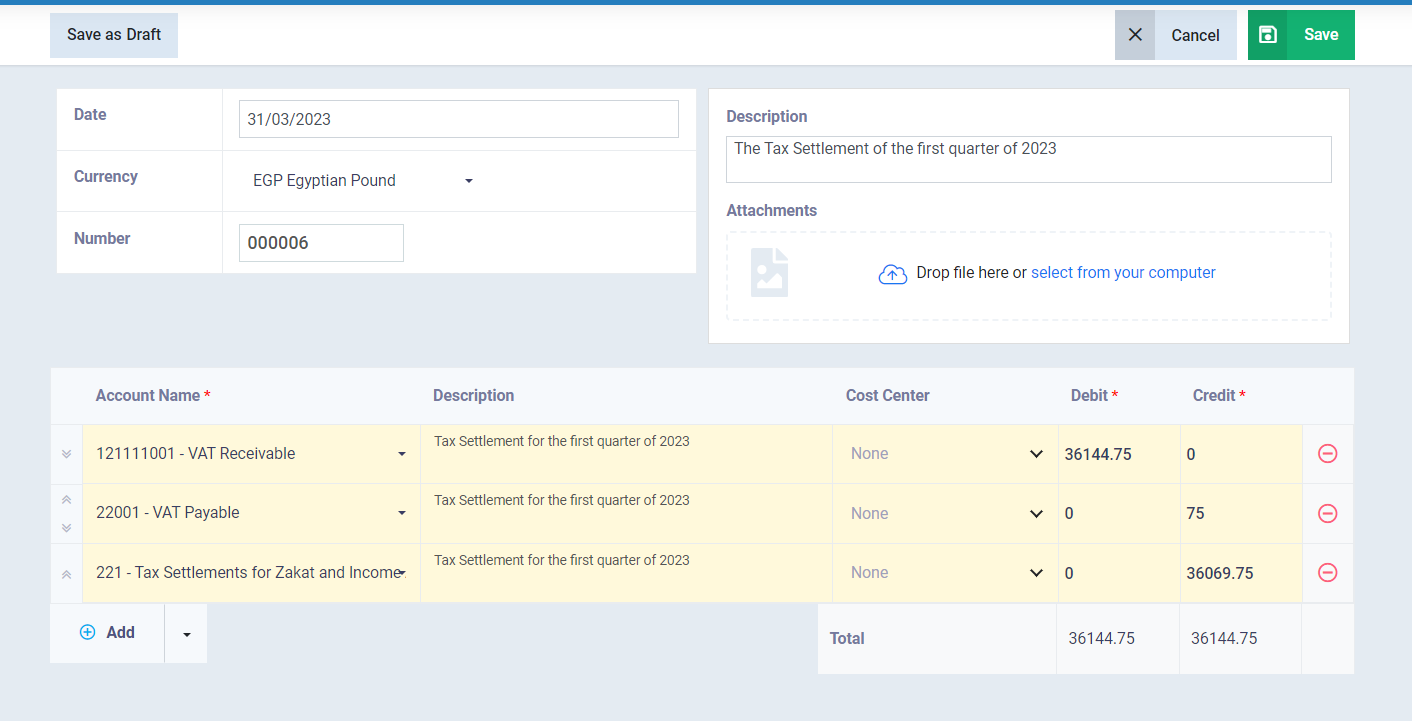
After saving the journal entry, this will zero out the tax value in the paid and collected value-added tax accounts and settle it in the “Tax Settlements” account that was added manually.
Proof of Payment of Due Tax to the Zakat and Income Authority
After the tax value settlement process, we come to the final step, which is proving the payment of the due tax amount to the Zakat and Income Authority.
The process of paying the due tax amount is done by creating an expense voucher through the following steps:
- Click on “Finance” from the main menu.
- Click on “Expenses”.
- Click on the “New Expense” button.
- Enter the expense voucher data as follows:
- Amount:
- Enter the value or amount of the tax due for payment.
- Select the currency of the voucher you want to record.
- Description: Enter any notes or additional guidance that describe the expense voucher.
- Date: Select the date of adding the expense voucher to the system from the calendar.
- Treasury: Select the treasury or bank account from which the expense will be made, from the treasuries or bank accounts added to the account. For more details on how to add a new treasury/bank account, you can review the guide “Adding a Treasury/Bank Account.”
- Journal Account: Choose the “Tax Settlements” account, which the tax value was settled on, in the journal account field.
- Note: If the journal account is not selected; the system will direct the expense to the “Other Expenses” account, and in this case, the “Tax Settlements” account will not be closed.
- Enter the rest of the voucher data as shown in the following link: Creating an Expense Voucher
- Amount:
- Click the “Save” button to issue the expense voucher.
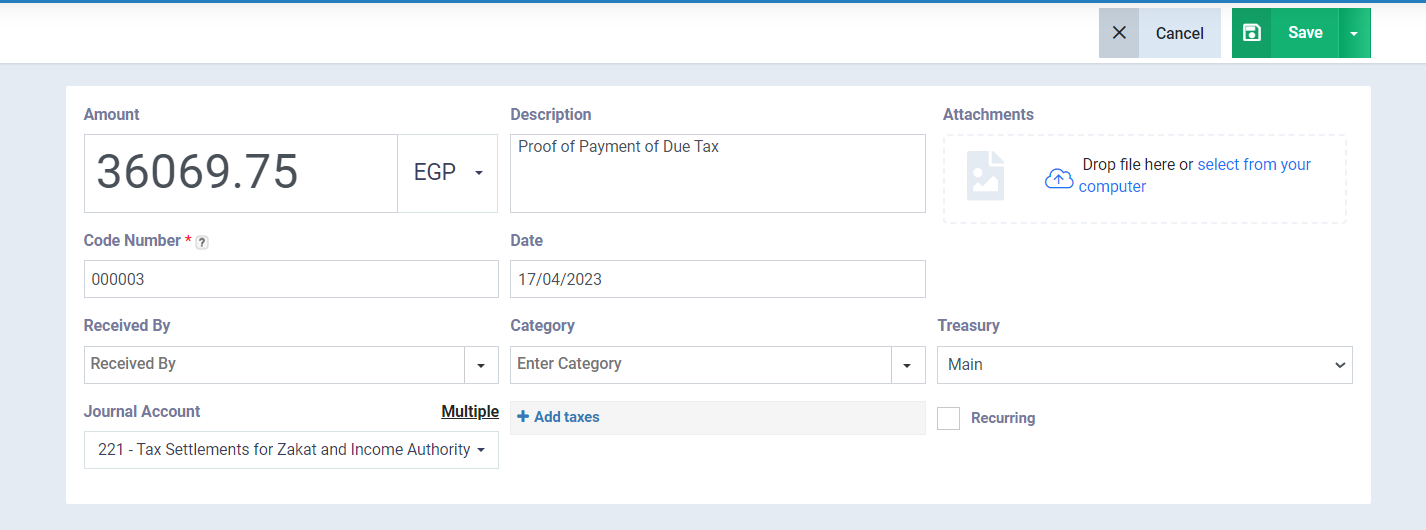
After saving the voucher, the balance of the “Tax Settlements” account will become zero following the payment of the due tax amount.