


Cheque Cycle Guide
Because cheques are one of the most important means of payment and financial collection in an institution, it was necessary to designate a special app for the cheque cycle in system that includes a set of features that ensure precise financial management for expenses, incomes, and the processes of issuing and receiving.
The Cheque Cycle Guide provides a comprehensive explanation of how to use the cheque cycle app, highlighting the following points:
- Activating the cheque cycle app in the account.
- Registering and managing cheque books.
- Managing payable cheques.
- Managing receivable cheques.
- Tracking cheques.
Enabling the Cheque Cycle App
To activate the cheque cycle app in your account, click on “Settings” from the main menu, then “Apps Manager“.
In the account management section, activate the option “Cheque Cycle” as shown in the following image:
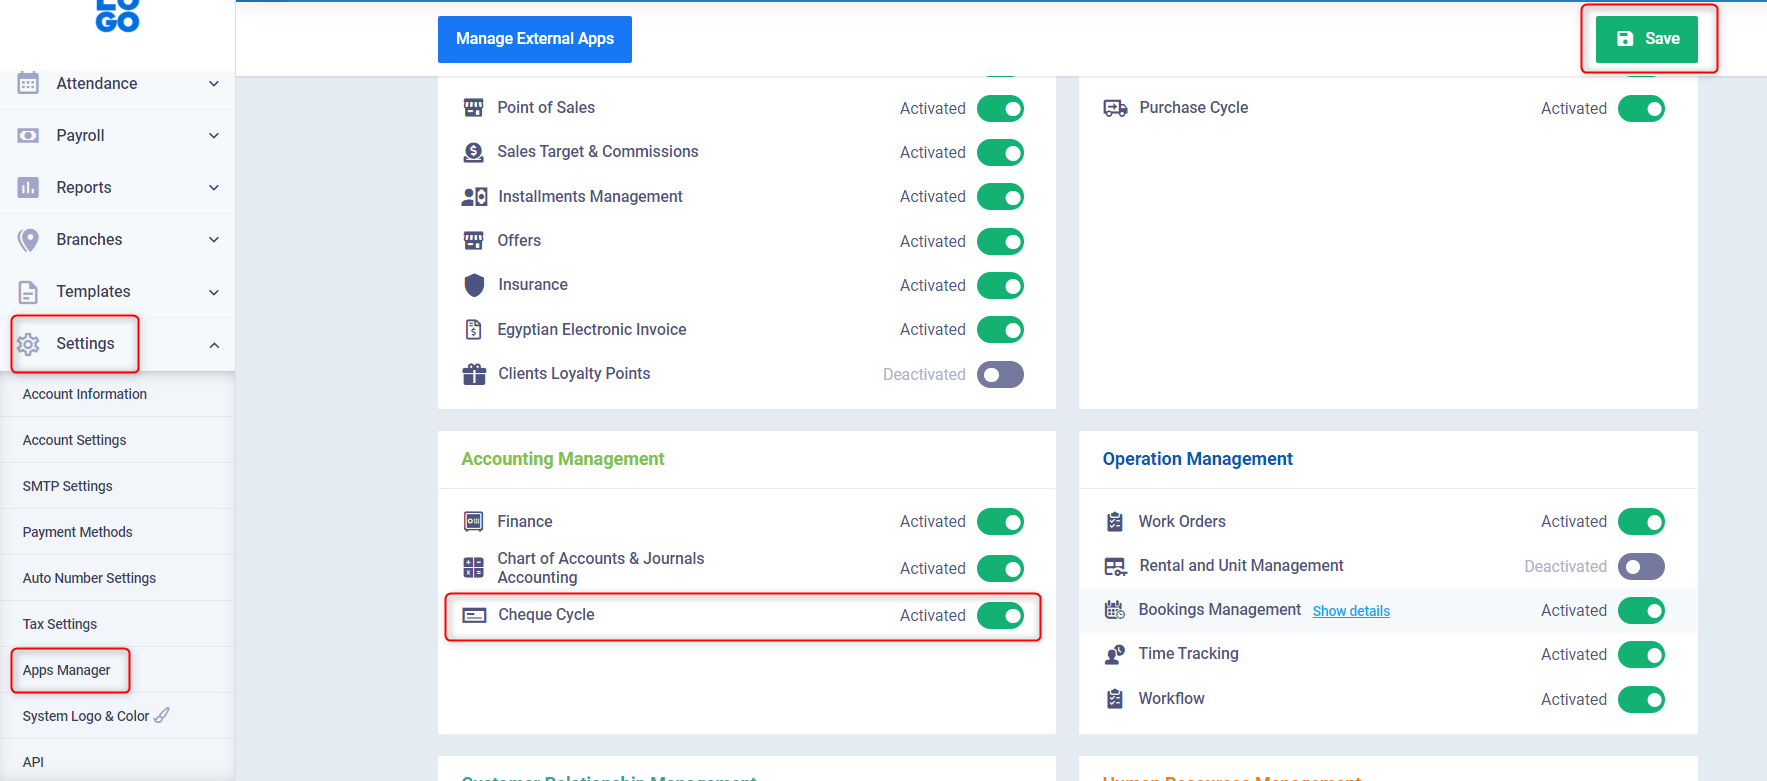
Then click on “Save“.
Registering and Managing Cheque Books
To be able to issue and document payable cheques, it is necessary for you to register cheque books in the account. Therefore, the system provides you with this feature, in addition to a set of procedures that facilitate the management of financial transactions.
Registering a Cheque Book
You can register a new cheque book after extracting it from the bank by clicking on “Cheque Cycle” from the main menu, then “Payable Cheques“, and then click on “Manage Cheque Books“.
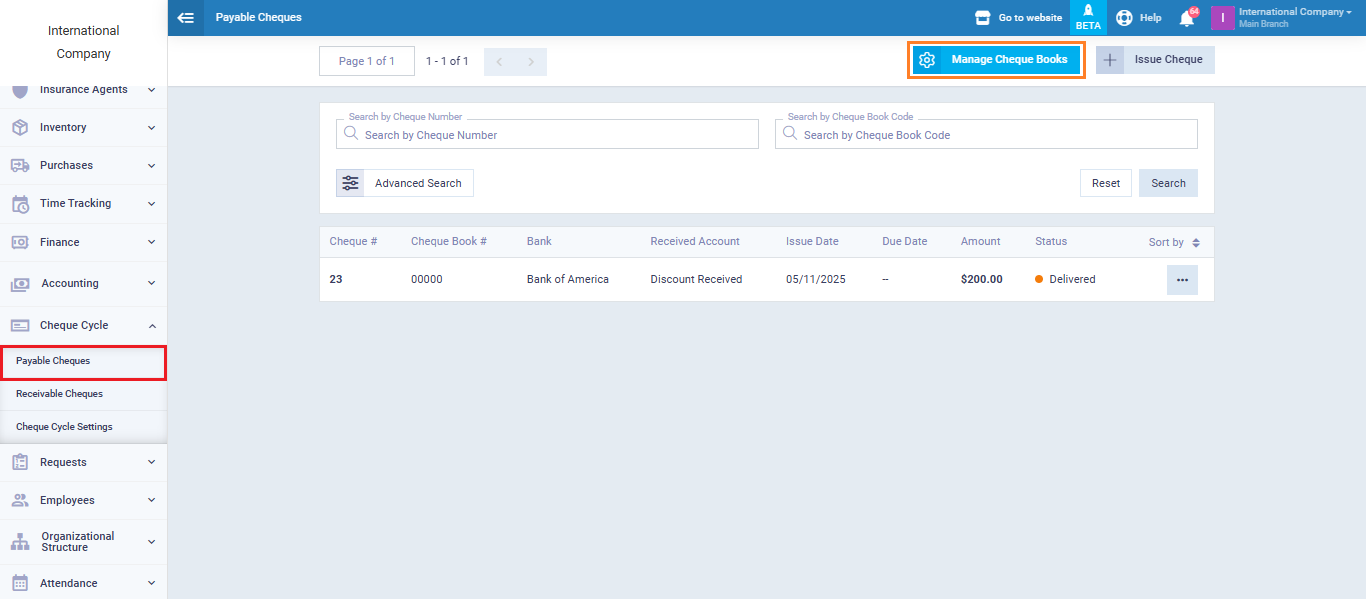
At the top right of the page, click on “New Cheque Book”, and a panel will appear for adding information about the new cheque book.
In our illustrative explanation, we will add a cheque book named “International Bank Cheque Book”, and we will fill its details as follows:
- Bank Name: Here we choose the bank from which we extracted the cheque book, and of course, it should be added to our account. Refer to the guide Adding a Bank Account to successfully complete this step.
- Cheque Book Number: We now enter the unique number of the cheque book.
- First Serial: Here we add the first serial number in the cheque book.
- Last Serial: And here we add the last serial number in the cheque book.
- Cheque Book Currency: We choose the currency in which we want to make the payments.
- Status: We determine the status of the book as “Active” to enable the cheque book for transactions.
- Notes: If we have any notes related to the cheque book, we can add them in this field.
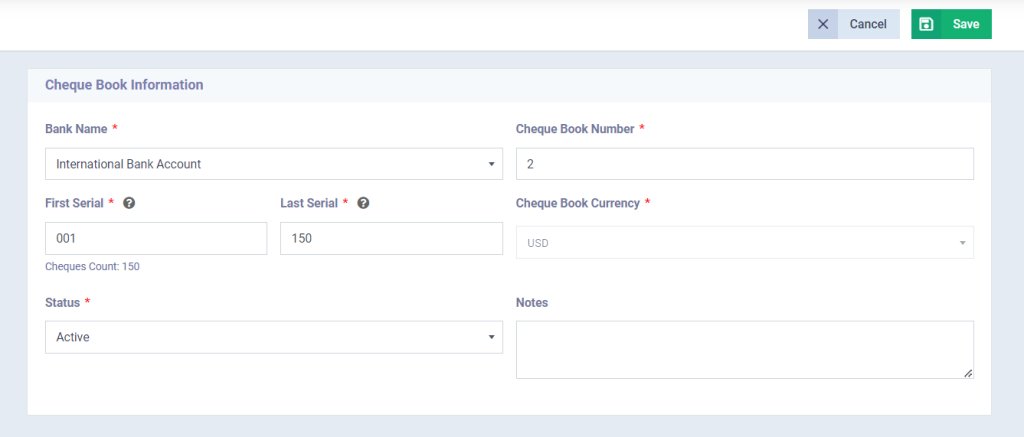
After filling in this information as shown in the previous picture, we click on “Save“.
Thus, we have successfully added a new cheque book to our account, which we can use to issue payable cheques. Before moving on to how to issue payable cheques, let’s quickly learn about the procedures provided by the system regarding the cheque book.
Actions on the Cheque Book
After learning how to register a new cheque book in your account, now get to know the actions you can take regarding the cheque book:
- Edit the cheque book.
- Deactivate the cheque book.
- Delete the cheque book.
To perform any of these three actions, click on “Cheque Cycle” from the main menu, then “Payable Cheques“, then “Manage Cheque Books“.
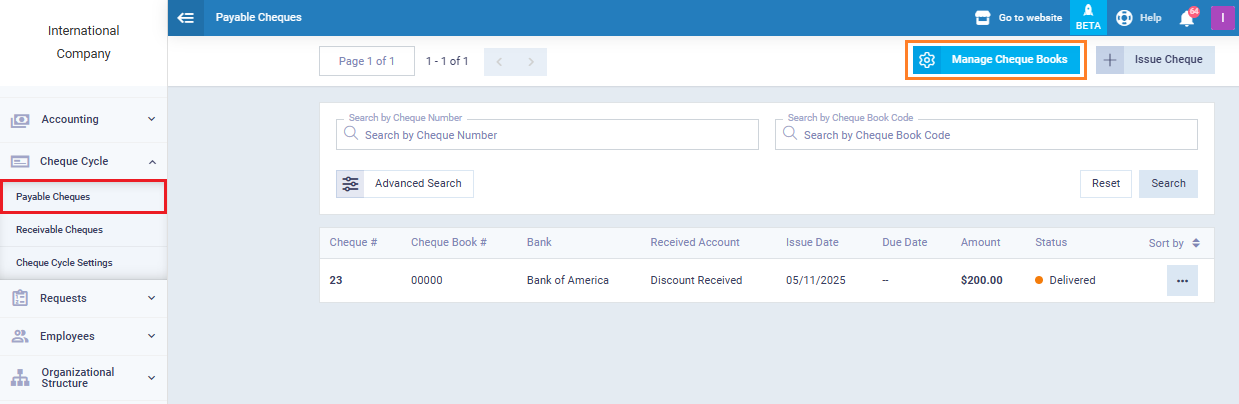
At the top of the cheque book control panel, the three options: Edit, Delete, Mark as Inactive will appear as shown in the picture:
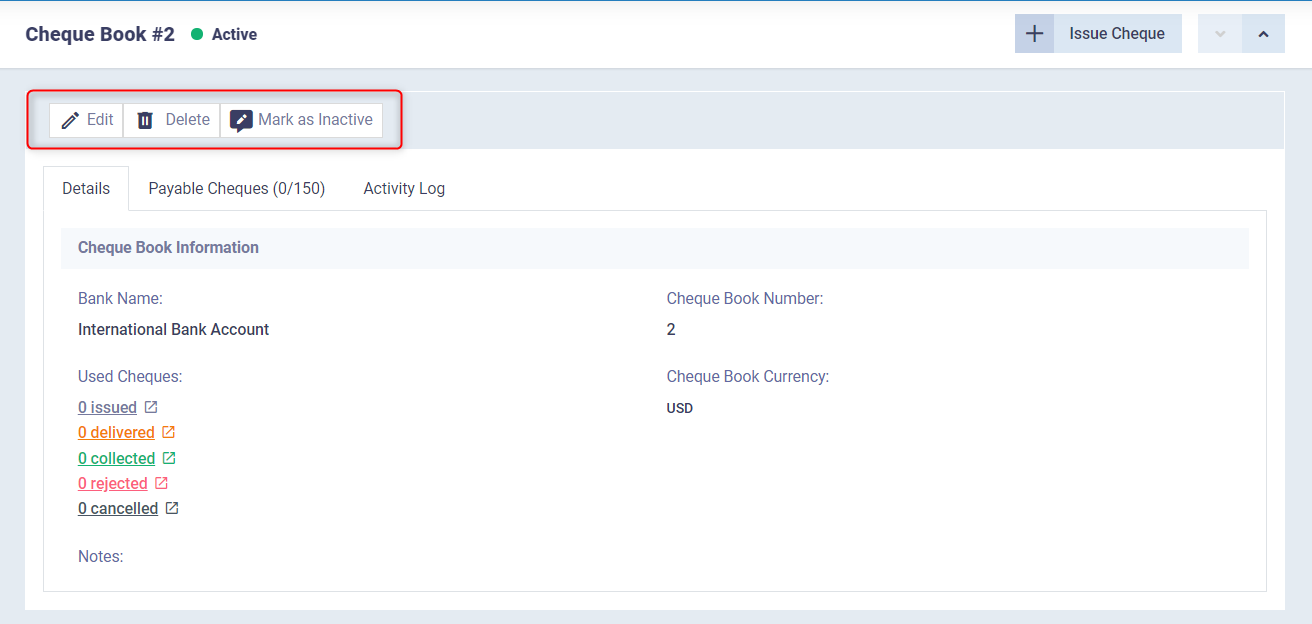
We can click on any of the three options to edit, deactivate, or delete.
Types of Cheques
There are two types of cheques in the system: payable cheques and receivable cheques. In the following lines, we will understand together what each of them means and how to manage them.
Payable Cheques
A payable cheque is one that you issue to a recipient, who then cashes the cheque value from the bank.
In the system, payable cheques go through three stages in order:
- Issuing the cheque.
- Delivering the cheque.
- Collecting the cheque.
In addition to the above, the system allows you to change the status of the cheque as follows:
- Cancelling the cheque.
- Rejecting the cheque.
Details of each of the above will be provided in the following sections.
Issuing the Payable Cheque
The cycle of payable cheques in the system begins with issuing a cheque, by clicking on “Cheque Cycle” from the main menu, then “Payable Cheques“, and then “Issue Cheque“.

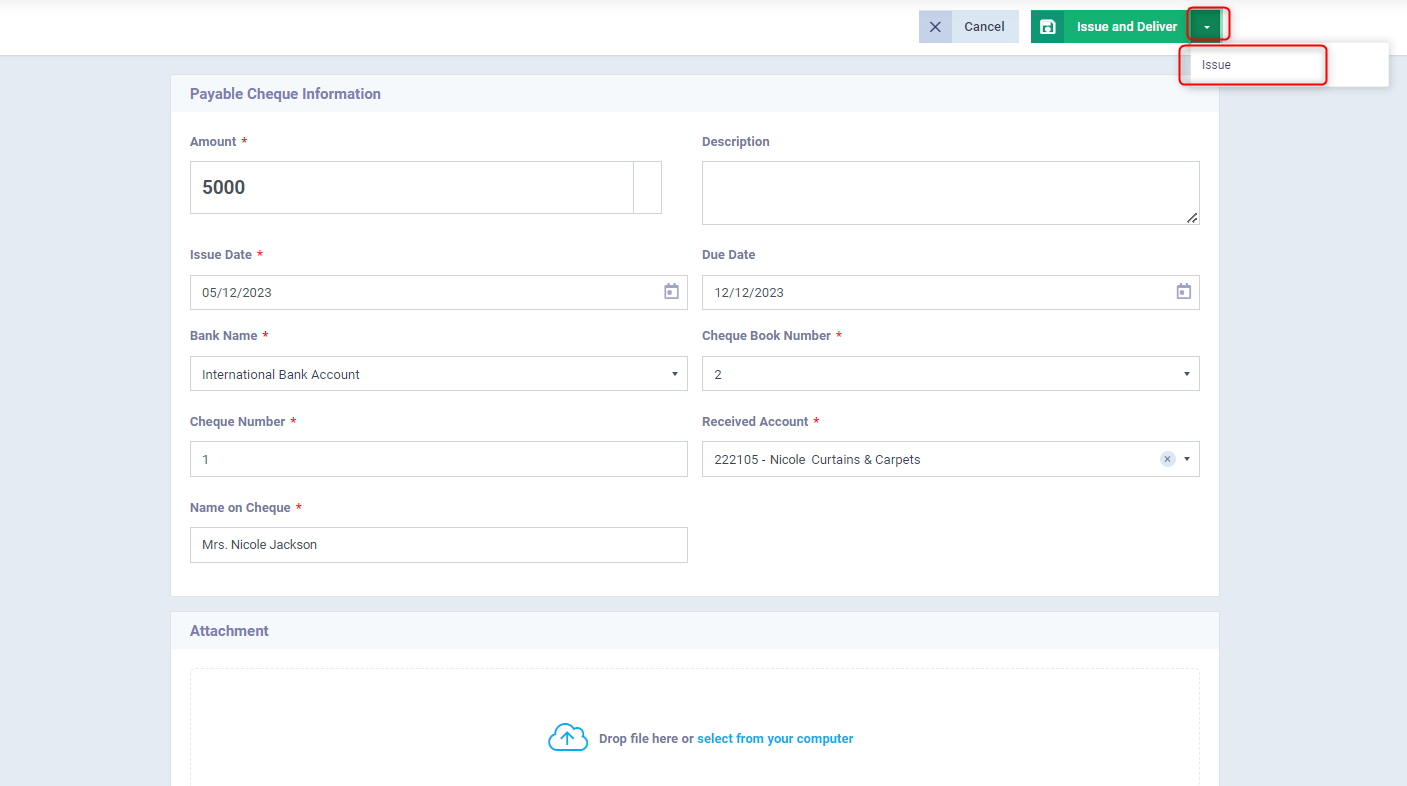
Now we begin filling in the cheque details as follows:
- Amount: Enter the financial amount included in the cheque.
- Description: If you have a specific description you want to add to the cheque, you can write it in this field.
- Issue Date: Here we specify the date of issuing the cheque. The issue date is when the cheque details are written and it is issued, regardless of its delivery to the vendor.
- Due Date: Here we determine the cheque’s due date (maturity date). The due date is when the vendor can cash the cheque value from the bank, and it cannot be cashed before this date.
- Bank Name: Choose the bank from which the cheque will be cashed, which must be already added to your account. Note that adding the bank name restricts the options in the cheque book field to those available in the bank account. Refer to the guide Adding a Bank Account.
- Cheque Book Number: Automatically shows the available cheque books in the bank account you selected. Therefore, if you do not specify a bank, you will not be able to choose a cheque book.
- Cheque Number: Add a number for the cheque.
- Received Account: Choose from the available accounts of the recipient, i.e., the vendor/ supplier.
- Name on Cheque: Choose a name to appear on the cheque.
- Attachment: If there is any file you want to attach to the cheque, choose it from your device and add it to this field.
Now choose between two options:
- The first: Issue the cheque only, without delivering it, meaning to retain the cheque without presenting it to the beneficiary.
- The second: Issue the cheque with delivery, meaning to issue and present it to the beneficiary to cash it as soon as the due date arrives.
We now click on the first option “Issue“. Once the cheque is issued, it is pending delivery so that the beneficiary can cash it when the due date arrives.
As we see, there are several options available as follows:
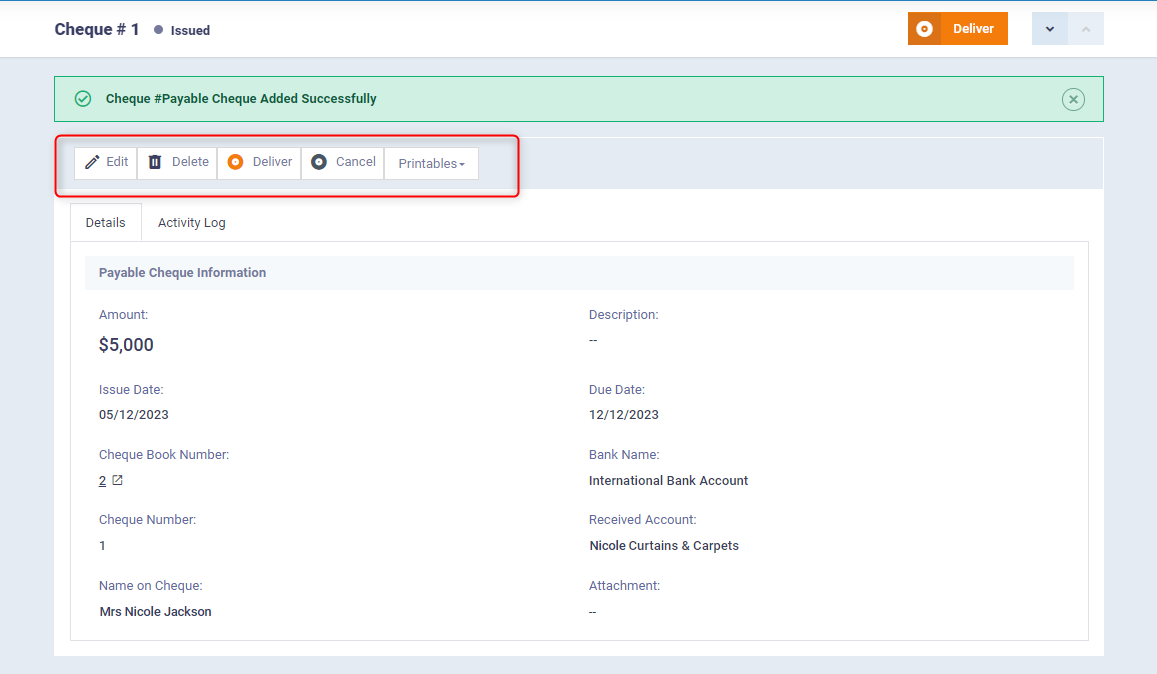
- Edit: By clicking on “Edit“, you will move to the control panel of the cheque details where you can make your desired changes. Note that a delivered cheque cannot be edited.
- Delete: By clicking on “Delete“, a confirmation message for the deletion process will appear, click “Yes” to confirm. Also, note that a delivered or collected cheque cannot be deleted.
- Cancel: By clicking on “Cancel“, the system considers this cheque as if it never existed. Naturally, a cheque cannot be canceled after being delivered to the vendor/supplier.
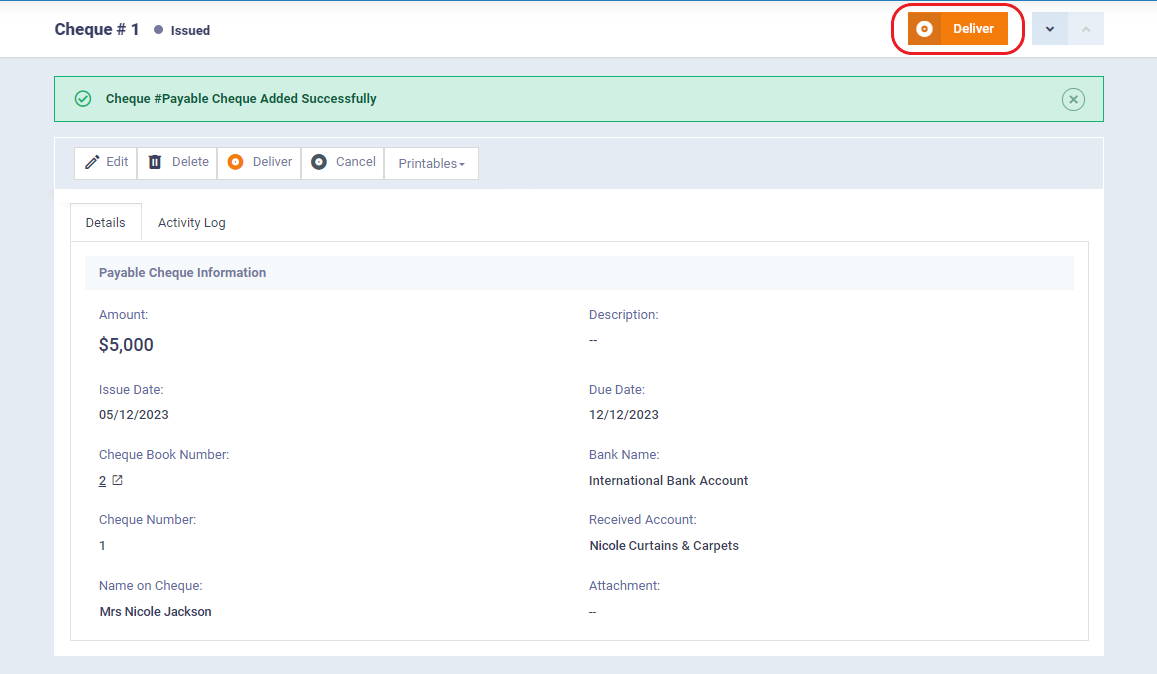
- Deliver: This is the most important option here; it moves us to the next stage of the cheque cycle, which is delivering the issued cheque to the deserving supplier. We will resume the explanation of this part under the title “Delivering the Payable Cheque“, so stay tuned!
Delivering the Payable Cheque
When clicking on “Deliver“, the cheque cycle moves to the next phase. After initially issuing the cheque, it is now issued and delivered to the supplier. The following panel appears as shown in the next image:
As seen in the panel that appears after clicking on “Deliver“, there are four options:
- Edit: After delivering the cheque, we can only edit the description field, where we can add a description for this cheque. Other cheque details cannot be edited.
- Undo Delivery: If we realize there is an issue with the cheque, we can return to the previous stage (issuing the cheque without delivering it to the supplier) by clicking on “Undo Delivery“.
- Reject: The rejection status is applied when there is insufficient balance in the bank account to cover the amount paid in the cheque. Therefore, the status of the cheque is changed to “Rejected“.
- Collect: To move to the next stage of the cheque cycle, we click on “Collect“, which indicates the supplier cashing the cheque value from the bank. Due to the importance of this procedure, we dedicate a separate explanation under the title “Collecting the Payable Cheque“.
Collecting the Payable Cheque
When clicking on “Collect“, we move to the final phase of the cheque cycle, which is the supplier collecting the due funds from the bank account.
As soon as we click on “Collect“, the following panel as shown in the next image will appear:

As shown in the previous image, the system requests adding the collection date, which naturally should not precede the cheque’s due date. If we have any additional notes, we can add them as well.
Then we click on the “Collect” button.
After clicking on “Collect“, we are redirected to the cheque information and collection details panel. Through this panel, the system allows the possibility of retracting the collection by clicking on “Undo Collection” and returning to the previous step.
Receivable Cheques
A receivable cheque is one that you cash from the bank under any item of cash settlement.
Just like with payable cheques, the cycle of receivable cheques is completed in stages and procedures:
- Issuing the cheque.
- Collecting the cheque.
- Depositing the cheque.
- Rejecting the cheque.
And here’s the detailed explanation:
Issuing a Receivable Cheque
The cycle of receivable cheques starts by recording their data in your account, by clicking on “Cheque Cycle” from the main menu, then “Receivable Cheques“.

Then click on the “Receive Cheque” button, and enter the following cheque data:
- Amount: Specify the amount received.
- Description: Add a description to appear on the cheque.
- Issue Date: Specify the date of cheque issuance.
- Due Date: Specify the cheque’s due date (maturity date).
- Cheque Number: Enter the number of the received cheque.
- Received from Account: Choose the receiving account from the drop-down menu in the chart of accounts. The receiving account is the client’s account from which the funds will be collected.
- Collect Account: Choose the account where you wish to collect the cheque, like a bank account, for instance.
- Name on Cheque: Write the name you want to appear on the cheque.
- Attachment: Select from your device the file you want to upload as an attachment.
- Endorse: In addition to the above, there is a feature available in the data of receivable cheques called “Endorsement,” which allows you to transfer the cheque’s ownership to someone other than the recipient, enabling them to cash it in their capacity. As soon as you activate the “Endorsement” option, a field appears for writing the name of this person authorized to withdraw the funds from the bank.

After filling out all the data, click on the “Receive” button, and the control panel will transition to the following image:
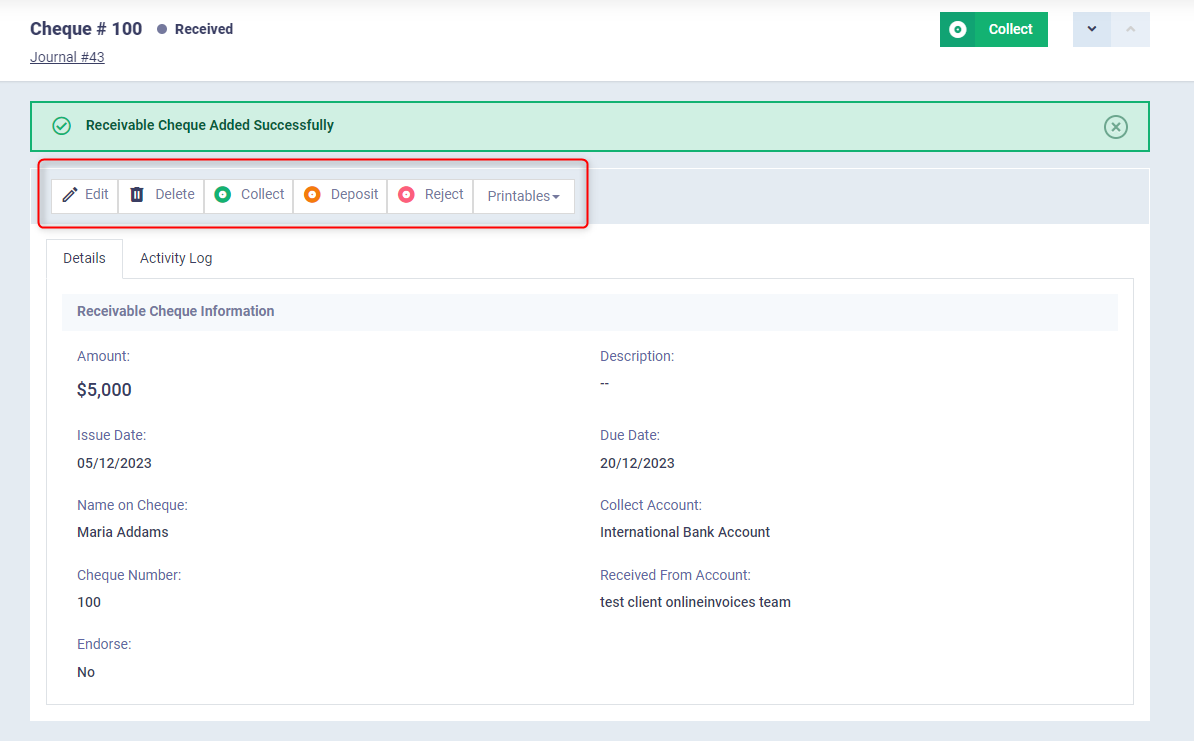
As shown in the previous image, we have a set of actions that we can take regarding this received cheque.
And these actions are as follows:
- Edit: By clicking on “Edit“, the system takes you back to the cheque data where you can make adjustments and save your changes by clicking “Save“.
- Delete: By clicking “Delete“, a confirmation message for the deletion process appears, click “Yes” if you are sure about deleting the cheque.
- Deposit: Since the life cycle of a cheque can extend for a long period based on prior agreements, the deposit action is taken to record the journal entry earlier than the actual cashing of the cheque, transforming it into a cheque under collection to be cashed immediately upon the due date.
- Reject: The rejection status is applied when there is insufficient balance in the bank account to accommodate the value supposed to be received in the cheque, thus changing the cheque’s status to “Rejected“.
- Collect: This is the most important option here; it moves us to the next stage of the cheque cycle, which is the collection of the cheque received from the client. We will continue explaining this part under the title “Collection of the Receivable Cheque“, so stay tuned.
Collection of the Receivable Cheque
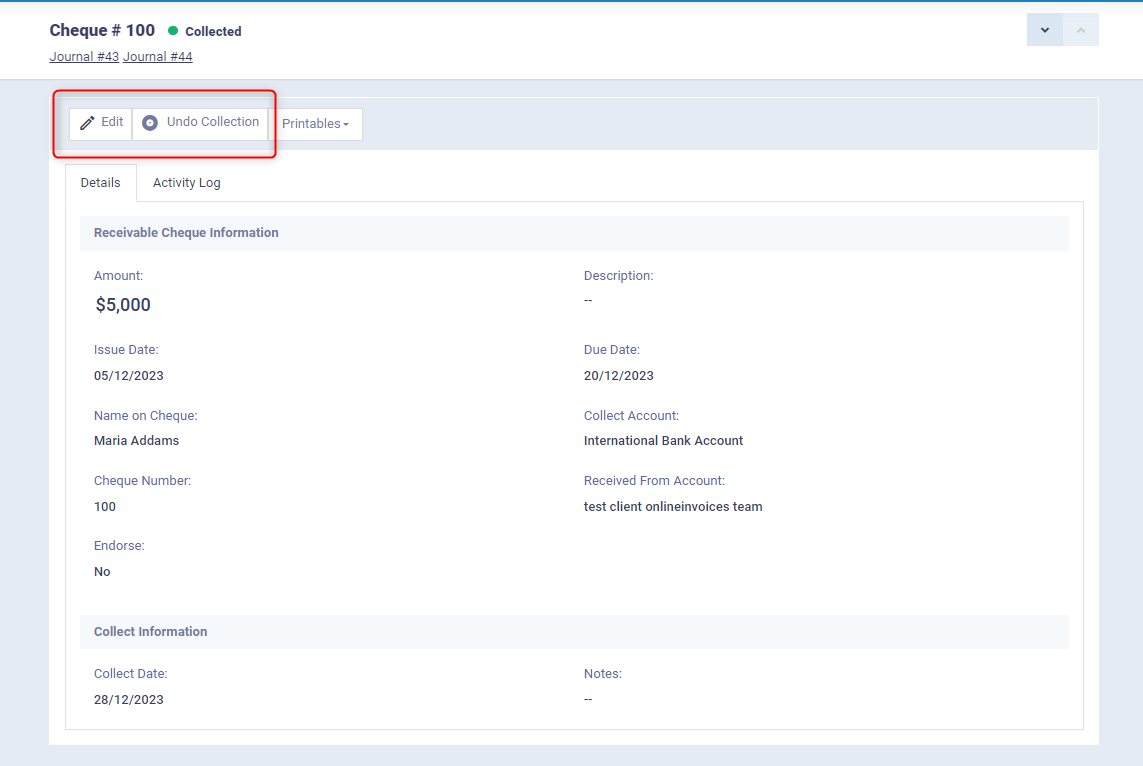
After clicking on “Collect“, the status of the cheque changes from just “Received” to “Collected”, and the control panel transitions to the following image:

As shown, the system asks to specify the collection date, which naturally should not precede the due date. You can also add notes to the cheque.
After completing the collection process, the following panel appears, where you can only modify the collection date and not any other information on the cheque. You also have the option to take a step back and undo the collection.
Tracking the Cheques
You can track cheques in the system by reviewing the cheque activity log and the actions taken on it since its issuance. You can also track the status of cheques through cheque books. The details of both methods are as follows:
Tracking the Activity Log of the Cheque
You can track all the activities performed on a cheque, such as issuance, delivery, modification, etc., by clicking on “Cheque Cycle” from the main menu, then we click on:
- Payable Cheques, if the cheque we want to track is payable.
- Receivable Cheques, if the cheque we want to track is receivable.
After selecting the type of cheque, a list of all receivable or payable cheques appears according to our selection.

We click on the cheque whose details we want to review.
Now, we click on “Activity Log” and a chronological list of all activities performed on the cheque will appear.

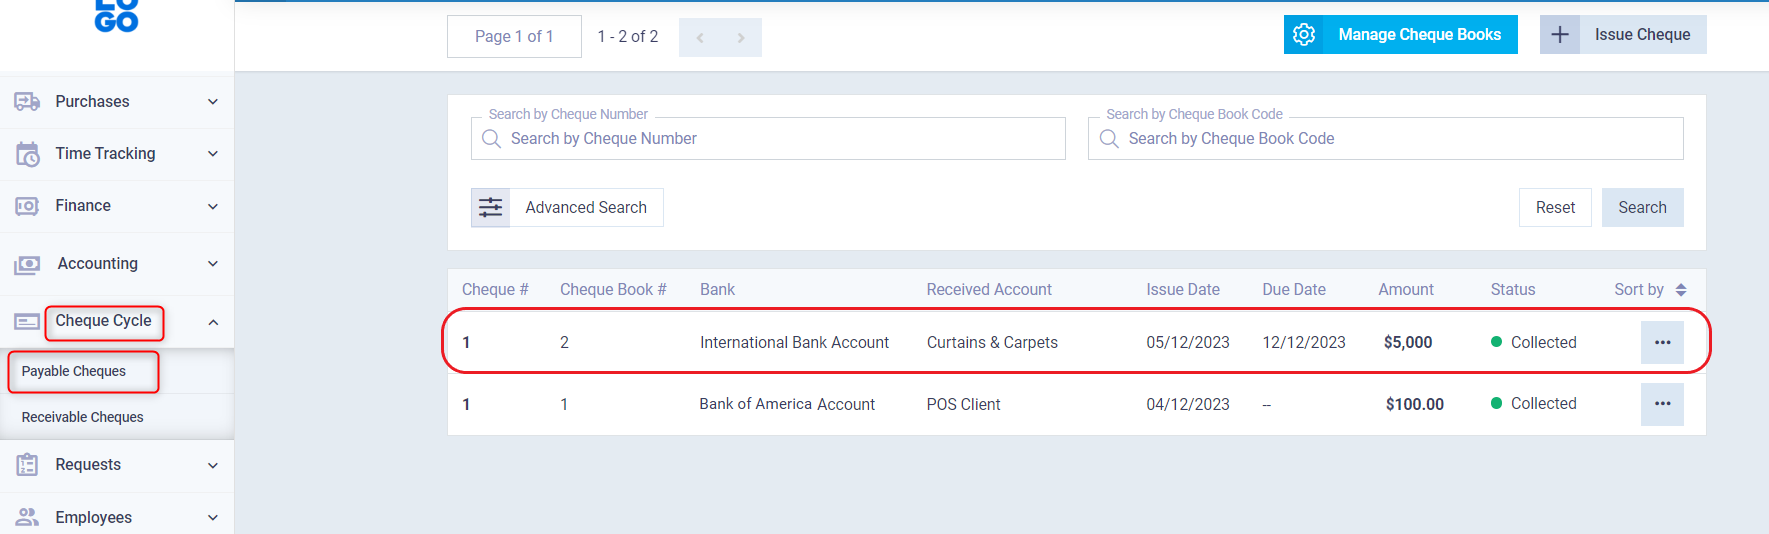
Tracking the Statuses of the Cheques
As we previously explained, cheques acquire a series of statuses throughout their lifecycle. To track these statuses, you can click on “Cheque Cycle” from the main menu, then “Payable Cheques“, and then “Manage Cheque Books“.

Now, we select the cheque book whose cheque statuses we want to track. Through the “Details” window, we can find out the number of cheques associated with each status, which are as follows:
- Issued.
- Delivered.
- Collected.
- Rejected.
- Cancelled.
You can click on any status to view the cheques associated with it.

Thus, we conclude our guide on the cheque cycle in the system, having covered how to activate the app in the account, register a new cheque book and manage it. We then explored the two types of cheques in the system: payable and receivable, and the available permissions for each. We also learned how to review the activity log for a cheque, and concluded with an explanation of the accounts for both payable and receivable cheques.