


Complete Employee Asset Lifecycle Guide
The system allows you to manage employee assets completely, starting from setting up asset types, physical locations, and warehouses, through adding and assigning assets to employees, and ending with maintenance and retirement processes. This guide explains all the steps required to complete the employee asset lifecycle correctly.
Before You Start: Configure Employee Asset Settings
Before adding assets, you need to configure three main elements: asset types, physical locations, and warehouses.
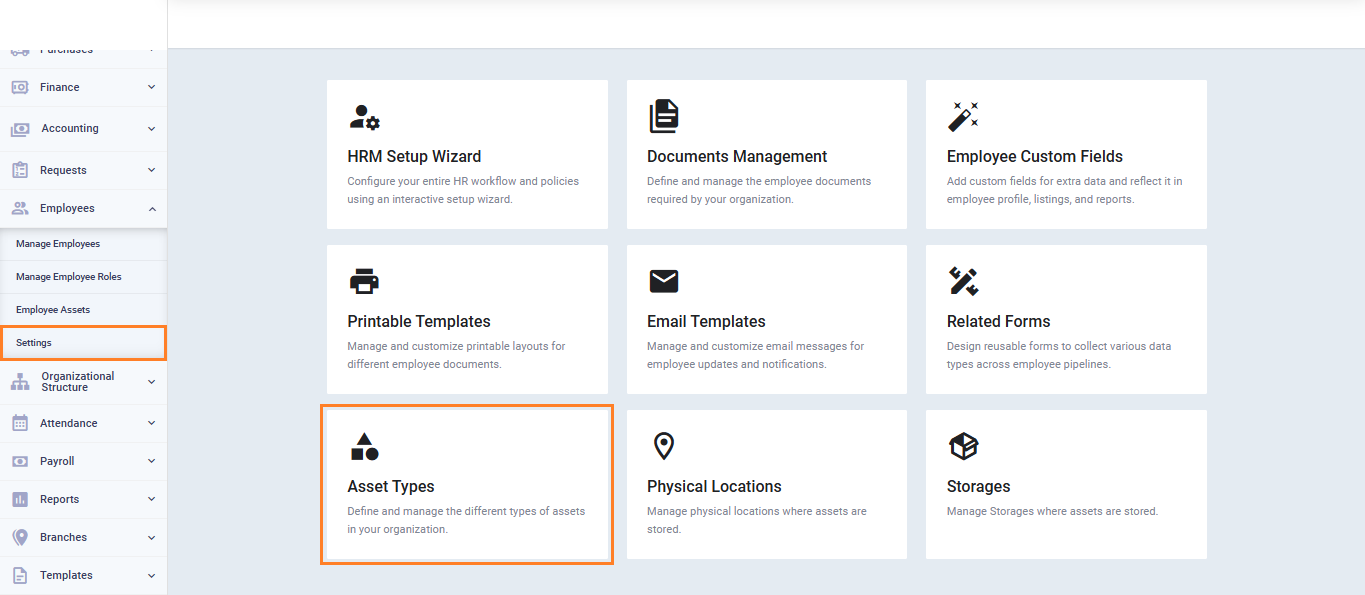
Add Asset Types
- From the main menu, click “Employees“.
- Click “Employee Settings“.
- Select “Asset Types“.
- Click “Add Asset Type“.
- Enter the asset type “Name” and description.
- Make sure the status is set to “Active“.
- Click “Save“.
Add Physical Locations
- From the main menu, click “Employees“.
- Click “Employee Settings“.
- Select “Physical Locations“.
- Click “Add Physical Location“.
- Enter the location “Name” and “Description“.
- Make sure the status is set to “Active“.
- Click “Save“.

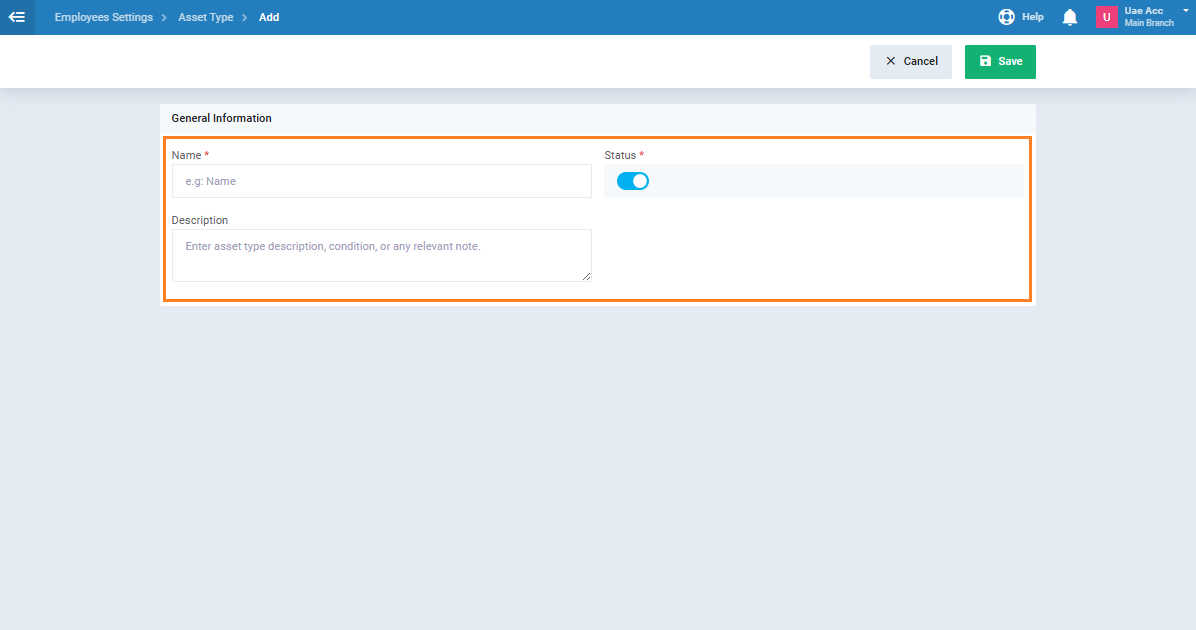
Add Storage
- From the main menu, click “Employees“.
- Click “Employee Settings“.
- Select “Storage“.
- Click “Add Storage“.
- Enter the “name” and “description“.
- Make sure the status is set to “Active“.
- Click “Save“.
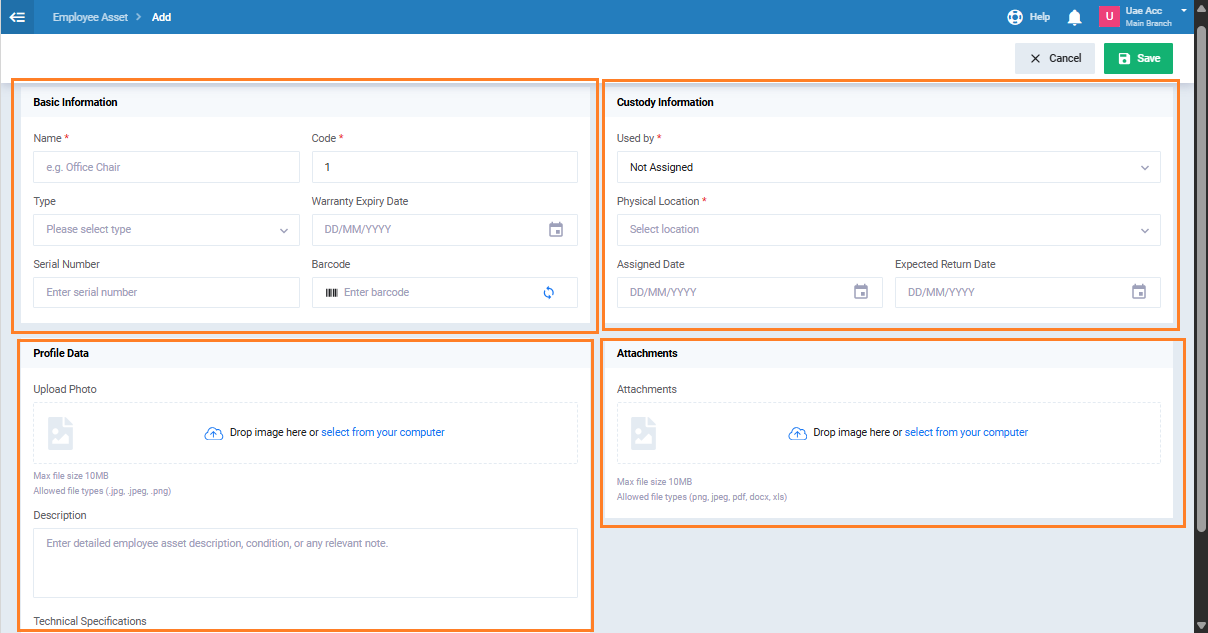
First: Add a New Employee Asset
- From the main menu, click “Employees” then select “Employee Assets“.
- Click “Add Employee Asset“.
- Select “Create New Asset” from the selection screen.
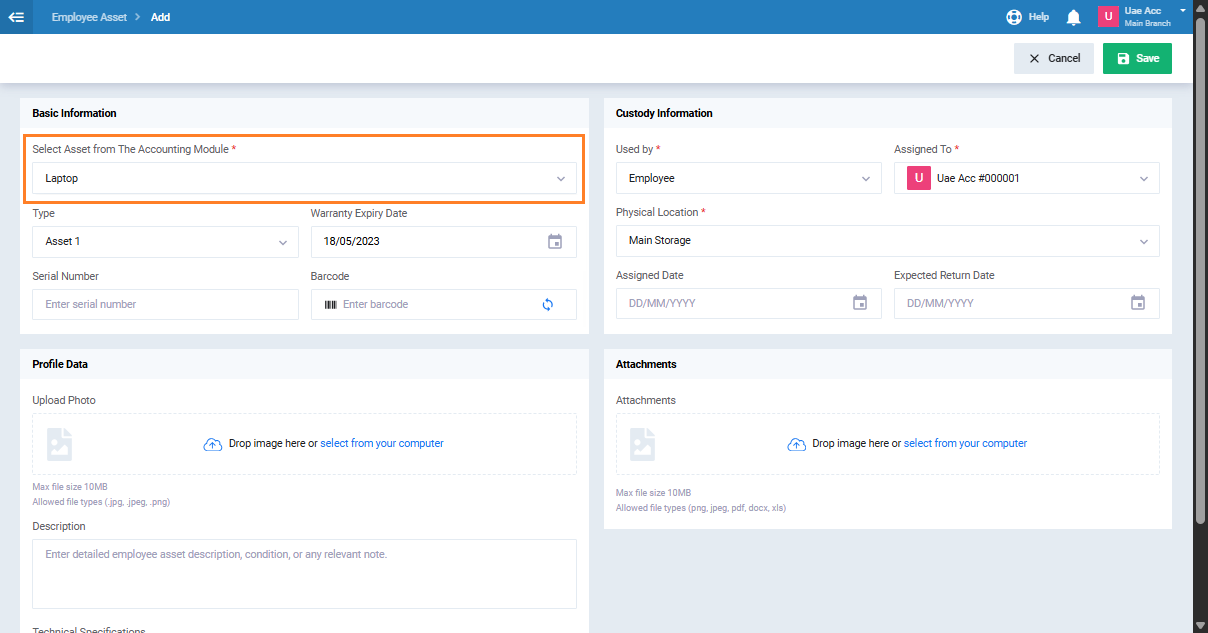
- Enter the asset details:
- Asset Name
- Asset Type
-
- Serial Number
- Barcode
- Used by: select an employee, warehouse, or leave it unassigned
- Physical Location
-
-
- Description
- Click on the “Save” button.
Second: Link the Asset to an Existing Accounting Asset (Optional)
If you want to link the asset to an existing asset in the Fixed Assets module:
- Click “Add New Asset“.
- Select “Link to Existing Accounting Asset” from the selection screen.
- In the “Select Asset from The Accounting Module” field, search by asset name, code, serial number, or barcode.
- Select the required asset from the search results.
- The asset data is imported automatically from the accounting asset.
- Review and edit the imported data if needed.
- Click on the “Save” button.
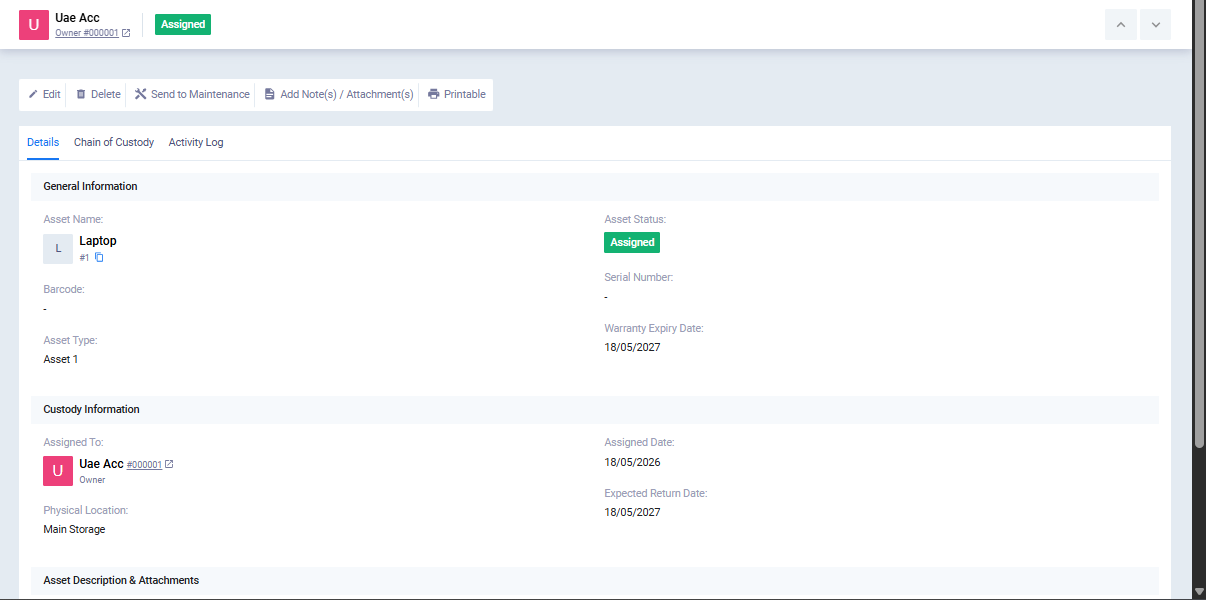
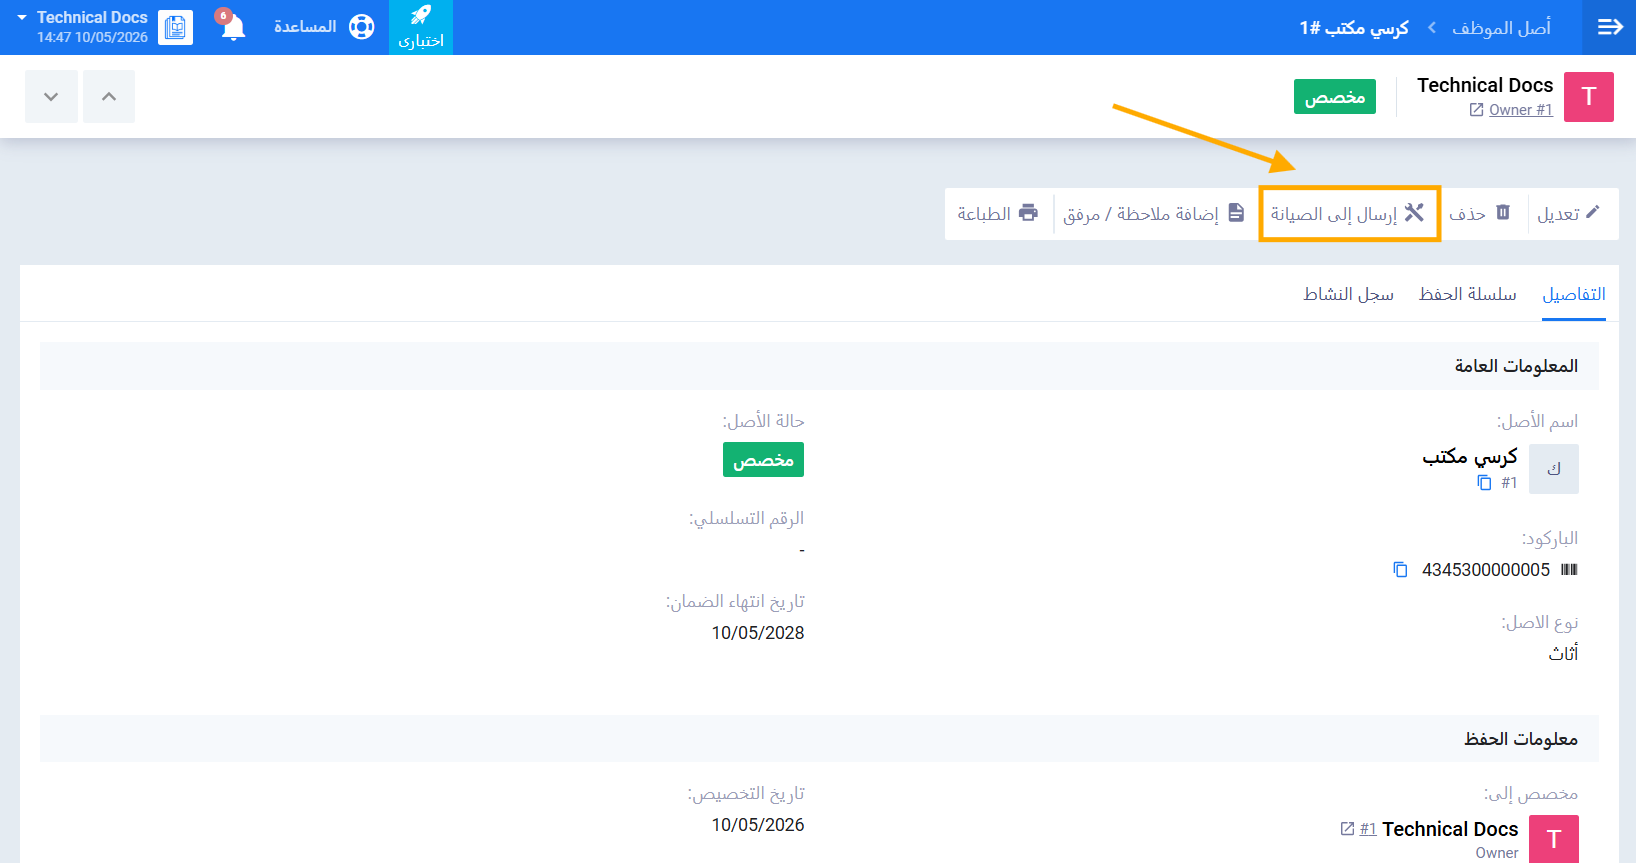
Third: Send the Asset to Maintenance
- Open the required asset from the “Employee Assets” list.
- اضغط على زر إرسال إلى الصيانة.
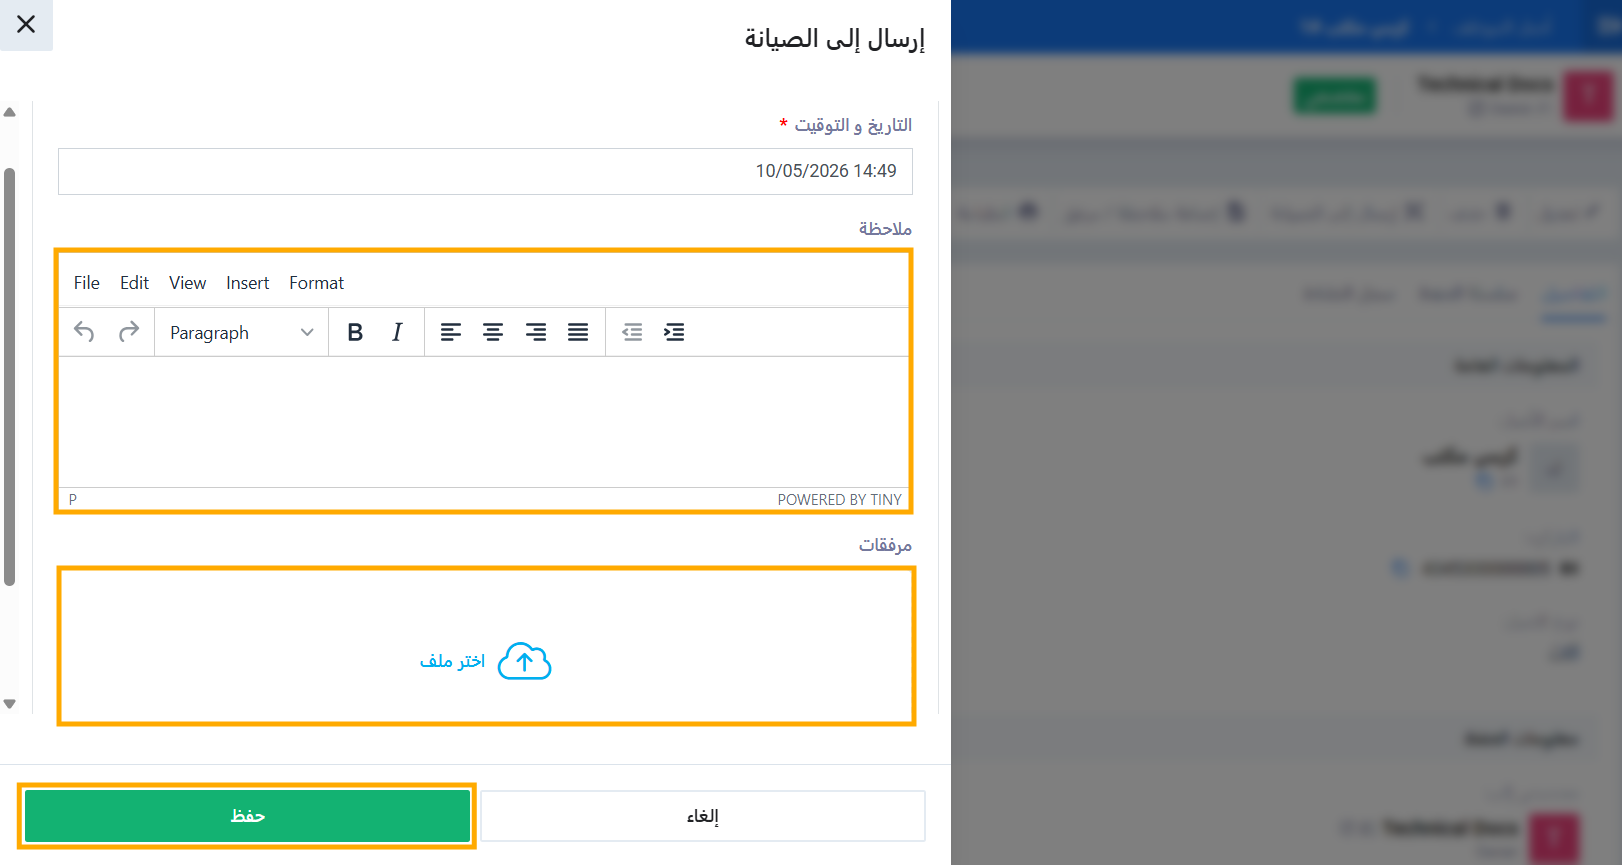
- تظهر نافذة منبثقة لإدخال تفاصيل الصيانة:
- أدخل ملاحظة توضح سبب الإرسال للصيانة. (اختياري)
- أرفق أي مستندات ذات صلة. (اختياري)
- اضغط على حفظ.
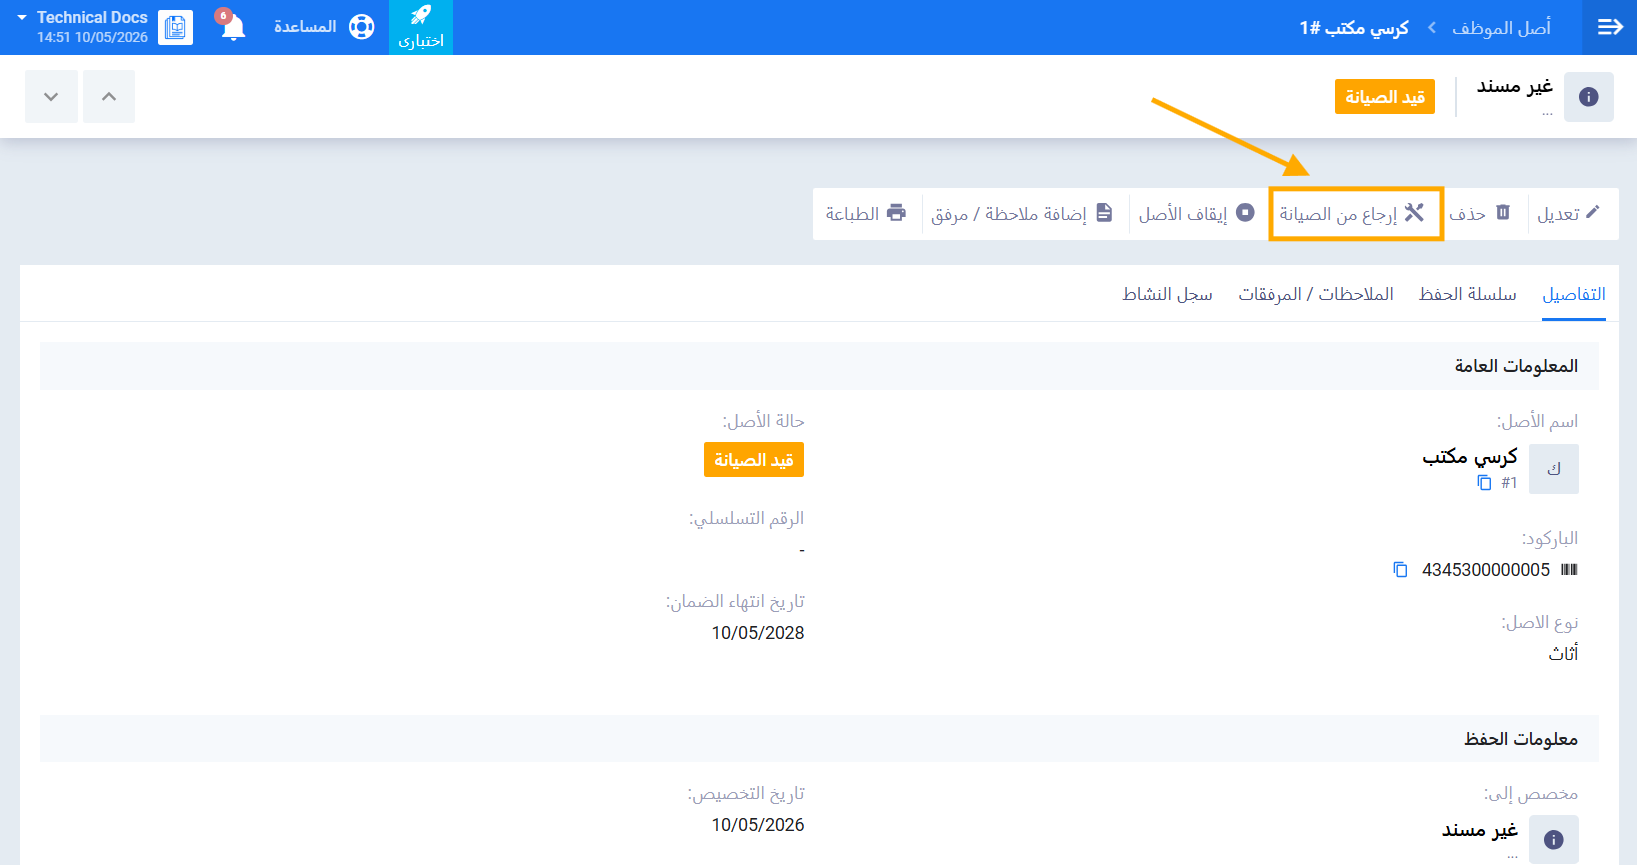
رابعاً: إعادة الأصل من الصيانة
- قم بعرض الأصل الذي حالته قيد الصيانة.
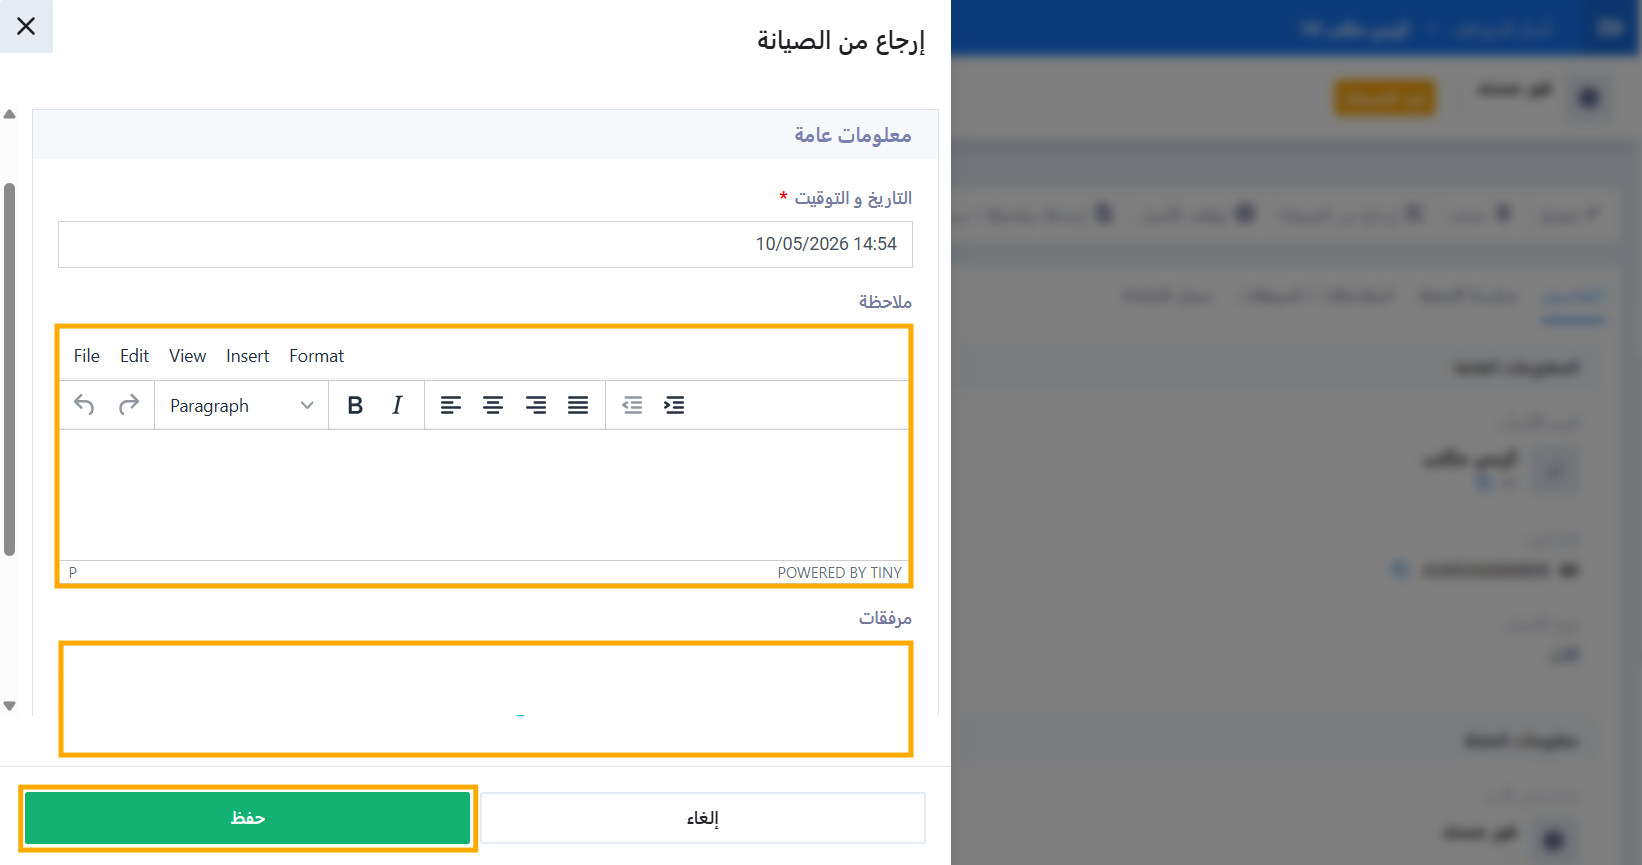
- اضغط على زر إرجاع من الصيانة.
- أدخل ملاحظة عن نتيجة الصيانة. (اختياري)
- أرفق أي مستندات ذات صلة. (اختياري)
- اضغط على حفظ.
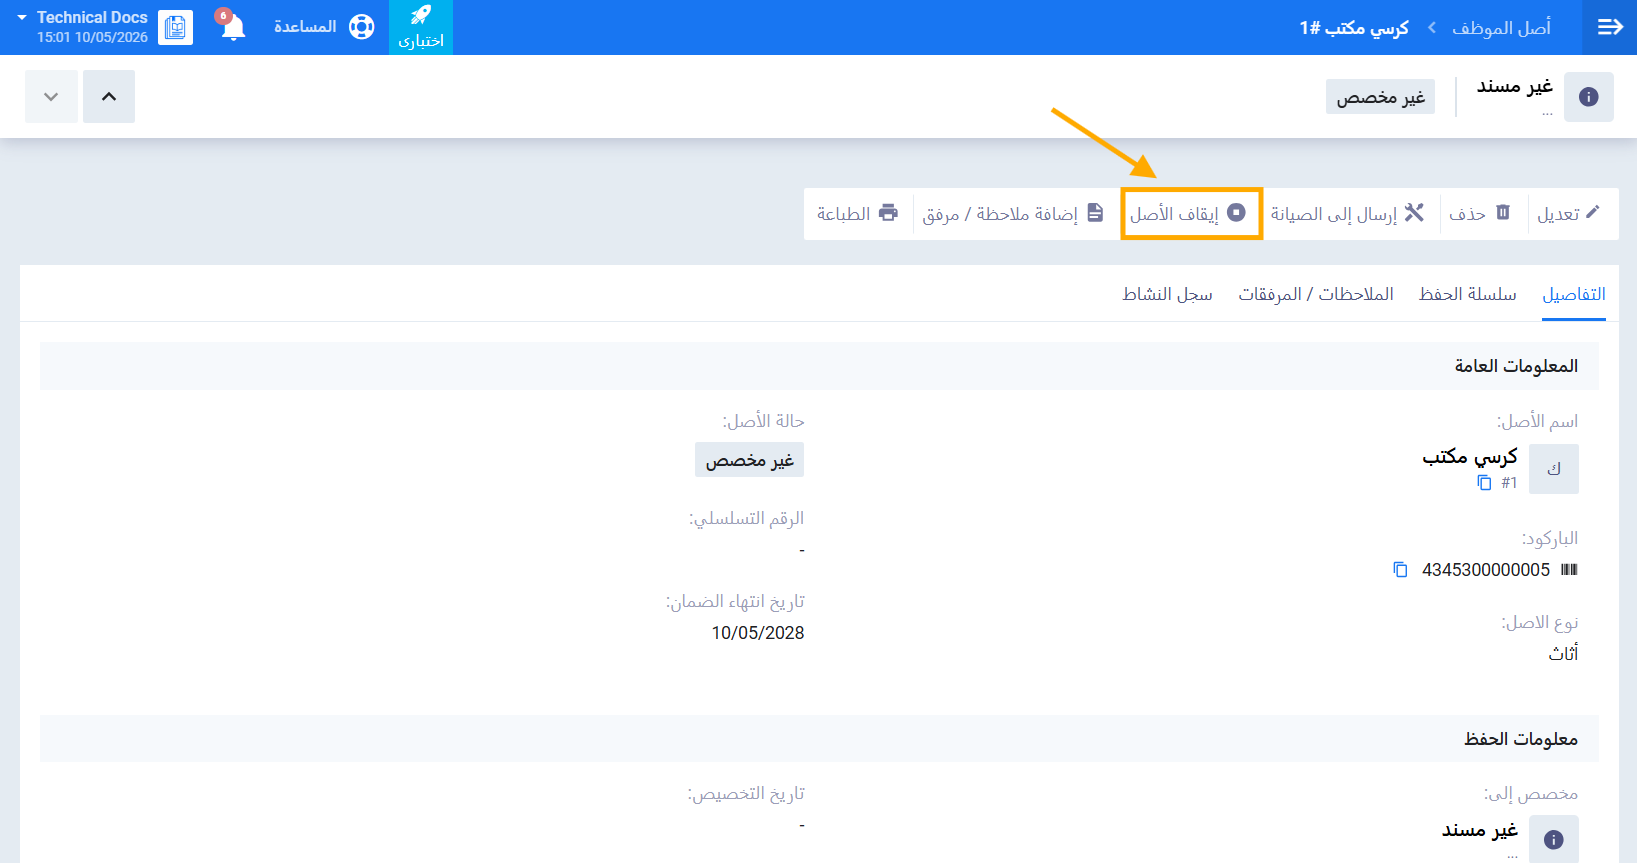
خامساً: إيقاف الأصل
عندما يصبح الأصل خارج الاستخدام التشغيلي يمكنك إيقافه:
- افتح الأصل المطلوب من قائمة أصول الموظفين.
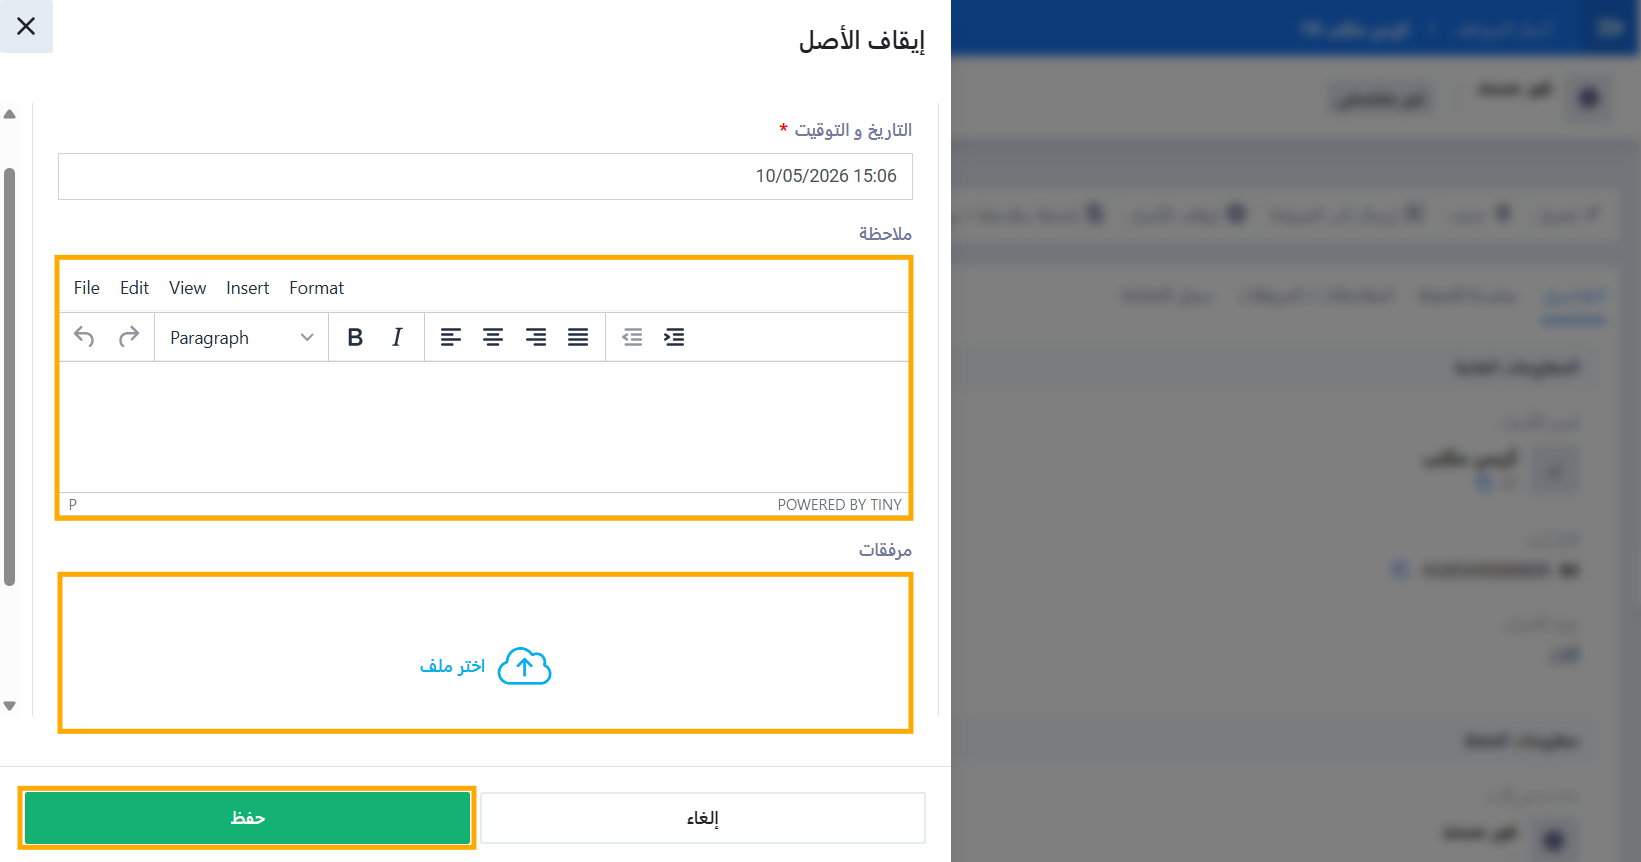
- اضغط على زر إيقاف الأصل.
- أدخل ملاحظة توضح سبب التقاعد. (اختياري)
- أرفق أي مستندات ذات صلة. (اختياري)
- ستظهر رسالة تأكيد — اضغط على نعم للمتابعة.
ملحوظة: حتى تتمكن من إيقاف الأصل يجب ان يكون حالة التخصيص للأصل: غير مخصص.
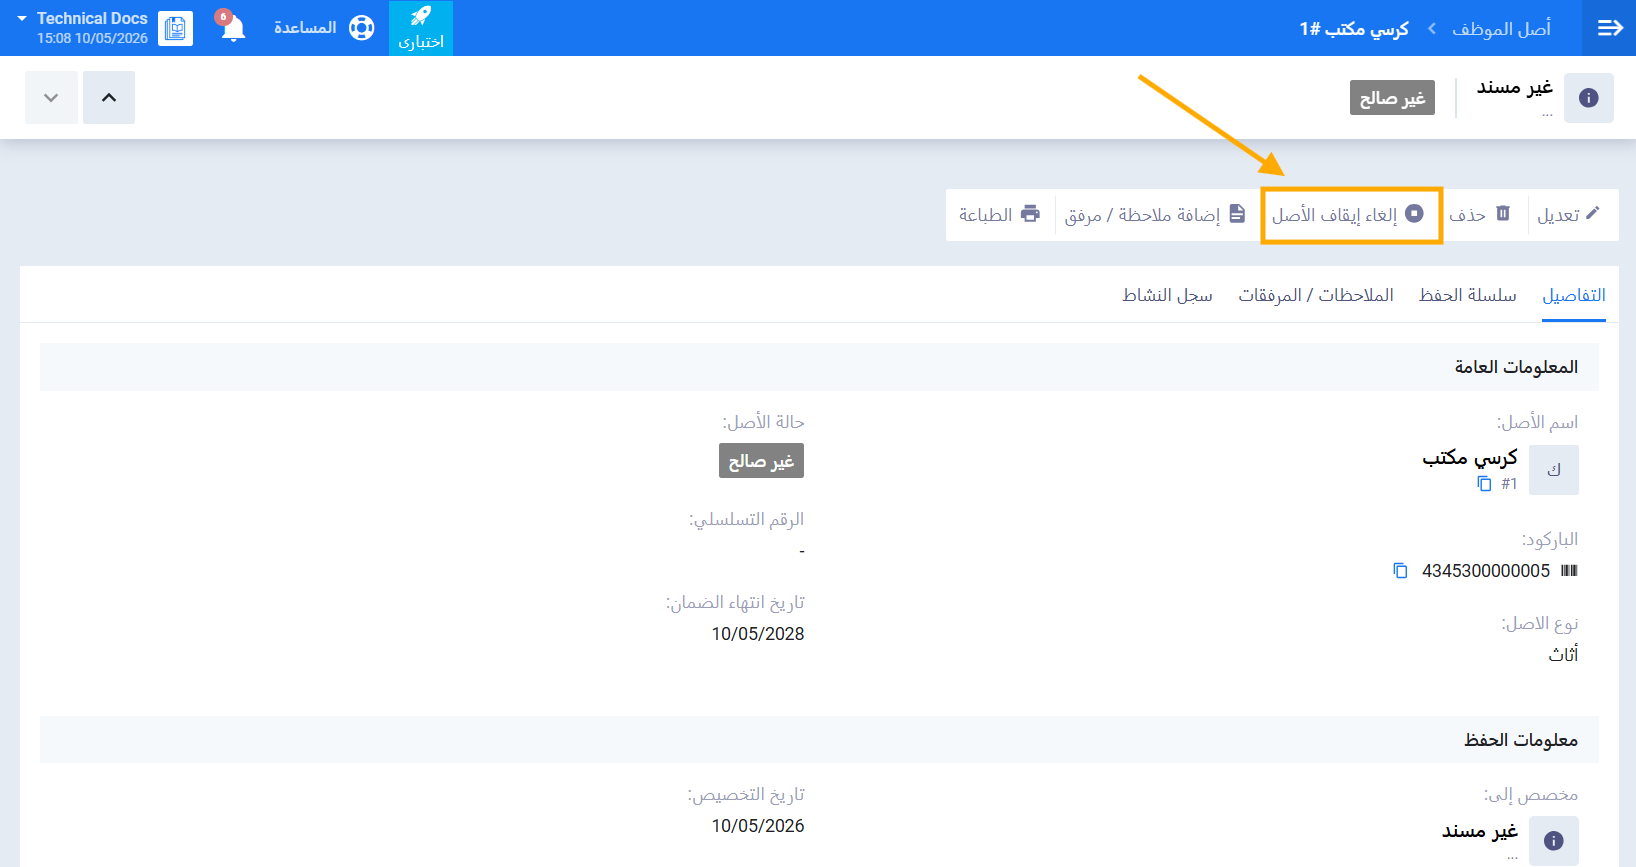
سادساً: إلغاء إيقاف الأصل
إذا تم إيقاف الأصل بشكل خاطئ يمكنك إلغاء الإيقاف وإعادته للاستخدام التشغيلي:
- قم بعرض الأصل الذي حالته غير صالح والمطلوب إلغاء إيقافه.
- اضغط على زر إلغاء إيقاف الأصل.
- أدخل ملاحظة توضح سبب إلغاء التقاعد. (اختياري)
- أرفق أي مستندات ذات صلة. (اختياري)
- ستظهر رسالة تأكيد — اضغط على نعم للمتابعة.
ملخص حالات الأصل ودورة حياته
| الحالة | المعنى | الإجراءات المتاحة |
|---|---|---|
| غير مخصص | الأصل موجود ولم يُعيَّن لأي موظف أو مخزن | تعيين إلى موظف، تعيين إلى مخزن، إرسال للصيانة، إيقاف |
| مخصص | الأصل مُعيَّن لموظف | إرسال للصيانة، إيقاف، تعديل التخصيص |
| في المخزن | الأصل محفوظ في المخزن | تعيين لموظف، إرسال للصيانة، إيقاف |
| تحت الصيانة | الأصل مُرسَل للصيانة | إرجاع من الصيانة |
| غير صالح | الأصل موقوف وخارج الاستخدام التشغيلي | إلغاء إيقاف الأصل |