


Attendance Restrictions Guide
The fingerprint is considered the most common method to prove employees’ attendance at the workplace. However, what if the nature of the employee’s work, such as a site engineer or sales representative, does not require their presence at the workplace? In such cases, attendance restrictions are used, allowing the employee to prove that they are present at their remote workplace at the specified time.
In this topic, we closely explore attendance restrictions and how to apply them using the system attendance app.
What are the Attendance Restrictions and what are they used for?
The “attendance markers” or “attendance restrictions,” as they can be referred to in the system, encompass three means through which an employee’s presence is proven when their job tasks require being outside the company premises. These methods include:
- IP address.
- Geographic location.
- Capturing a photo of the employee.
The system allows you to assign one or more of these restrictions, or all of them, depending on the nature of the work. Consequently, the three restrictions can be enforced on the employee mandatorily, and they won’t be able to complete the login process without fulfilling all three restrictions.
Alternatively, you can make one of the restrictions mandatory while leaving the others optional. In this case, the employee must execute the mandatory restriction during login, or else the process won’t be completed. We’ll explore how to implement this and link the restrictions to employee profiles in the following lines.
How to add a New Attendance Restriction
To create an attendance restriction for an employee, click on “Attendance” from the main menu, then “Settings,” and click on the “Attendance Restrictions” card as shown in the following image:

Now, click on the “New Attendance Restriction” button to start filling in the restriction details as follows:
- Name: Add a distinctive name, for example, “Sales Representative Attendance Restriction.”
- Status: Set the status to “Active” for the restriction to be recognized during operations.
Afterward, specify the type of attendance restriction and whether it is mandatory or optional, as follows:
- Type of Attendance Restriction: Choose the type of restriction based on the nature of the work.
- Validation: Specify whether the entry is “Required” or “Optional.”
Complete the remaining details for the attendance restriction, such as its description, restrictions, and any additional settings required. Finally, click on the “Save” button to create the new attendance restriction.
Assigning the "IP Address" as an Attendance Restriction
To apply this restriction, the IP addresses of the allowed networks for the employee to log in through must be linked to your account. Once the employee logs in through these networks, the system records their attendance.
- Validation: Specify whether this restriction is required or optional.
- Allowed IPs: In this field, add the IP addresses of the networks through which the employee can log in to the system and prove their attendance.

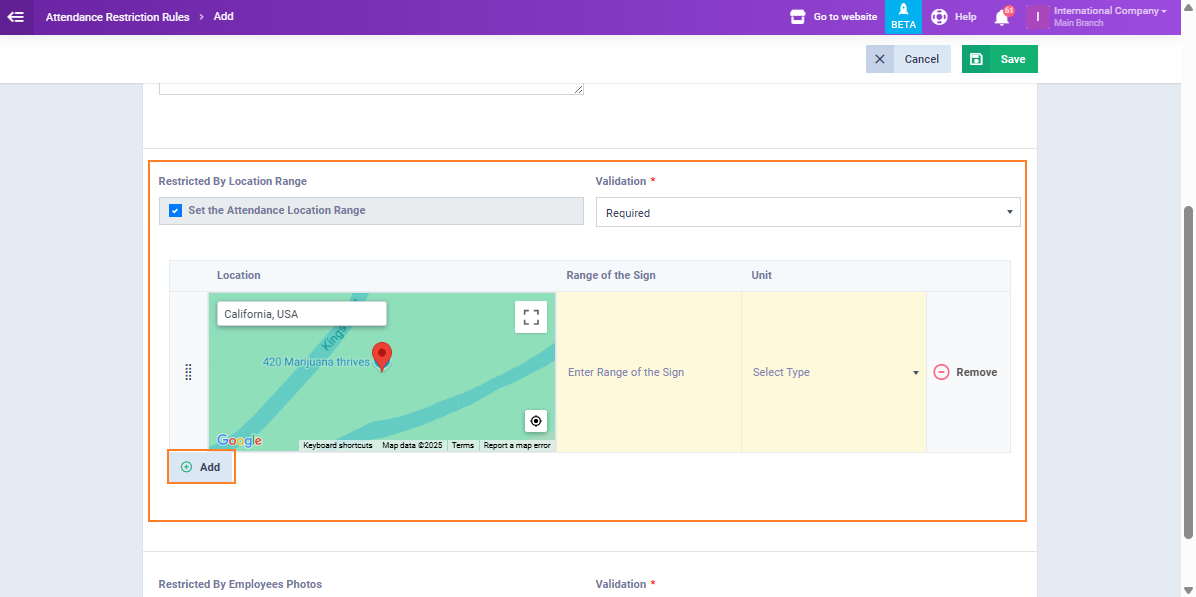
Assigning the "Geographical Location" as an Attendance Restriction
To apply this restriction, the employee is assigned a geographic range within which they can prove their attendance. Through the system attendance app, the employee shares their live location.
- Validation: Specify whether this restriction is required or optional.
- Location: Define the geographical location where employees must prove their attendance. The system will request permission to read your geographic location when trying to specify the location on the map; click “Allow” to enable map usage.

- Range of the Sign: This is the range that represents the boundaries of the employee’s work location. If the employee leaves this range, it is considered outside their designated work location where attendance should be recorded.
- Unit: You can specify this range in meters or kilometers.
- Label: This is the name you give the location to help you identify it.
You can add multiple locations for employee sign-in, which is especially useful if your company has several branches or remote employees, by clicking on the “Add” button.
Assigning "Capturing an Employee Photo" as an Attendance Restriction
To apply this restriction, the employee shares a live photo from their workplace location to prove attendance.
- Validation: Specify whether this restriction is required or optional.

Assigning the Attendance Restriction to the Employee's Profile
Attendance restrictions are not automatically applied to all employees in your account; you need to perform this step manually. Continuing with our practical example, we will set up attendance restrictions for the employee “Maria” as follows:
Click on “Employees” in the main menu, then “Manage Employees,” and select the employee “Maria”.

Then click on “Edit“:

At the bottom, under “Attendance Information,” find the “Attendance Restrictions” field and add “Sales Representative Attendance Restriction.”

Finally, click “Save.”

This QR code will be used by the employee later when logging into the Attendance App (ESS Attendance App).
Logging the Attendance through the "ESS App"
After setting up the attendance restrictions for the employee “Maria,” let’s now see practically how attendance is recorded through the Attendance electronic app. This app is available on both Android and Apple operating systems.
Steps to register attendance through the app:
1. First, log in to the app with your account number, link, or email, as shown in the following image:

2. Next, the screen illustrated in the following image will appear. If the employee “Maria” is a user, he can log in with his email. If not, he can use the “Scan QR Code” button to log in using his QR Code.

Once the QR code is scanned, the following screen appears, where the employee “Maria” can press the “Log My Attendance” button.
![]()
In the next screen, as shown in the image below, the system asks “Maria” to fulfill the three requirements: Capture a photo, set the geographical location, and match the IP address. As each requirement is fulfilled, a checkmark appears, then press the “Confirm” button.

Thus, we have concluded the explanation of the meaning of attendance restrictions in the program and how to apply each restriction. We have also learned how to link the attendance restriction to the employee’s file so that they can use attendance restrictions in the system.