


Attendance Flags, Variables, and Salary Components Guide
Attendance and payroll variables in the system enable you to automate payroll adjustments for special cases, whether they apply to a single employee or a group of employees.
For example, through these variables, you can deduct a percentage you set from an employee’s salary if they are late by 10 minutes to their shift, and deduct a different amount if they are late by 20 minutes, without having to manually adjust salary deductions and entitlements.
In this guide, we will explore a set of the most important variables and their uses.
You can also reach out to our support team if you need assistance or would like to learn how to customize and apply these variables to serve your business needs.
Attendance Rules
Number of Attendance Rule Occurrences — attendance flag count
The system displays the number of times a specific attendance rule was triggered within the defined time period in the attendance log.

Total Duration Calculated for Attendance Rule Occurrences — attendance flag amount
The system displays the total calculated value (hours/minutes) based on the fulfillment of a specific attendance condition.

Attendance Day Sign-In (Hours):
The system processes employee sign-in times in 24-hour format.
Attendance Day Sign-In (Timestamp):
The system processes employee sign-in times in timestamp format.
Attendance Day Sign-Out (Hours):
The system processes employee sign-out times in 24-hour format.
Attendance Day Sign-Out (Timestamp)
The system processes employee sign-out times in timestamp format.
Attendance Day On-Duty (Hours)
The system processes the shift start time in 24-hour format.
Attendance Day On-Duty (Timestamp)
The system processes the shift start time in timestamp format.
Attendance Day Off-Duty (Hours)
The system processes the shift end time in 24-hour format.
Attendance Day Off-Duty (Timestamp)
The system processes the shift end time in timestamp format.
Attendance Day Start of Sign-In (Hours)
The system processes the beginning of the employee’s sign-in period in 24-hour format.
Attendance Day Start of Sign-In (Timestamp)
The system processes the beginning of the sign-in period in timestamp format.
Attendance Day Start of Sign-Out (Hours)
The system processes the beginning of the sign-out period in 24-hour format.
Attendance Day Start of Sign-Out (Timestamp)
The system processes the beginning of the sign-out period in timestamp format.
Attendance Day End of Sign-In (Hours)
The system processes the end of the sign-in period in 24-hour format.
Attendance Day End of Sign-Out (Hours)
The system processes the end of the sign-out period in 24-hour format.
Attendance Day End of Sign-Out (Timestamp)
The system processes the end of the sign-out period in timestamp format.
Attendance Sheet Expected Working Hours
The system calculates the total expected working hours for the employee, recorded in hours format.
Attendance Sheet Actual Working Hours
The system calculates the total actual working hours completed by the employee, shown in the attendance logs, recorded in hours format.
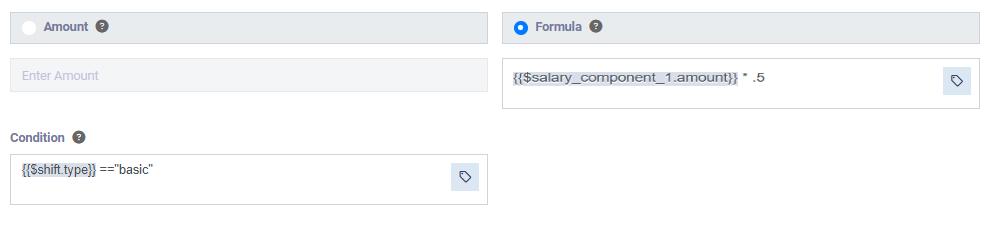
Shift Type
This variable is used only in attendance rule conditions or salary item conditions, not in the calculation formula (result of the condition). It checks whether the shift type is basic or advanced.
When the defined shift type in the condition matches the employee’s assigned shift (via attendance rules or via their contract), the calculation formula (result) is applied.
Shift Type-Key
This variable is used only in attendance rule conditions or salary item conditions, not in the calculation formula. It checks whether the shift type is basic or advanced.
When the defined shift type in the condition matches the employee’s assigned shift, the formula is applied.

Shift Name
This variable is used to check the name of the shift. It can be used in attendance rule or salary item conditions, but not in the calculation formula.

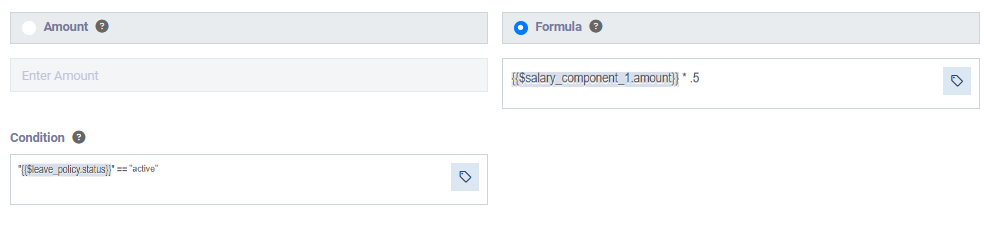
Leave policy status
This variable is used only in attendance rule or salary item conditions, not in the calculation formula. It checks whether the leave policy status is active or inactive.
When the defined status in the condition matches the employee’s assigned leave policy (through shift or contract), the formula is applied.
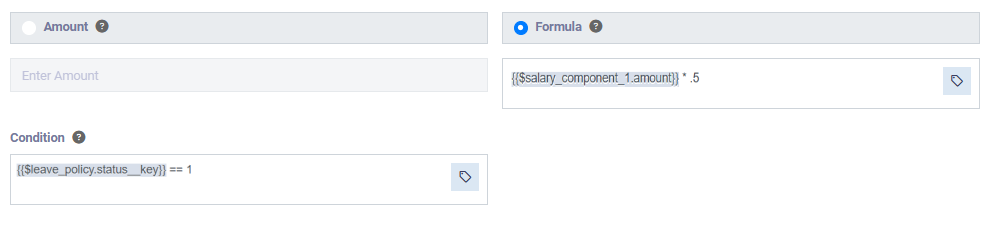
Leave policy status-key
This variable is used only in attendance rule or salary item conditions, not in the calculation formula. It checks whether the leave policy is active or inactive.
When the defined status in the condition matches the employee’s assigned leave policy, the formula is applied.
Leave Policy Name
This variable is used to check the name of the leave policy. It can be used in attendance rules or salary item conditions, but not in calculation formulas.

Attendance Day Status
This variable is used only in attendance rule or salary item conditions, not in the calculation formula. It checks whether the attendance day status is present/absent / on leave.
When the defined status matches the employee’s attendance status, the formula is applied.

Attendance Day Status key
This variable is used only in attendance rule or salary item conditions, not in the calculation formula. It checks whether the attendance day status is present/absent / on leave.
And when the specified attendance condition in the rule matches the attendance status of the employee’s workday, whether assigned through the shift (if the condition is part of the attendance rules) or through the employee’s contract (if the condition is part of the salary item) the calculation formula (condition result) is applied.

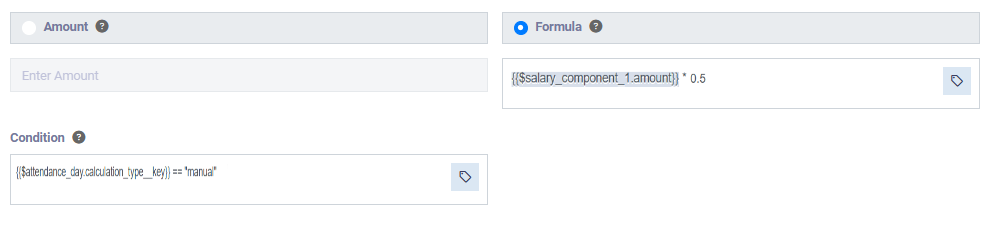
Attendance Day Calculation Type
This variable is used only in attendance rule or salary item conditions, not in the calculation formula. It checks whether the attendance calculation type is manual or automatic.
And when the specified attendance account type in the condition matches the employee’s attendance account type, whether assigned through the shift (if the condition is part of the attendance rules) or through the employee’s contract (if the condition is part of the salary item) the calculation formula (condition result) is applied.
-
The attendance account type is assigned for each day individually, even in the attendance log exported for a time period such as a month.

Attendance Day Calculation Type Key
This variable is used only in attendance rule or salary item conditions, not in the calculation formula. It checks whether the attendance calculation type is manual or automatic.
And when the attendance account type specified in the condition matches the employee’s daily attendance account type, whether assigned through the shift (if the condition is part of the attendance rules) or through the employee’s contract (if the condition is part of the salary item) the calculation formula (condition result) is applied.
- Each day has its own calculation type, even if the attendance sheet covers a longer period.
Attendance Day Attendance Delay
The system calculates the duration of delay after the scheduled shift start time.

Attendance Day Early Leave
The system calculates the duration of leaving earlier than the scheduled shift end time.

Total Leaves Taken
The system calculates the total leaves taken during the current attendance sheet period for a specific leave type.

Attendance Day Leave Count
The system calculates the number of leave days deducted from the leave balance for a leave day or period.
For example, one leave day may equal two days deducted, or partial attendance may result in only half a day being deducted.
If the system’s calculated deduction meets the condition, the “attendance flag” is triggered.

Total Leaves Taken
The system calculates the total leaves taken during the current attendance sheet period for a specific leave type.
Total Leaves Taken Before
The system calculates the total leaves taken before the current attendance sheet period for the specified leave type. If the condition is met, the formula is applied.

Total Leaves After
The system calculates the total leaves taken during the current attendance sheet period plus those taken before it, for the specified leave type.

Leaves Credit Before
The system calculates the total available leave balance for the employee from each leave type before accounting for the leaves recorded in the current attendance log (the one intended for payroll processing to apply the salary component).

Leaves Credit After
The system calculates the total leave balance available for the employee from each leave type after accounting for the leaves recorded in the current attendance log (for which the payroll is being generated to apply the salary item).
