


Creating an Invoice/ Estimate Layout
- Click on “Templates” from the main menu.
- Click on “Printable Templates“.
- Click on the “Invoice/Estimate Layouts” card.
- Click on the “New Layout” button.
- Select one of the initial designs supported by the program to modify.
- Make the required modifications in the “Custom Invoice Builder” section, where you can modify the following:
- Title: Set the title for the invoice/refund receipt and click the “Save” button.
- Business Info: Use variables to add business data as needed, then click the “Save” button.
- Logo: Upload your institution’s logo image to add it to the invoice template by clicking the “Choose file” button, then adjust the logo size within the invoice and click the “Save” button.
- Client Info: Use variables to add client data as needed, then click the “Save” button.
- Shipping Info: Use variables to add shipping information as needed, then click the “Save” button.
- Custom Fields: Click the “Add More Fields” button from the window, fill in the data as needed, then click the “Save” button.
- Labels: Modify the labels of fields within the template as needed, then click the “Save” button.
- Notes: Use variables to add notes as needed, then click the “Save” button.
- Header: Use variables to add an introduction as needed, then click the “Save” button.
- Footer: Use variables to add a footer as needed, then click the “Save” button.
- Item Columns: Select from the dropdown menu the columns to be inserted in the invoice, with the ability to change the name of each as needed, then click the “Save” button.
- If you choose the “Tax Invoice” or “Arabic/English Tax Invoice” design, we do not recommend modifying the template columns or replacing them, except for the “Item” and “Description” columns, to avoid any formatting errors according to the template’s programming.
- Style: Adjust the invoice formatting such as font size, data table formatting, paper size, page margin, and others as required, then click the “Save” button.
- In the field below the Template Details, name the template to distinguish it from other used templates.
- Click the “Set this layout as default” button to display it as the default design for your invoices or estimates when creating a new invoice/estimate.
- If you make the design primary, the system will show more checkboxes for related options:
- Set this layout as default for invoices
- Set this layout as default for estimates
- Set this layout as default for time invoicing
-
-
- If you make the design primary, the system will show more checkboxes for related options:
- Click the checkbox “Don’t show the currency symbol in the items list” to not display the used currency in the sales invoice or estimates.
- You can click the checkbox again to cancel this option.
- Click the checkbox “Always show “Paid Amount” and “Balance Due”” if you want to display the paid and due amounts.
- You can click the checkbox again to cancel this option.
- Choose the quantity and unit price options from the dropdown menu, and select among (“Show unit price before quantity“, “Show quantity before unit price“, or “Hide quantity and unit price“).
- Click the “Save” button.
- When creating a new invoice, you will find the design you just created included in the “Invoice Layout” menu at the top left of the screen. For more details, refer to the guide “Creating a Sales Invoice“.
Formatting the Items of the Template Editor Menu
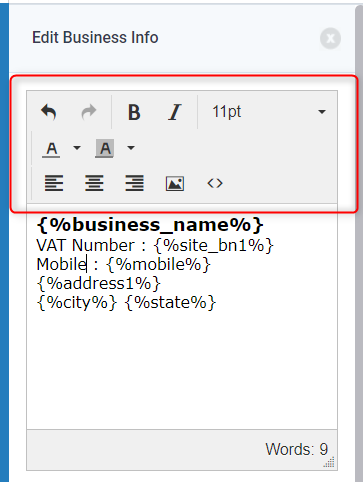
- ↶: Through this field, you can undo the last modification added and return to the previous one.
- ↷: Through this field, you can return to the last addition/modification after its deletion.
- B: This button allows you to display words in a bolder font than the regular font size.
- I: This button allows you to display characters in italic font.
- 11PT: Through this field, you can control the font size for the written data.
- A: Through this field, you can set the font color for the data.
- 🄰: Through this field, you can select the background color for the data.
- Text Align: With the three options available, you can determine the data direction, whether to the far right, far left, or center of the page.
- 🖾: Through this field, you can add an image to the design data.
- <>: Through this field, you can add custom code to the design data.
Adding Data to the Invoice Layout
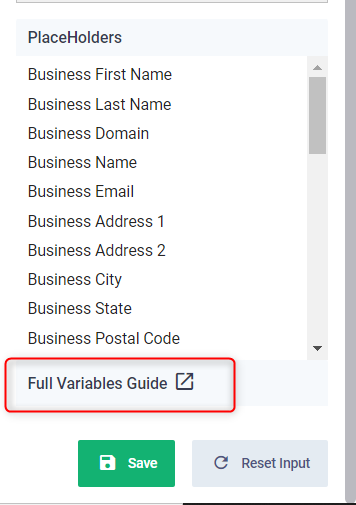
- You can click on any of the data in the replacement words (placeholders), and upon clicking, its variable will appear inside the data box above.
- You can click on “Full Variables Guide” to see all the variables that can be added to the printable template.
- If additional fields have been added, they will appear in the “Full Variables Guide” in their respective section.